
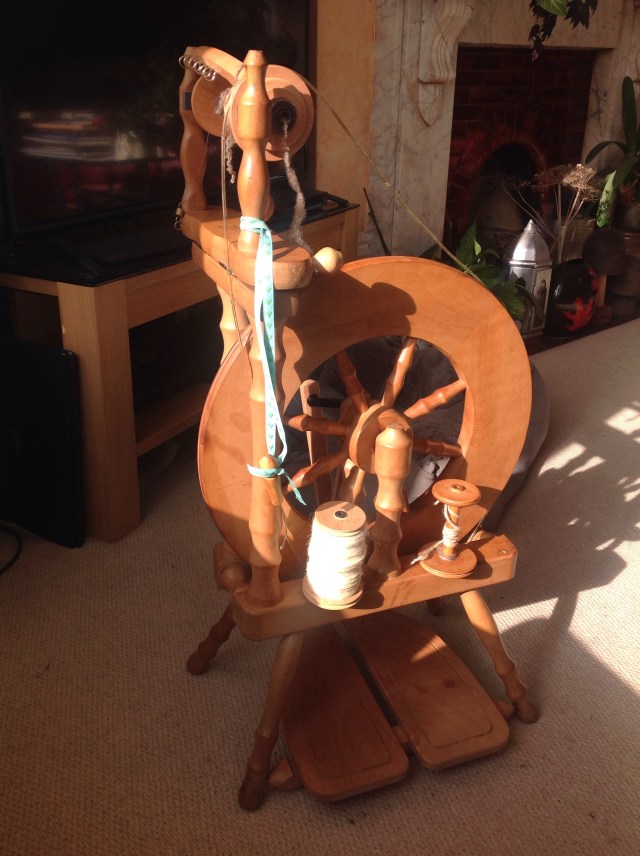
Now this post is based on my experience after fitted a double treadle kit to an older single treadle Ashford Traveller model, but might be of interest to anyone who has removed their Traveller drive wheel for other reasons. I believe mine is a Traveller II, and I call her Dora.
About 18 months to 2 years ago I bought a double treadle kit for Dora. I sanded and waxed the parts, and with help from my husband it was duly fitted. To do this we had to remove the drive wheel and con rod; getting the hub pin out of the drive wheel was quite scarey – but actually reasonably straightforward once started. The nail that Ashford provide in the kit makes this a lot easier than if you had to sort one out for yourself.
Once you have put the wheel back between the uprights, and slid the new crank through the uprights and wheel, you will have to find the hole for the hub pin that runs through the crank. Before doing this, I held the wheel whilst my husband gauged where the hole was in relation to the bend in the crank, so that when it was inside, we would have a rough idea of the right position. With the help of a torch shining through the hole in the wheel and the nail provided in the kit, we eventually found the hole and with some difficulty inserted the hub pin. We found this extremely awkward to do – even for two handy people like ourselves – but more about this later. In general we felt all was going well.
Dora’s wheel seemed a little stiff, but I put this down to the double treadle effect, gave her a thorough oiling and started to spin. Whereas the drive wheel had been quiet before it now made a creaky clunk every revolution, not a loud noise, but enough to annoy whilst watching TV. But I loved the new double treadle, so decided to live with it.
Due to other things in life getting in the way I had to put Dora away for a while, but after several months started to use the wheel again, and lo and behold, the creak had gone. Several weeks down the line, after a good amount of use, I noticed that the uprights that hold the drive wheel in place were loose, and the wheel was wobbling every revolution. It was all very insecure so I was pleased to have spotted this before disaster struck Dora down in some way. I tightened the uprights, carefully making sure they were not pinching the wheel hub, and started to spin again. The creaky clunk was back! Now that I knew that there was a relationship between the loose uprights, the balance of the drive wheel and the creak, so I concentrated on finding where it was exactly occurring.
It seemed to be coming from the rear of the crank shaft, where the bend emerged from the upright. When the uprights were secure they resisted moving, but you could see they were straining to accommodate some weird front to back movement of the wheel every revolution, and as the wheel revolved the bend in the crank was scraping on the concave edge of the cup cut into the wood of the upright. There were dark rubbed deposits there to support this theory. If I loosened the nuts holding the uprights in place, the noise disappeared, but the uprights lurched from front to back on every revolution of the now-wobbly wheel. The family put their heads together over Dora’s problems; I wondered if her crankshaft was bent, my son thought that the new crankshaft was too short, which made sense, and suggested using a spacer, and my husband suggested shims under the uprights to allow more movement in the wheel. None of these seemed right to me; I am extremely careful with my equipment, so I didn’t see how the crank could have been bent, and equally I saw no reason why Ashford would supply a too-short crank with the kit. The suggestion of using shims might have had a knock on effect all over the wheel, but could be considered. I remember reading somewhere that its best to use wooden shims and tags of fibre to hold parts of a spinning wheel secure rather than glue or screws, (unless of course they are part of the original build) because they are flexible and don’t disturb the integrity of the wheel’s structure. So before doing anything drastic, I went back to the instructions that came with the double treadle kit – well actually I looked them up online- thinking the answer might be found in the way in which we installed the kit. Careful reading led me to this sentence in the paragraph about replacing the drive wheel, ‘Note: the hub pin is on the same side as the con rods’. Such a brief and none-to -clear instruction, but I took it to mean that when putting the wheel back between the uprights, the hub pin should be to the rear of the spinning wheel. There was also a note in the first part of the instructions saying that older models may have the hub in in the centre of the hub, but no more details, and no definition of an older model. I thought Dora was an ‘older model’, so I checked this. Dora’s hub pin, although nearly central on the hub, is actually slightly offset from the centre line of the hub, and at this point (after installing the double treadle kit), was positioned to the front of the spinning wheel – not to the back near the con rods as per the instructions. Would taking it off and turning the wheel around make a difference?
Yes, I decided it would! There are two holes in the new crank that came with the kit, and only one works for the Traveller wheel, if the hub pin hole in the wheel is also slightly offset, in combination there is a margin of error that could be causing the crank to be fighting the wheel all the time, to be out of line enough to wobble the wheel and not have the length to clear the concave cut-out on the rear upright. It would also explain why the crank shaft appeared to be crooked, and the wheel sat unequally on the crank, sliding from front to back during each revolution.
My lovely husband once again helped me with the necessary removal and refit, and this time it was much easier to get the hub pin lined up with the hole in the crank (thank you Ashford once again for that handy nail), Dora’s drive wheel was restored between the uprights with the hub pin towards the con rods (so at the back of the wheel when in use). It was amazing, no creak, no wobble in the drive wheel, no wobbly uprights. Dora now spins without any effort (or noise).
In the photo below you can just see the second hole in the crank (to the left of the black bearing in the right hand part of the photo). Presumably this hole is for when use adding the kit to a Traditional wheel. This was not visible before, when the drive wheel was on the wrong way round!
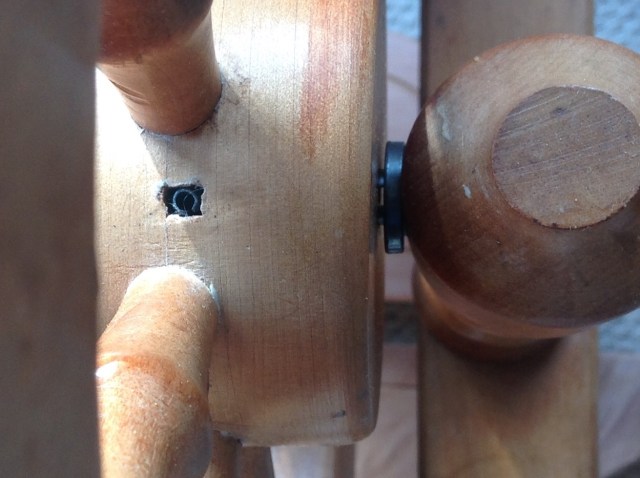
The hub pin now sits just to the rear of the centre line of the drive wheel.
Whilst the drive wheel was off I took the opportunity to clean the gunk out of the bearings and of the crank shaft and re-oil the parts that are hidden inside. As a reward to both Dora and myself I decided to give her a thorough clean and re-waxing, so she looks lovely now.
This lesson about reading the instructions before rushing into things is a salient one. It is a practise that I repeatedly find fault with in others – so I am shame-faced. Apologies to Dora as well, she has been struggling!
I’d like to finish with a final plea to Ashford. Please put what may seem to you such a small point in BIG LETTERS so that over-enthusiastic and people who are excited to get spinning take notice and put things back the way they should be.
Ashford’s instructions for fitting the double treadle kit to a traveller wheel
