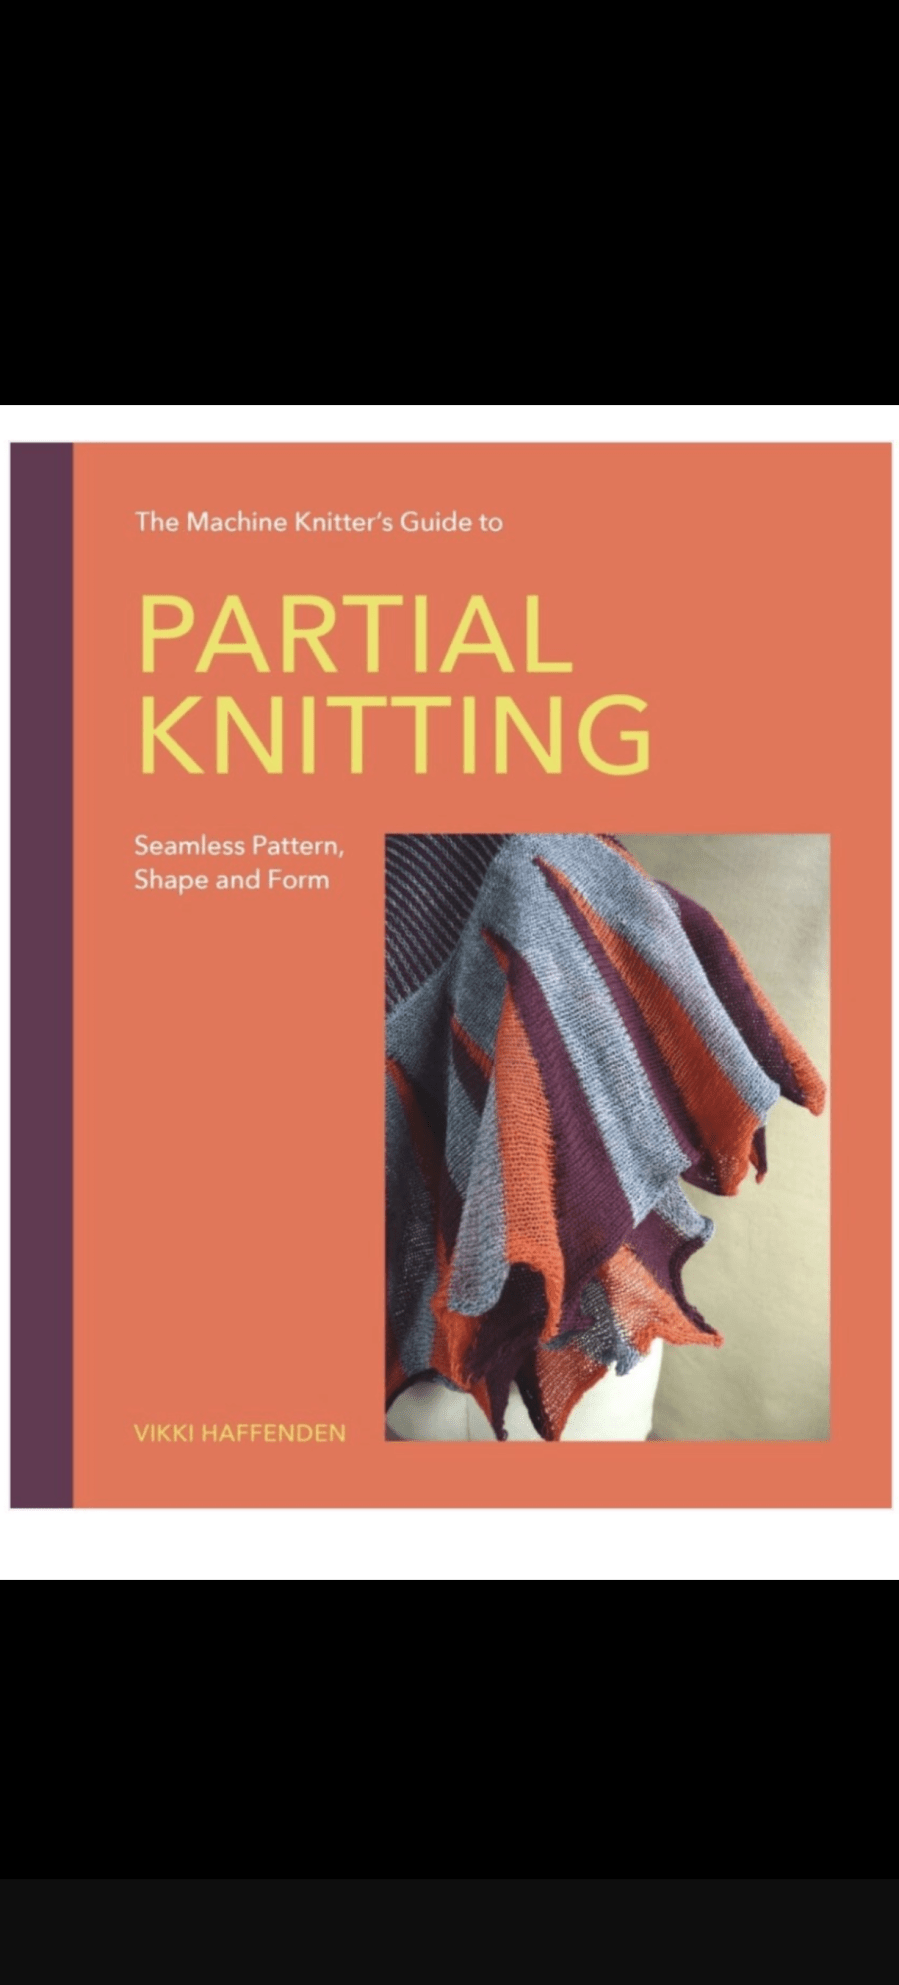
The Machine Knitter’s Guide to Partial Knitting; Seamless Pattern, Shape and Form
I wrote this post last July, and thought I would share it with you in retrospect, as the book has now gone to print.
July 2025
Finally, after a long and fraught 18 months it is done!
I signed the book contract only a few weeks before we moved house. After several false starts with the sale of the house we thought we would be staying for a while and would lose the property we wanted to purchase. However, the way it happened in the end meant that we had to rush into moving in a 3 week window.
Which meant of course that we had to pack what we hadn’t already packed in a hurry, and organize everything else and then move and organize this end when we arrived. Settling in took far longer than anticipated due to unanticipated building work through last summer. It wasn’t until late autumn that I was able to safely unpack a machine and start to knit and write in earnest. Then the arrival of our first grandchild interrupted my flow for a while, the sun shone and the garden needed work done. All in all, let’s say life got in the way!
The last month has been full-on working on the book, so it was wonderful to finally send it off. Of course they will be editorial suggestions and corrections to do, and then a final check once it is laid out for printing, so it’s not finished yet.
May 2026
If you have persevered and read to this point, you might like to know what the book is about. This book, my third about machine knitting focuses on short rows, or partial knitting. It is suitable for any machine with holding position, single bed, double bed, plastic or metal bed, and any gauge. I particularly wanted to include the popular plastic bed, mid-gauge machines like the LK150. Rather than struggle to emulate the punchcard machines with repeating patterns, short row pattern and shaping can be as easily done on either type of machine.
Its been quite a few years since I visited the page on this website which is about , ‘things I have been interviewed for’. It made me realise how time flies, and that I have not grown any younger! Things have moved on since then, but I see that the same issues are still out there. To name one, its clothing sizing. I see that AI might be the solution, excuse my guffaws.
A company called, ‘Fit Collective’ mentioned in this article on the BBC website sound like they might be working towards some solutions, but the trouble is, we are all different. Not just in our physical dimensions, but in the way we want our clothing to fit. That is a style issue, not a cutting and sewing issue.
I see so many women wearing the incorrect size for their waist circumference, squashing themselves into ‘muffin tops’ because they want to wear the size they aspire to, but the manufacturer/designer/buyer whatever, deems that their waist should be a particular circumference in comparison to that of their hips, (or even bust!). I feel for them, because I can’t fit into a size 14 with a non-elastic waist, but am a size 14 in most other places, not that that is a true designation anyway.
A pair of main-store M&S trousers I tried a few months ago had a totally different waist to hip ratio to a similar pair in Per Una, so what does that make me? If I went a size up in either, the bum area hung loose, the hips looked weird and a bit ‘jodhpury’, and the Per Una ones were still too tight on the waist. So I left them on the rail and went home and got my sewing machine out.
Ah, ‘mummy jeans’, might be the answer, but once again the waist to hip ratio is nearly always wrong for me. I have always had a big waist compared to hips and bust, and that is not uncommon. Others might have a smaller than average waist to hip ratio ,but not many women are the ‘perfect’ shape.
Have a read of the article linked to below and see if we have progressed much since 2017. I also ask you to consider the vast amounts of irreplaceable resources being gobbled up by AI. Is the application of AI really going to make us happier with our clothing fit? Isn’t more about how we see ourselves, and how we feel comfortable, something that is not quantifiable en masse, and is so, so subjective.
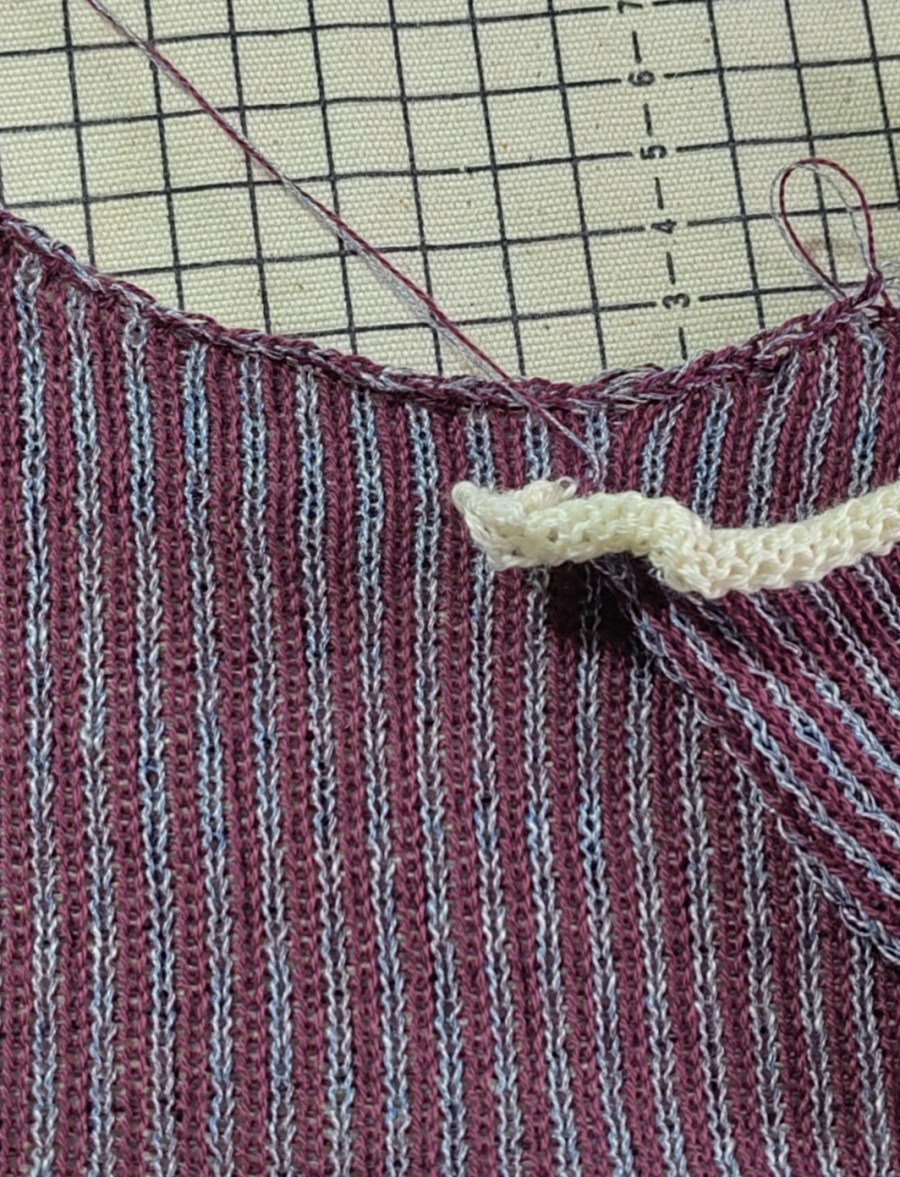
I think this might be the final sample for my latest book. The manuscript went into the publishers a week or so ago and I’m just working in a few outstanding samples and photos.
Of course machine knitters, well knitters in general, will know that ‘sorting out a sample’ is a shorthand for:
knitting several design swatches
knitting a tension swatch (or three)
working out the garment pattern
knitting it
finding you’ve made a mistake
knitting it again
steaming it
sewing it together
washing it
blocking it
etcetera, etcetera….
So I am just at the first steaming stage and getting ready to assemble the garment. And of course I’ve had to re-knit one piece because the dratted yarn got caught by the brushes irrevocably and it was easier to restart than try and sort that out. More haste, less speed is so very true in machine knitting. Nice and steady is always the best way.
I’m hoping this garment will be nice enough to go on the cover, but we will see.
Meanwhile let me tell you a little bit about the book. The title is still to be finalised, but it is all about short rows and partial knitting on a machine. There is a lot in there for beginners, for example the first chapter is all about the principles of short rows and how you knit them and there is a whole basic techniques appendix at the back for additional support. Chapters 2 to 5 offer loads of information, samples, examples and exercises for more experienced knitters to really come to grips for short rows, and to understand how and when to use them for different results.
Chapter 6 has patterns that use short rows as they’ve been described in the earlier chapters, but applied to an item. So from these patterns you actually get to use short rows purposefully to create shape and form combined with colour and surface pattern.
So once it’s published I will obviously be shouting about it, but keep an eye out and do pop back here for updates.
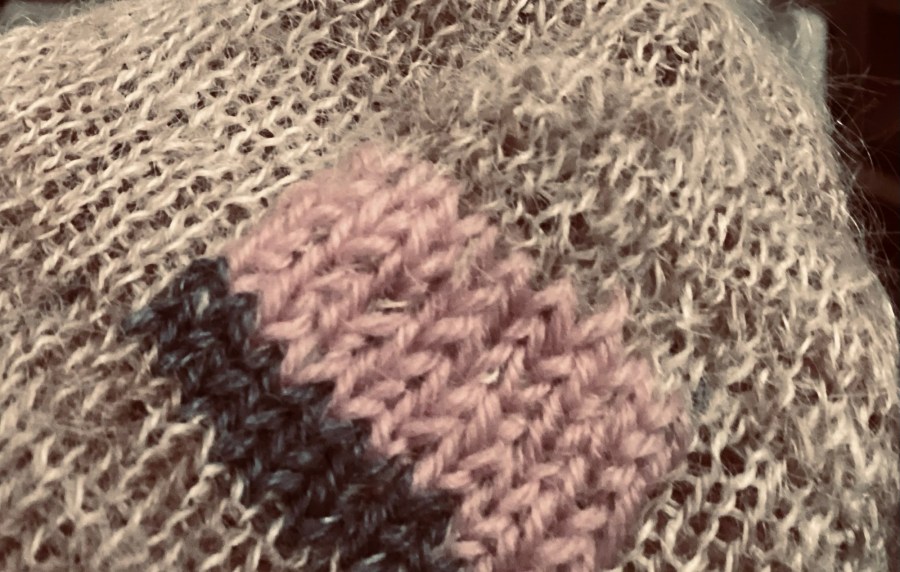
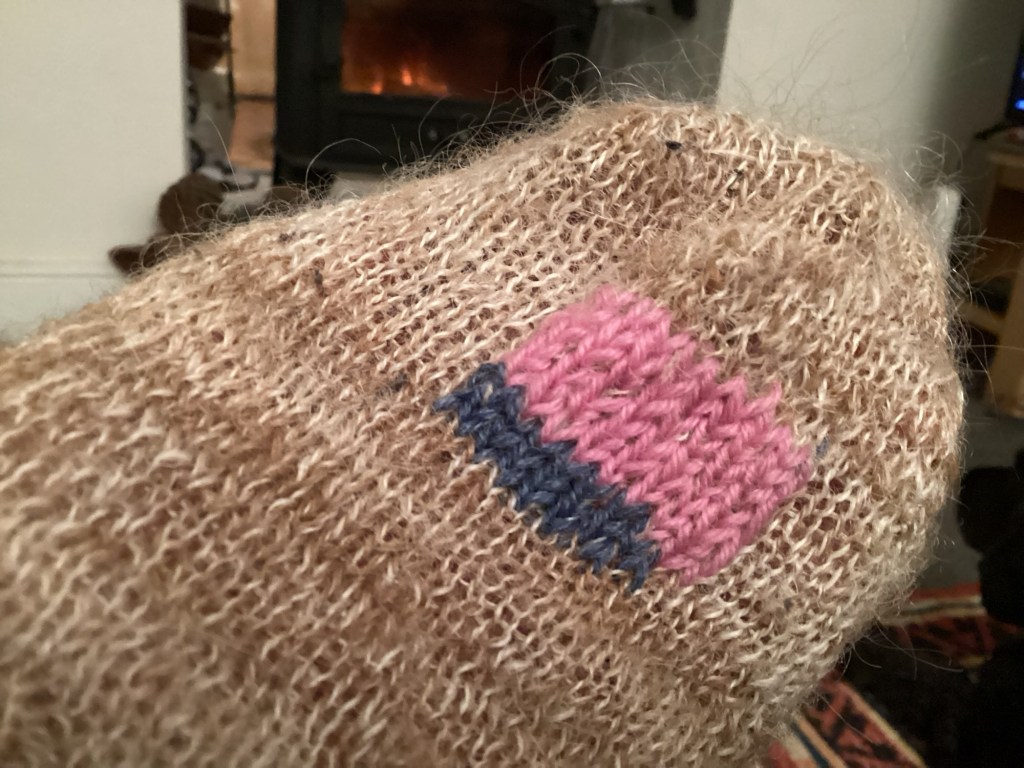
It’s a howling gale outside tonight, so the place to be is by the fire doing a bit of mending. The subject is a pair of socks machine knitted from my hand spun yarn. These sticks are like , ‘Trigger’s broom’ from Only Fools and Horses.
I plied the yarn from singles of Alpaca and Texel fibre, but did not include any nylon. Consequently, but after a reasonable amount of wear they have begun to thin and finally the stitches have burst. First of all the big toes went, and now the heels.
I had a little of the yarn left, but now it’s onto improvised and colourful mending…
The toes that were mended a while agoTodays heel mending
I used one of those little mending looms for the toe repair, but the heels have been done ‘freehand’ using a technique from a 1970s mending book. I bought this useful book secondhand when a penniless student in the 80s, well before ‘slow textiles’ and ‘visible mending’ became a thing. Since then, useful book has helped me extend the life of many items for reasons of economy and necessity rather than fashion. Now my mending is on trend and it’s good to see the skill encouraged by a plethora of modern books on the subject.
How I disassembled the needle selector plates of a KH710 and they lived to knit again
I have purchased one of these older, push-button knitting machines and at first look it was not in too bad condition. I have fond memories of these machines; Jones KH588 machines were the first ones I used at college when I started my degree in textile design in the dim and distant past. Apart from being cream rather than blue, the KH 710 is pretty similar to look at, and has the same functions and a lace carriage included. The KH710 is a little more streamlined as the two carriages have integral handles, not screw-on ones like the 588.
The 710 unpacked, de-needled and ready to be worked on
After a quick assessment it seemed to be complete and by the state of the brushes, I would say never used – but the main problems were sticking push buttons and, sadly, rusty needles. It looks like the machine may have been stored in a damp place as the needles were rusted underneath the sponge bar. This is not too bad, as the hooks and latches are not damaged so I planned to salvage as many as possible. The sponge bar itself was disgusting, melted, sticky and disintegrating into the bed, but this actually made it easier to clean it and re-line with a replacement sponge from Xena Knits. https://www.xenaknits.com/
The new sponge bar ready to go in
Before I tackled the sponge bar I removed the needles and put them into a jar of 10% citric acid for about an hour or so to see if I could shift the rust. The needles came out of the soak and after a thorough rub with wire wool and surgical spirit followed by a gentle oil they are not too bad. I’ve only had to swap a few few dire ones for fresh ones, and after a knitting test the salvaged needles knit fine. I’ve tried tuck, fair isle and slip in an acrylic 4ply and all went well.
Sample still on the machine, fair isle, tuck and slip all working OK
However, I now needed to take a look at the push buttons as some were sticking down. This started with number 8; it was very slow to rise up so the cancel button didn’t clear the selection and the needle was reselect – really annoying.
Brother apparently didn’t issue a separate service manual for the KH710, so I worked with the KH588 one I have, which was a good starting place. Although I have taken these machines apart before it was a long time ago, so I trawled the internet and found useful info on YouTube from the Answerladyknits and also from Vintage Knitting Machines. However, as with the service manual, these feature older KH585 and 588s which seem to be slightly different inside – particularly where the button module sits.
Whilst working on the machine I cleaned out the buttons, not that they were dirty, but one of the little springs was out of line, so had to be babied back into position. I may have done that whilst repeatedly testing the buttons for a clean return.
One of the parts that was difficult to get apart was the long wire that is attached to the plate which slides the button/needle selection across the bed. This is connected to the black numbered scale on the cover which shows the needle positions and has to be removed if you want to take the main back cover off. The screw is difficult to remove becasue there is nothing behind it, so no resistance to turn against. I managed to strip this and needed to use pliers in the end and a new screw was needed to replace the old one.
Since starting the refurbishment I’ve taken it apart several times and made a video which might help people with this model. I will put it on YouTube and link to it at the end of this post. The first time I removed the case, and sprayed the insides with LP1 to clean and food grade silicone to lubricate as recommended by Jack on the Answerladyknits, using both on the selector plates as well. After testing I thought the buttons were freer, but they reverted to sticking quite quickly, and had this had now moved to numbers 3 and 7. By now they were not miss-selecting but the slow return was annoying me! The physical needle selection with the set lever was also a little sluggish, so I decide the problem was probably with the needle selector plates inside the machine rather than the buttons themselves. All really frustrating. A lot of rude words were heard!
As I had taken the machine apart I thought it might be useful for other owners of 710s to see how I did this. Sadly I didn’t think of this until I was putting it back together again, but have put photos and video together to show most of my method, as you can see below.
This video explains how to disassemble and reassemble a Brother KH710 push button knitting machine. I have also made another video about unsticking sticky buttons on this machine and refurbishing rusty needles.
This video explains how to check over a Brother KH710 push button machine and the first thing to try to release sticky buttons. It also describes how to clean rusty needles and knitting to test the machine. For a more advanced fix, which includes taking the needle selector plates apart for extremely thorough cleaning, read on…Garment pattern in tuck and stripe knit cotton yarn. Prepared in DAK 9 to be knitted on the KH710
At this point, thinking I had solved the problem I decided to knit a garment to test the machine. But whilst knitting this number 3 button began to get sticky and annoyingly slow to respond to the cancel button and pop up to neutral. It was only a little glitch, but enough to be noticeable. I also noted that number 1 and 2 were a bit slow as well. After I completed the back my frustration with the buttons overcame me and the machine came apart again.
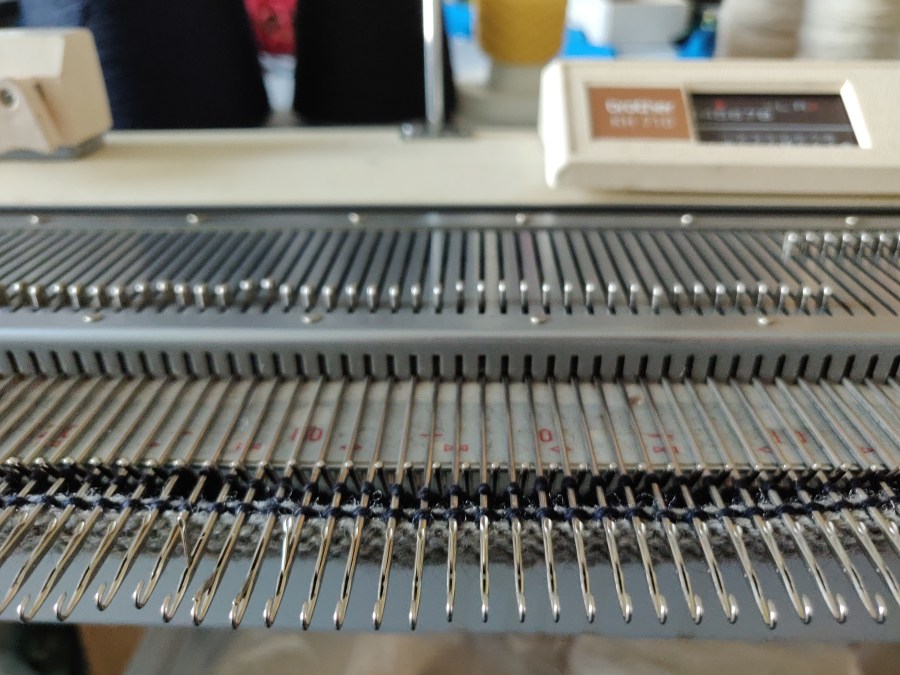
This time I decided to concentrate on the needle selector plates. There are eight of these plates which are thin metal strips with tabs along the top, longer edge that look a bit like castle battlements. These are sandwiched between two ‘L’ shaped nesting metal needle selector plate holders in one complete assembly. Each thin plate has differently positioned, evenly spaced tabs which correspond to a push button and a needle. These plates are held in the needle selector plate holder with pins and screws and slide across each other, so must be clean and smooth without any gunge between them.
Close up of the selector plates when out of the machine, but still in their holder. In this image, plate one, which responds to button one is at the back, plate eight, which responds to button eight is at the front. This positioning depends on the way in which the needle selector holder is viewed.
The way these plates work is rather neat. Each has a different sequence of holes, (round and elongated) along their length. They also have as series of slots shaped like extended ‘U’s. When the plates are stacked together in the holder in the right order the holes overlap, forming a set of eight small holes that line up with the control wires, (or feelers) that come from the eight push buttons. When a button is pressed its feeler wire moves to the side, sliding the corresponding plate so that the tabs are inline with the needle number (1-8) to be selected. However, the plate is still too low to touch the needle butts and this is where the pins and slots come into action. When the plates are stacked in the holder, the slots fit onto the pins. As a plate slides, the slot travels over the static pin and the plate rises upwards as it reaches the higher side of the ‘U’. This lifts the tab high enough to align it with the butt of the correct needle. As the set lever is pulled the whole plate assembly slides forwards and each selected plate tab pushes the needle in front of it as it moves forward.
So I bit the bullet and stripped it down a bit more. To start with I unscrewed the white nylon zig-zag arm and removed the metal plate that slides the button selection/assembly along the bed from position 1-8. You can see how to do this in more detail in the earlier video. This allowed me to see the needle selector plates more easily. At this point the needle selector plates were still inside the machine. Next I tried taking out the three little screws on the base of the plate holder assembly which hold the right angle plate-holders together. This allowed me to open them up so that I could slide a scalpel blade between the plates to open the gaps, and squirt more LP1 into the gap and clean out any debris. I then stood the machine at 45 degrees so that the fluid would run out from between the plates and left it for an hour or so. After this the sticking improved, but didn’t go away. Plus I had a pool of lubricant in the lid of the machine that I had sat the end in… messy and smelly.
Next I decided to remove the plate holder itself. This involved removing the button assembly as well. Horrors! I was entering the dark side…
All the sensible advice is to avoid disassembling the needle selector plates, but I could see that there was a stringy, viscous substance between them preventing them sliding across each other. I really needed to clean this off! My envy of videos showing effortless button pressing on other machines spurred me on.
The selector plates being taken apart. Note the ‘U’ shaped slots and the labelling of the parts. These plates are shown with the tabs at the top, as they would be in the machine.
It all came out quite easily, which was a surprise to me. The whole needle selector assembly is mounted on three raised-head screws that enable it to slide from left to right but there is a long, screwheaded nut that fits through a metal blocking plate attached to the button assembly which stops it sliding totally off these mounting screws. I had to remove this long screwheaded blocking nut to remove the holder from the machine body. The button assembly had tocome out as well, so before going any further I carefully unscrewed the two large headed screws that hold it in place on the metal slide its rear. Once that long headed blocking nut was removed, and with a little fiddling the whole needle plate holder could be slid to the ‘keyhole’ end of the three long screw slots and holder and button assembly lifted out completely. The button wires could then be slid out of the plates and put to one side. Mine was clean, but if yours needs cleaning do that after cleaning the plates and before reassembling it all.
The long screwheaded blocking nut fitted underneath the needle selector plate holder. It fits through that metal plate so that the plate stops against a bracket, preventing the needle plate holder sliding all the way out of the raised-head mounting screws.
Now it was easy to take the plates apart. BUT, if you do this, take the time study how it all works before starting. Take lots of photos as you disassemble, and label each part clearly in permanent marker BEFORE moving it. Then if you knock things over, or have to leave the machine for a period of time, you will know how it goes back together again.
My order of work, once the holder was out of the machine, was a follows:
Remove the inner plate holder
Label L and R end
Remove all the plates in one go and lay them parallel to the inner with the tabs facing away from you
Label the outer holder L and R.
Carefully separated the top needle selector plate
Label it on one end. I used ‘L1’ meaning it is push button 1, and that that end matches ‘L’ on the holders. All others followed as ‘L2’, ‘L3’ etc. One is the plate at the rear of the holder, eight is the one at the front.
Wipe the plate clean of oil and dirt and polished both sides
Replace it onto the pins in the outer holder, matching L to L.
Repeat with each plate, making sure to label them methodically.
Test that the plates slide smoothly.
Screw the holder back together.
Phew, time for a cuppa now!
With a little fiddling the button wires went back into their respective holes. I found this easier to do with the assembly held so that the wires were vertical.
Sliding the button wires back through the selector plate holes
Because that long screwheaded blocking plate nut is really awkward to replace in situ I replaced it in the needle plate holder before putting it back into the machine. This meant that I had to remove one of the raised screws which the holder slides on otherwise the blocking plate didn’t fit correctly and the holder would not slide. These raised screws attach through to the set lever mechanism, but temporarily removing the left hand one, (button side of the bed) meant that I could slide the needle selector holder and button assembly back in place so that the blocking plate and nut fitted together correctly and did their job. Just remember to replace and fasten this screw before you move anything else.
A quick test showed that the buttons were zapping away cleanly and efficiently and that the needles were selecting with ease. After that is was plain sailing, and the machine went back together as shown in the original videos without any problem.
I hope this might help anyone who wants to take a Brother KH710 apart for repair. I certainly could have done with a bit of help.
I will put this into a pdf at some point and upload it here.
Today was the deadline for an Infinity Scarf pattern that I had been commissoned to write at short notice, you know the sort of thing that happens!
Anyway, as I’d only finished knitting it last night we had to do the photoshoot today, even though it was raining and grey. So we set off with a collection of coloured umberellas, plastic bags for camera stuff and my nifty, home made, shower-cap camera raincover! Luckily I had been clearing out the bathroom cupboard yesterday and unearthed a bundle of those freebie ones from hotels. I knew they would be useful some day. The other thing they are great for is proving bread, but I digress…
Finding a model at short notice was not easy, but my lovely friend Jo came up trumps, and offered to stand in the rain before shooting off to see her Mum.
It was fun anyway, because I love photoshoots; seeing your knit design come to life on a person is so rewarding.
As always there were loads and loads of shots to sift through, but it was well worth braving the rain for such a nice photo.
you can never have enough umbrellas
I will be releasing the pattern on this website once it has been published later on in the Autumn so do drop back if you would like to knit the scarf. There will be a page for the Infinity Scarf with the pattern, hints and tips on working the pattern, and tutorials for the various knitting techniques used. Techniques used in the pattern, including a great stretchy cast on, are also featured in my popular knitting ‘bible’, The Knitting Book.
…and here is the final image I selected, and I’m pretty pleased with the result!
Thanks once again to Jo for her stoicism and humour.
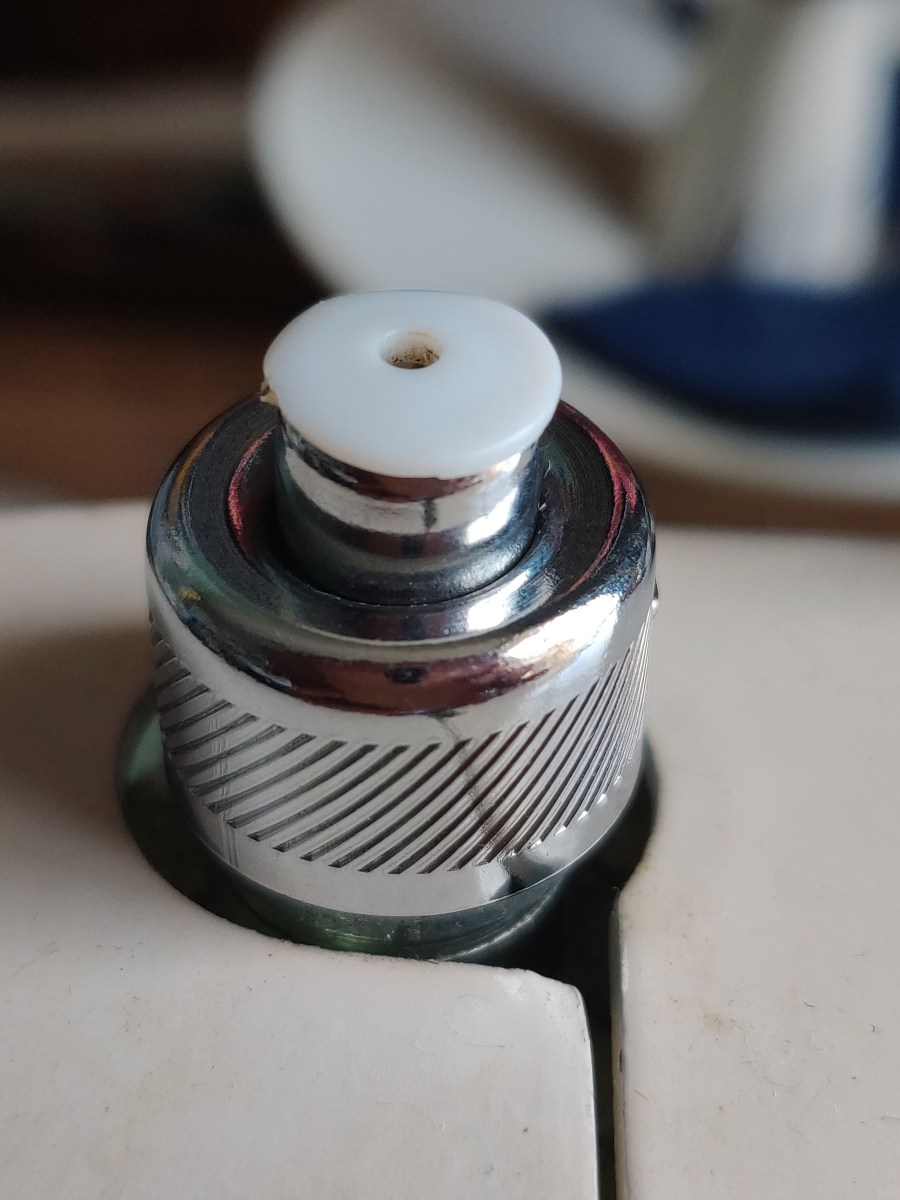
I’ve been having problems with adjusting the foot pressure on my Jones 125 machine. I’ve not seen one like it before and couldn’t work out how to use it. Today I’ve had 3 broken needles and I traced this to the really strong pressure on the foot. My Bernina 1030 doesn’t have this adjustment so it’s not something I work with much.
The pop darner for pressure adjuster on the Jones 125.
Before reading this I’d been twiddling it, popping it up, trying to unscrew it and seeing no difference. After reading this helpful page, it seems the Jones has a ‘pop darner’ style pressure adjuster. The central core pops up when you push down the outer ring, and then you depress the central core in increments to achieve the pressure you want. I imagine the name comes from popping it up to take pressure off when darning (or free embroidering) on the machine. Suddenly it all makes sense. The 3/4 position is so much better for what I am sewing today than all the way down, where it was because I couldn’t work out how to adjust it.
Probably common sense to others, but not to me!
Thank you to the kind person who took the time to write about the different methods of adjusting foot pressure, and for such a clear explanation.
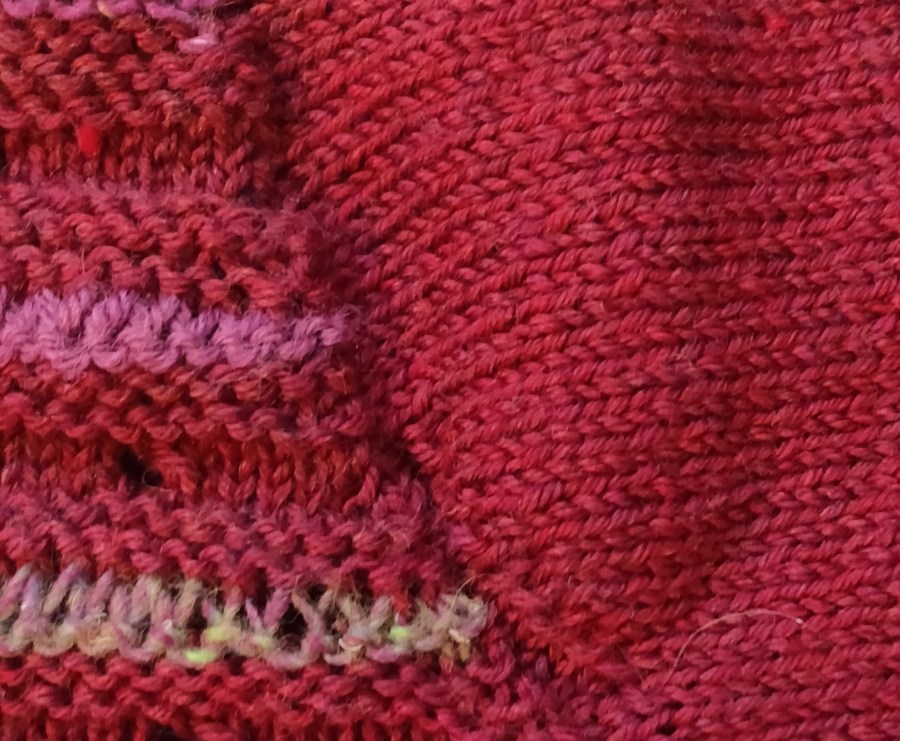
Today I finally completed a top-down jumper I started last December! I bought the main 100% wool yarn in Hereford, and the stripes are worked in two odd balls, one Noro and the other Icelandic. I’m looking forward to hearing it next winter.
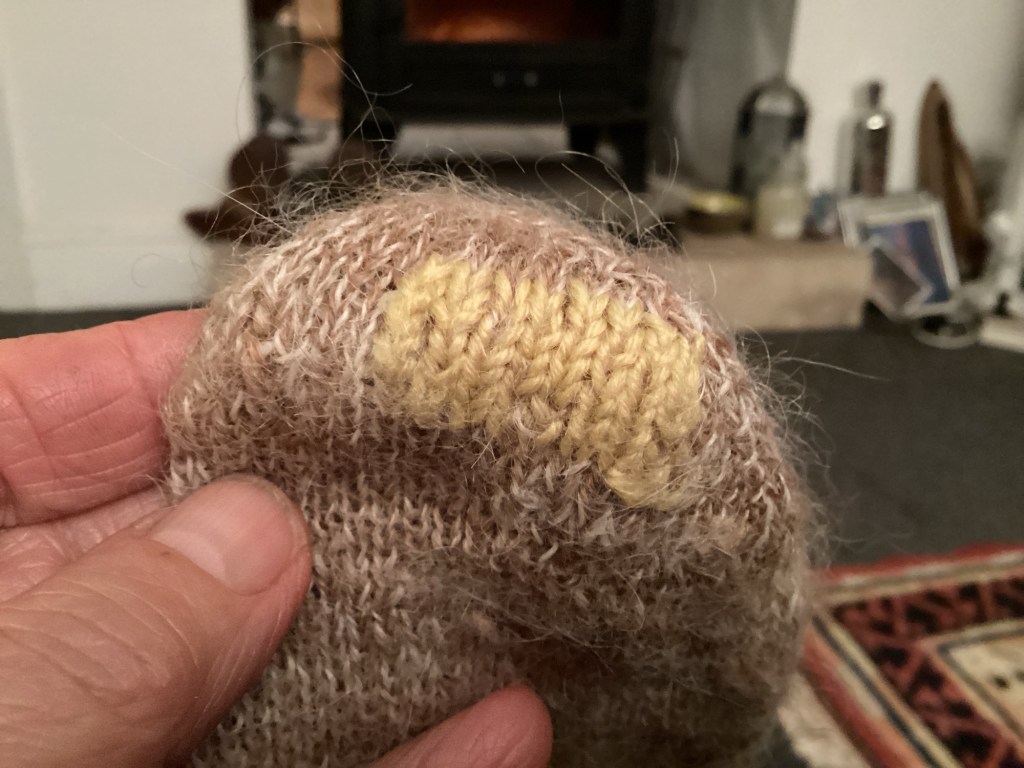
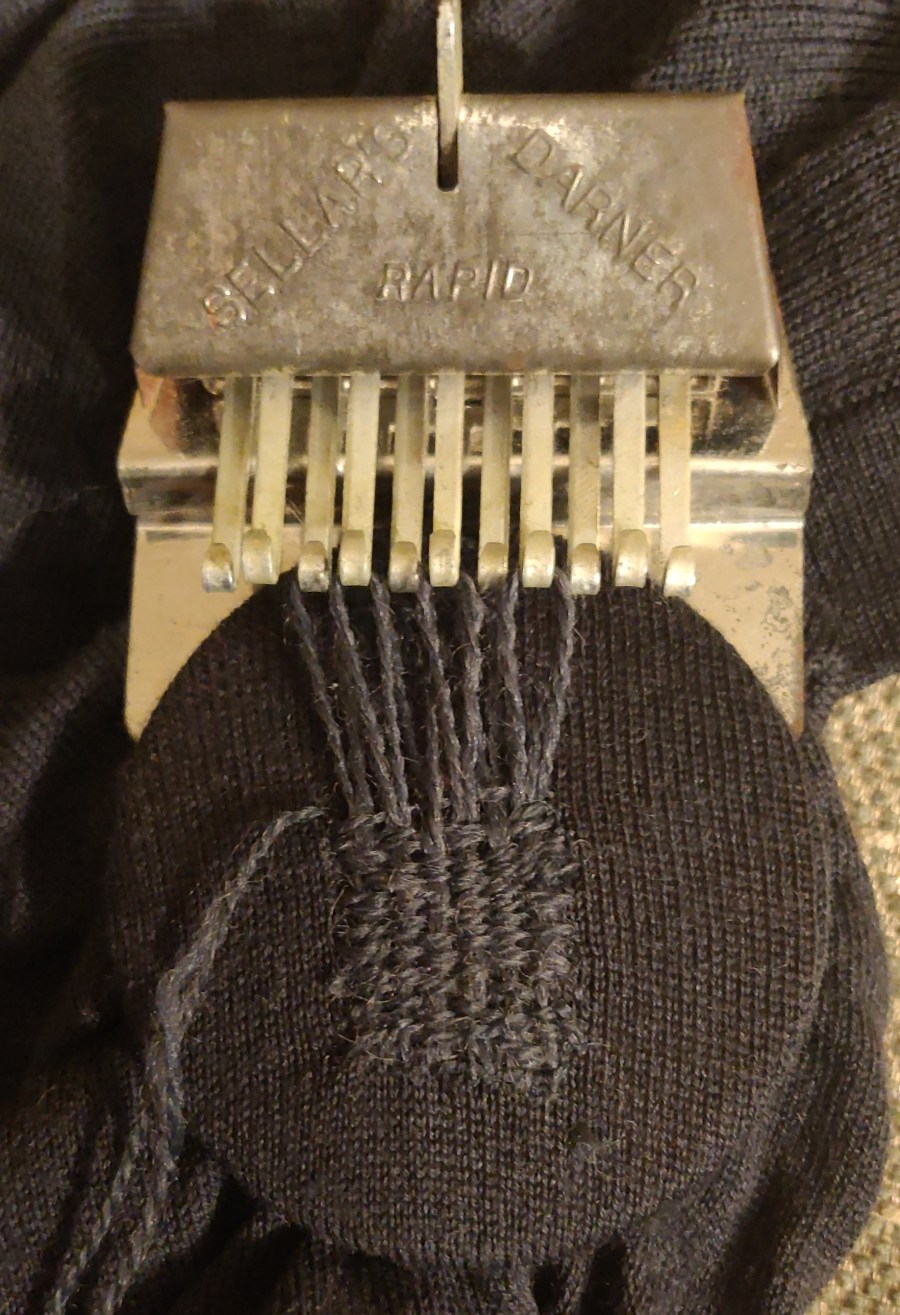
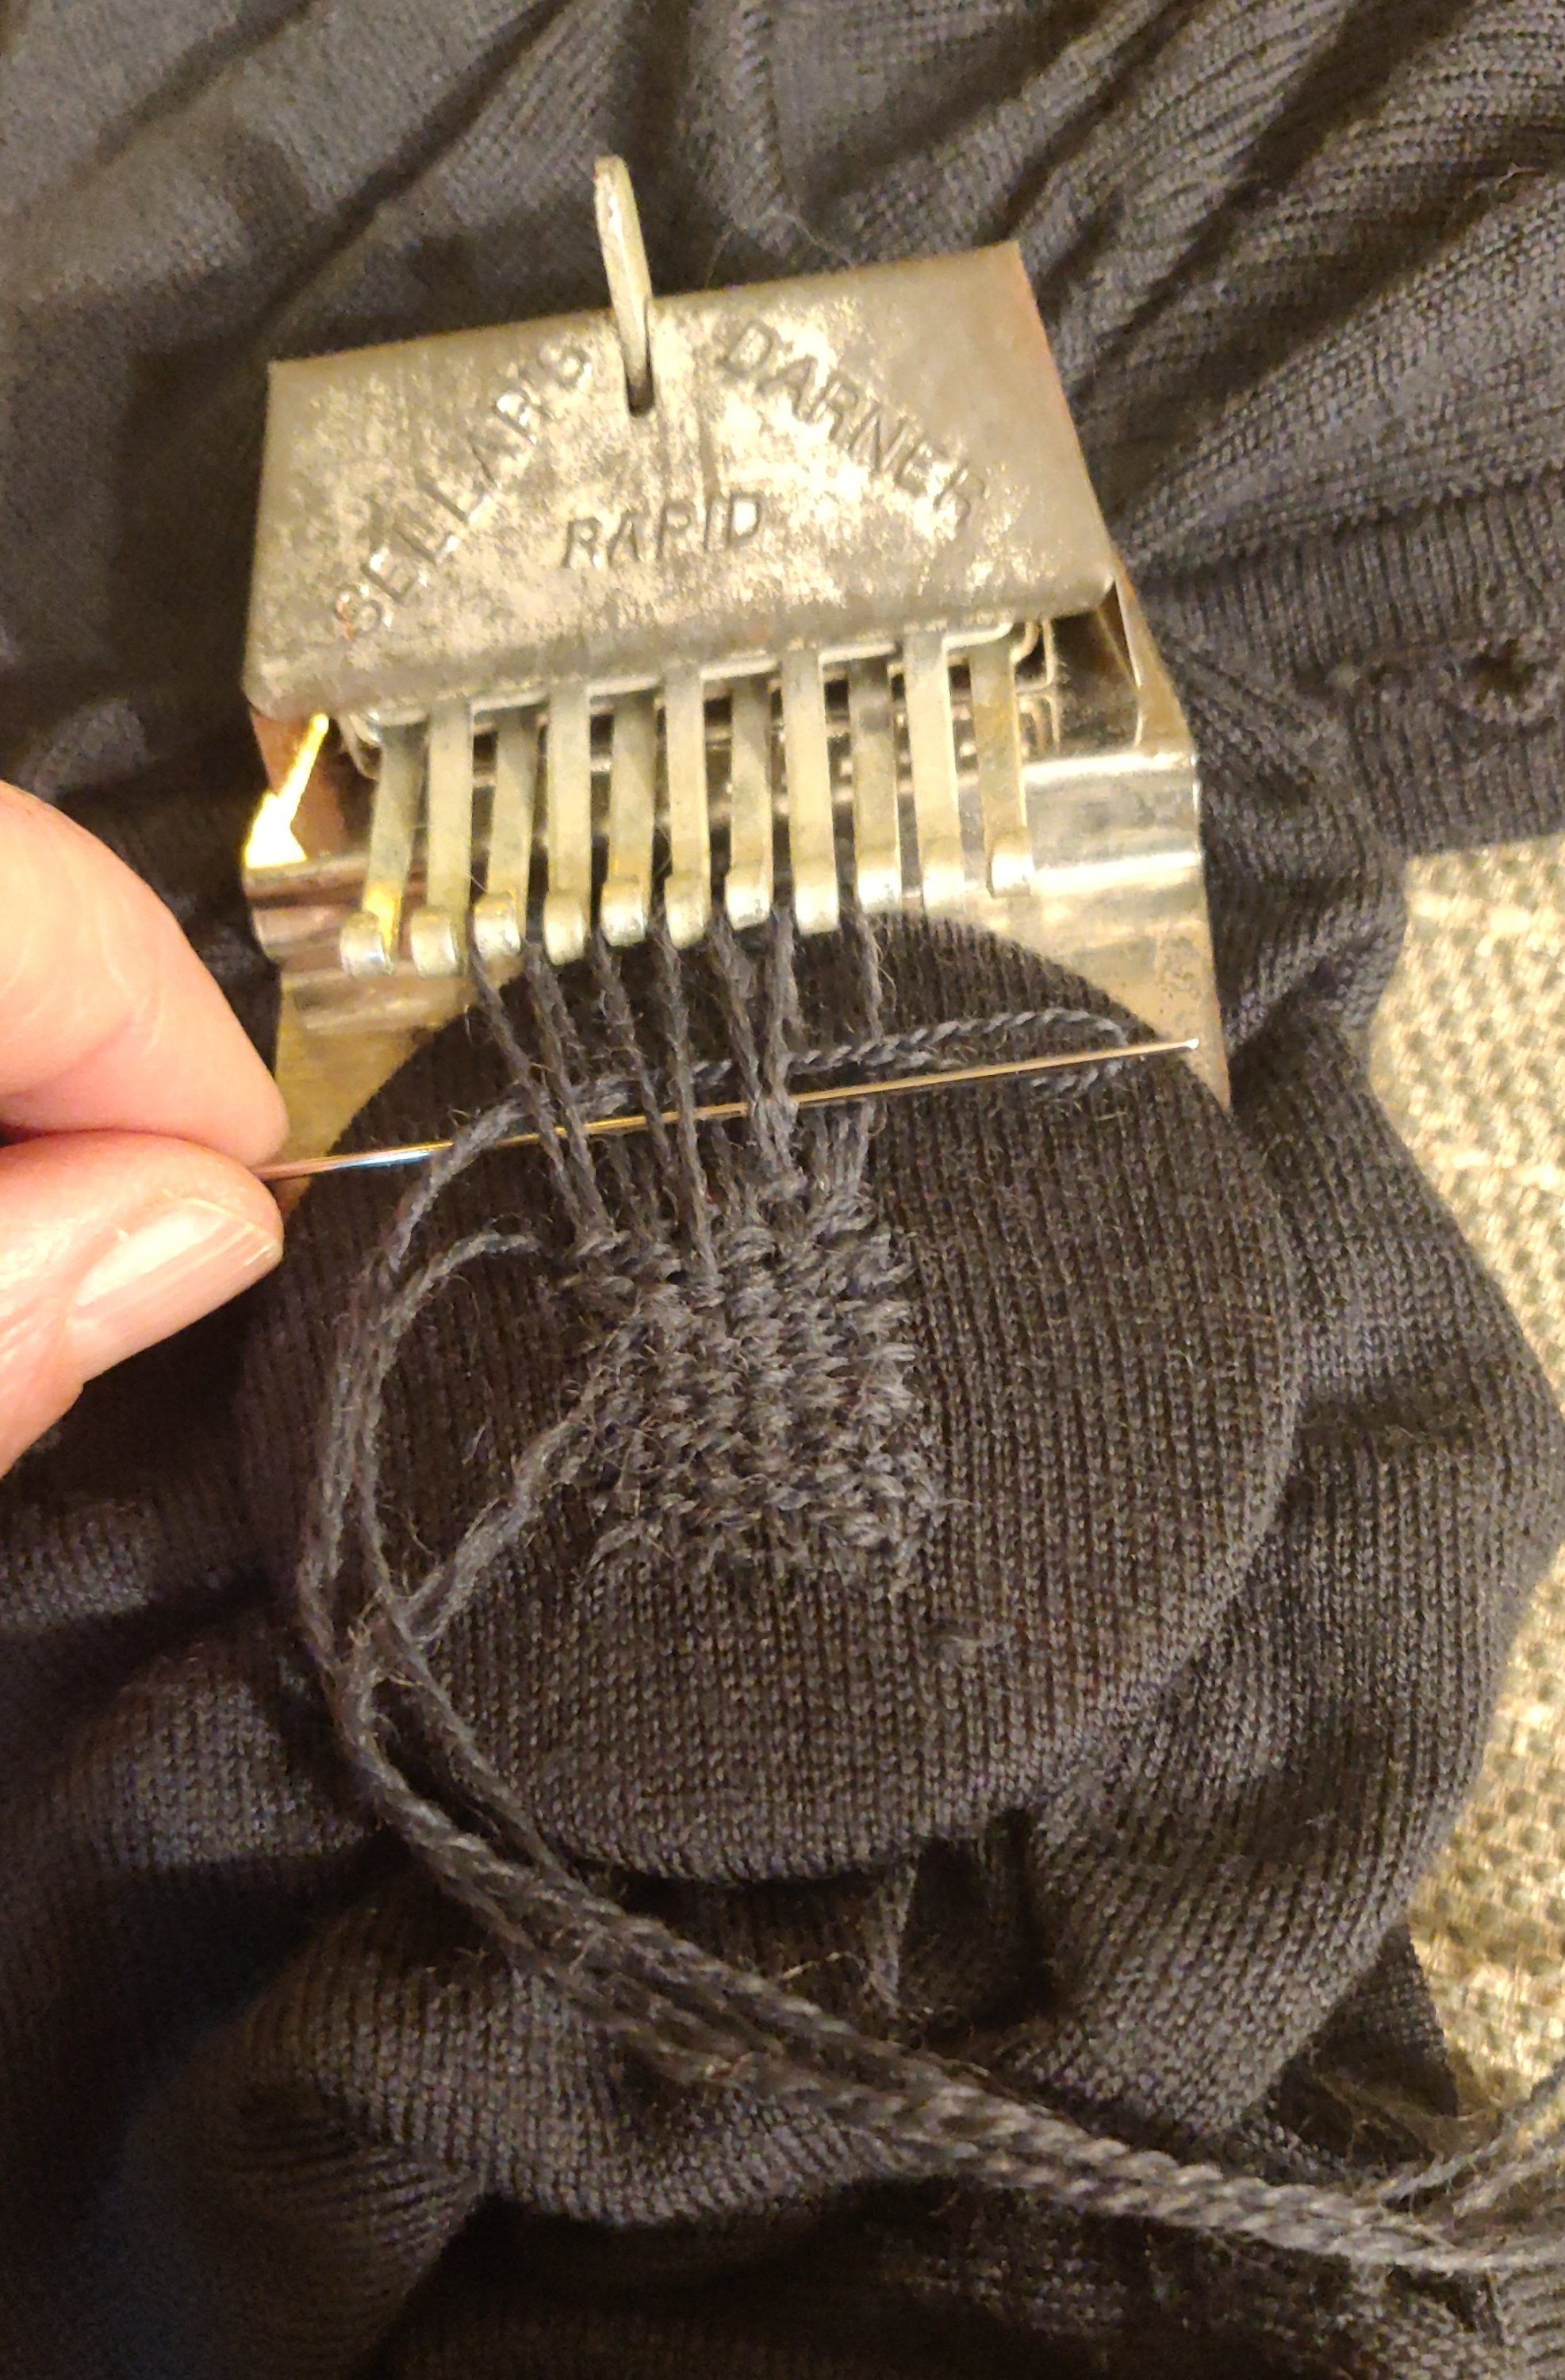
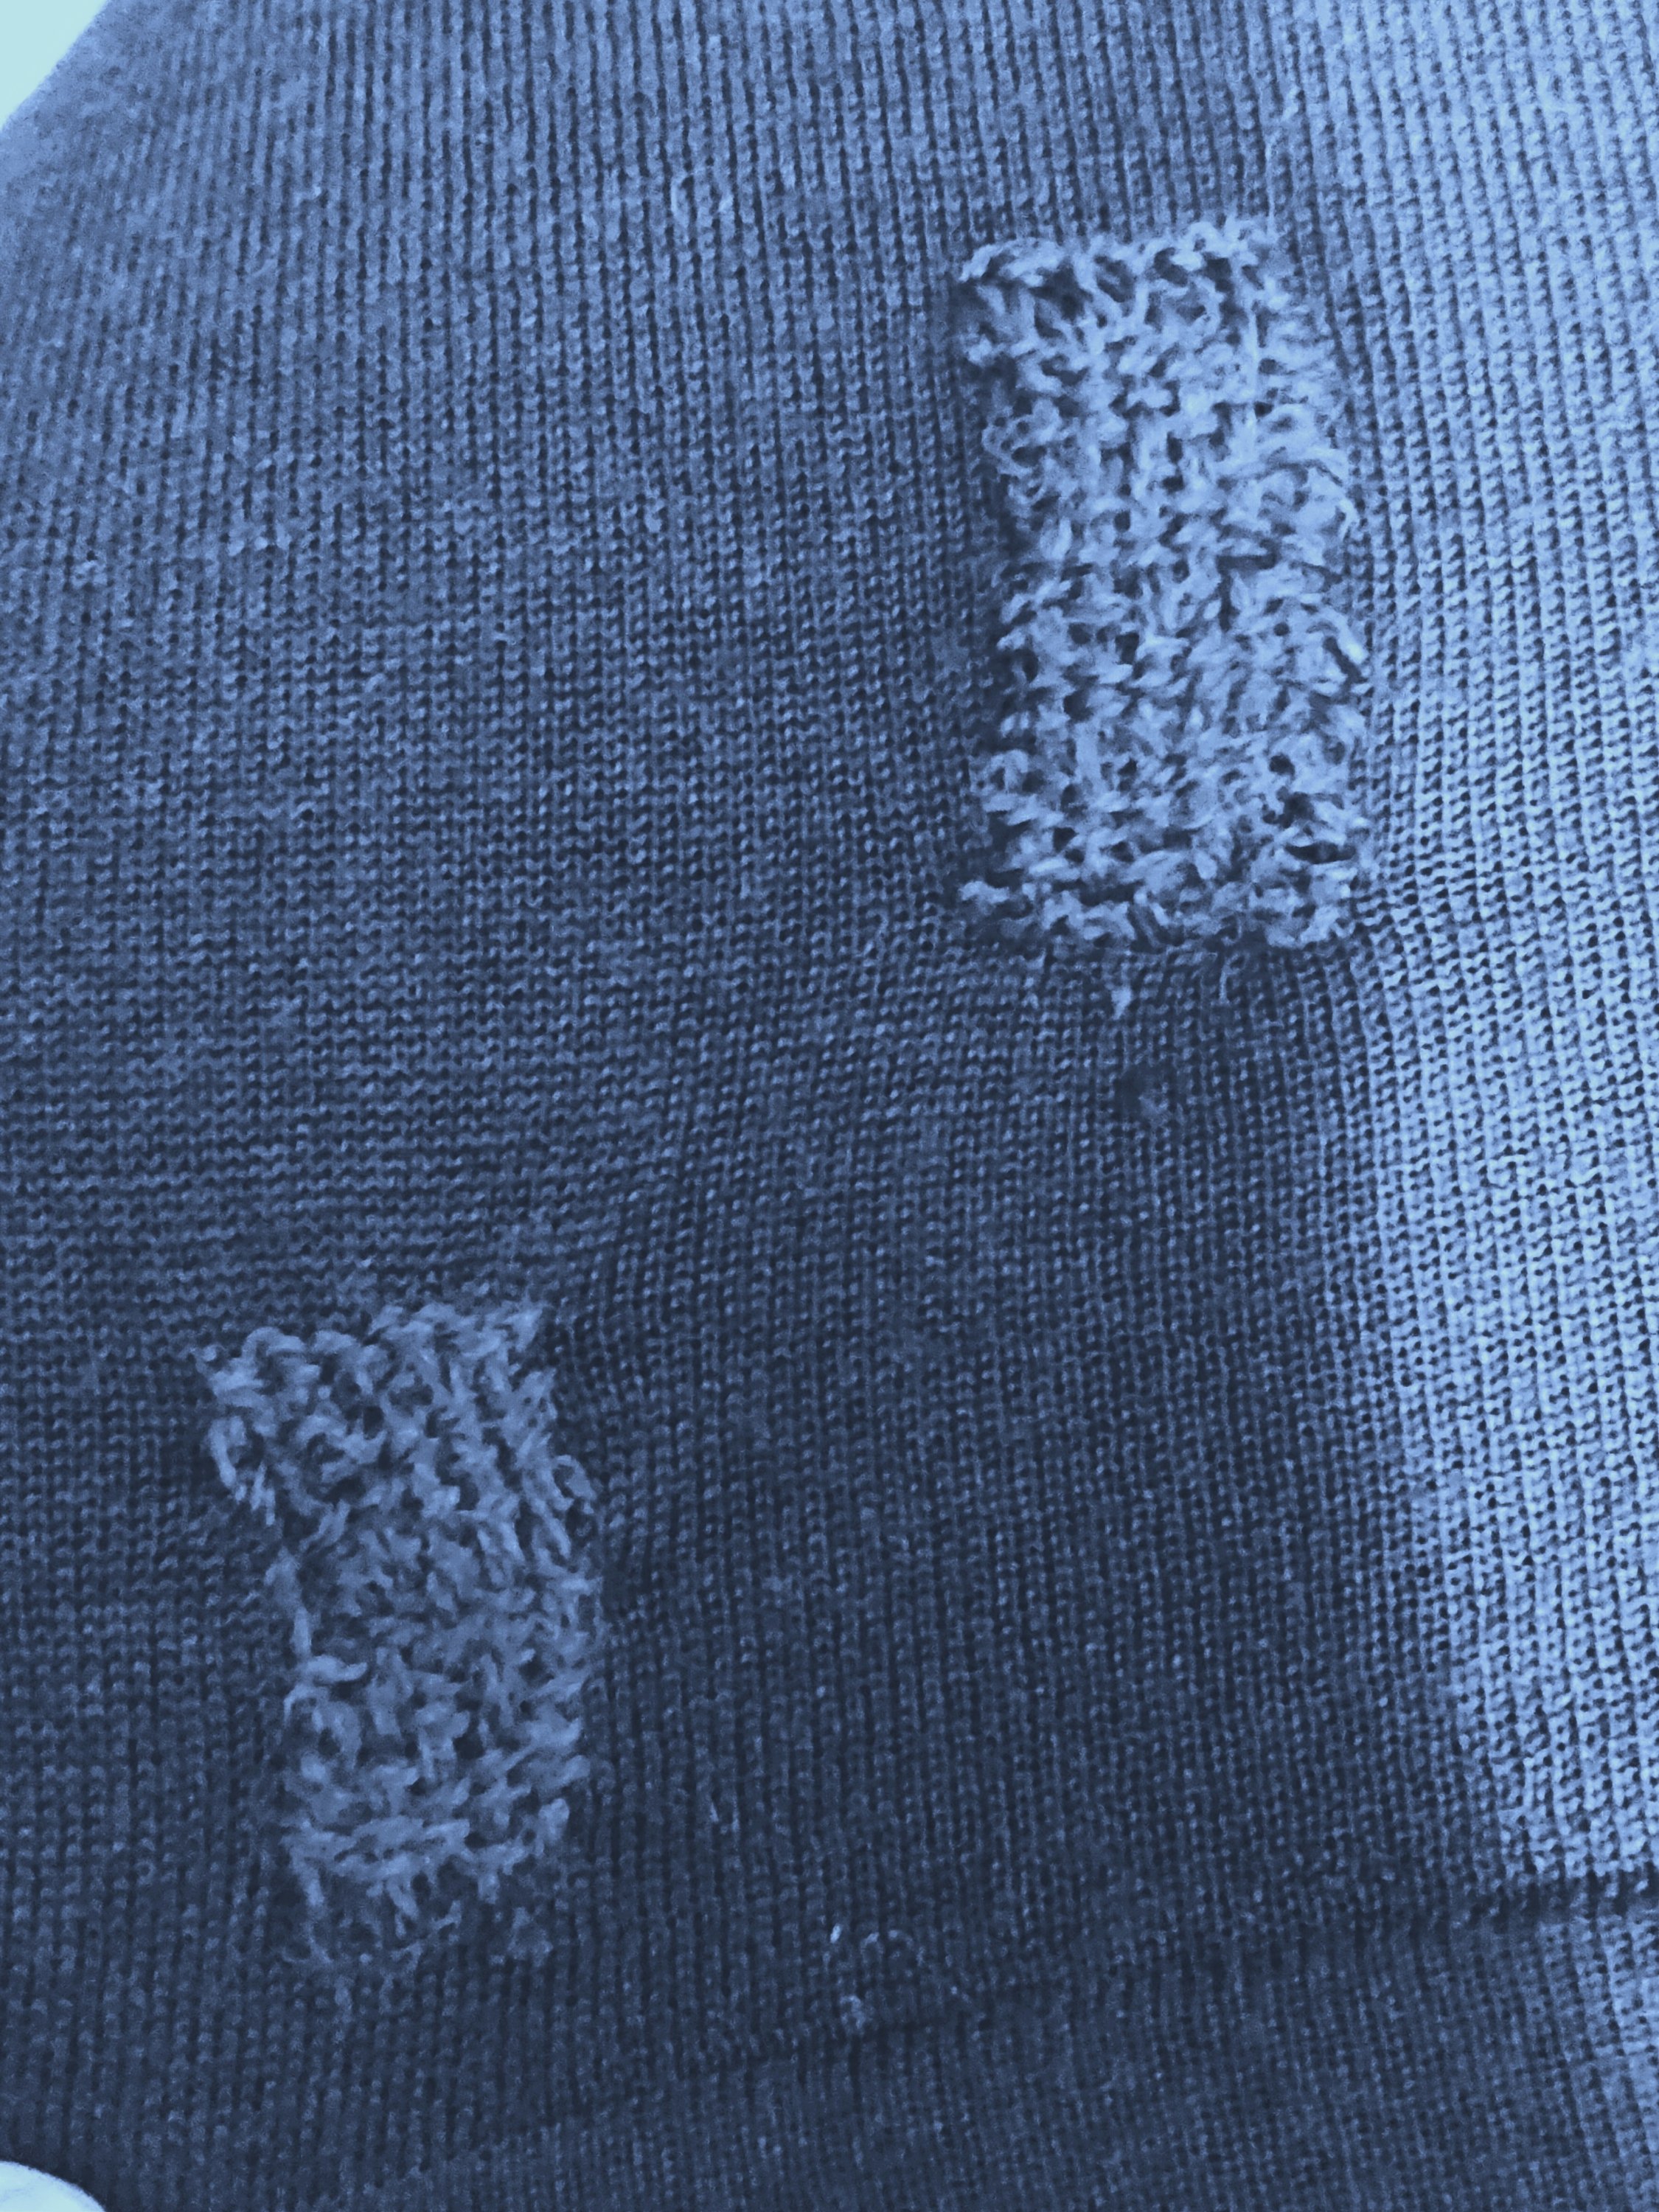
Just before Christmas I opened my wardrobe and took out a long merino wool cardigan to wear when going out for the evening. It went well with the dress I was going to wear and I felt good in it! Sadly it wasn’t until the next morning that I realised there were several quite large moth holes in the front, back and sides. Rather embarrassing!
Good intentions to mend it were shelved over the holiday, but today I got down to the task. Fortunately I had a pack of darning yarn that is quite a good colour match, so I dug out my antique ‘Sellars Rapid Darner’ darning loom and a long darning needle and got cracking. It always takes me a while to get back into the swing of this task and remember the little tricks. I remembered that I find it makes a neater darn to thread the cross-thread yarn through the ‘warp’ threads from side to side
with the blunt, eyed end of the needle so that it doesn’t split the wool. Then I use the needle to pack the cross-threads down into the warp threads before lifting the opposite set of warp threads.
I was quite pleased with the results, but can obviously improve and finesse my technique!
In a flurry of energy today I made a T-shirt tunic out of some of my fabric stash. My stash is a pile of fabric that hunkers down in the corner, offering me enticing glimpses of exotic colours, textures and exciting new projects before my guilt makes me go and do the hoovering.
So today I said ‘hang the Hoover, dump the dishes, it’s time to SEW!’. And I did!
This is my variation of The Makers Atelier ‘Boxy T-Shirt’ pattern. I’ve lengthened the whole T-Shirt into a tunic, and made the back a little longer than the front. They advise using stretch interfacing to stabilise the shoulder seams, neck, cuffs and hem, and luckily I had some to hands – that’s the beauty of being a fabric hoarder.
The Makers Atelier patterns are easy sized and they encourage you to be inventive when using their patterns. I cut between the medium and large to get the fit I wanted. I considered altering the pattern by adding bust darts but am now pleased I didn’t bother. In a fabric with less drape that might still be a good idea for the future.
This cotton print Jersey fabric has been tantalising me from the depths of my stash for a few years. It was a remnant, so only just over a metre long and never quite enough for most things I considered. It had been expensive as it’s really good quality fabric so I didn’t want to waste it on something I wasn’t going to be happy with. All of which meant that it’s lain there waiting for its moment.
Now it is finally made-up into this tunic I am very pleased with it; this will be going on holiday with me. The Jersey won’t crease too adult and I can dress it up and ring the changes with linen trousers, Capri pants, leggings and even skirts I think. Plus it will work on the beach. Win-win I think!
It took me about 4 hours to make including cutting out the main fabric and interfacing, (oh and finding the interfacing which I had put somewhere totally illogical). The making was interrupted by the ‘incident of the bloody overlocker’ – when there was a ‘bang’ and the machine light went out. Well yes, I did panic, but it turned out that the bulb had gone ‘pop’ and blown the fuse of the overlocker at the same time. So it was easily repaired thank heavens. I hate it when my machines break.
Finishing off called for the coversew machine. I could have topstitched with a double needle on the sewing machine, but why have a coversew machine if you don’t use it? Threading it up is a bit of a pain but it sews a lovely hem, especially when the fabric is interfaced, so it was worth the bother.
I have a glow of achievement as I sit here blogging.