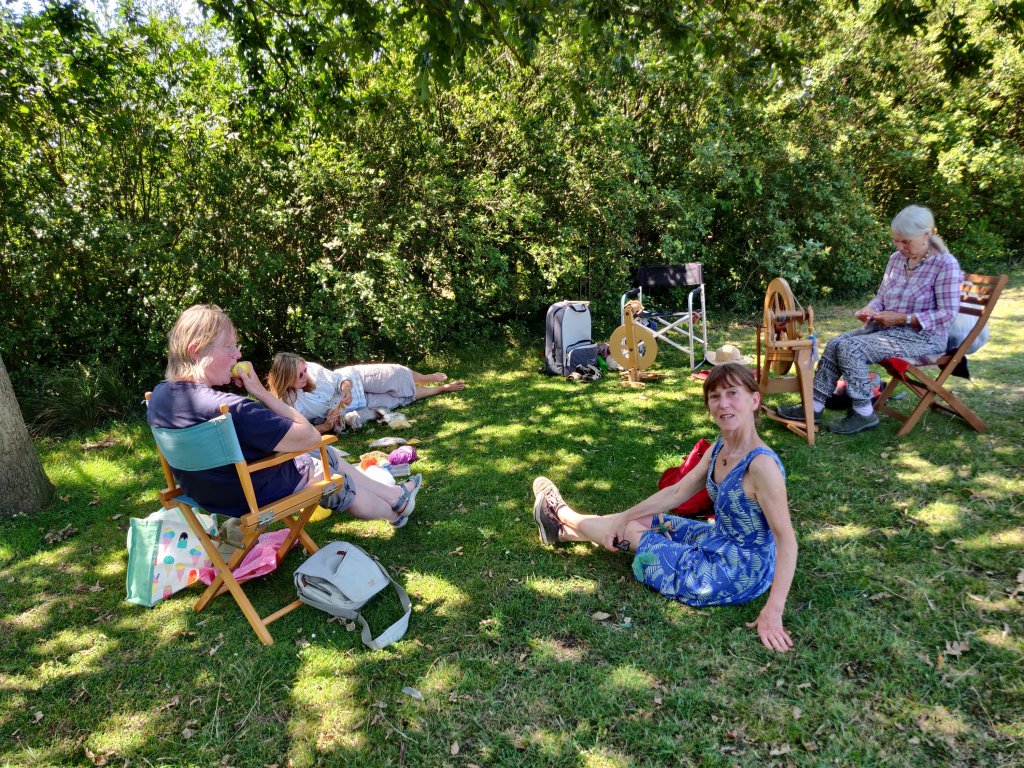
Is it risque? It’s certainly liberating. Given the restrictions on meeting up indoors, going to the park seemed the the perfect way to meet up when we can’t go to our normal groups.
This is the second one I’ve organised and it was lovely way to spend a Friday afternoon. I took my portable Louet wheel and others brought wheels, drop spindles, knitting and crochet. And a picnic lunch!
Shade was mandatory as it was so hot, and we found a generous tree that have us a shady space big enough for plenty of social distancing.
I’m taking the photo…So someone kindly took one of me
I took along a sack of stove-top rainbow dyed fleece as described on my Dyeing Wool page. It’s a little coarse, but in nicely formed locks, so I am flick carding it and spinning it quite thick for use in a rug, (maybe)?
We had a few rainy days recently so I put a lot of fleece to soak outside – hoping the rain water would help the process along. The catch of course was that I then didn’t want the waste the opportunity that the glorious weather we had today offered for washing the fleece in the garden and getting a head start on the drying.
When will I learn? Four hours later I do have a load of lovely white fleece hanging up to dry on meshes, but I am exhausted.
Because I had soaked the fleece in cold water for a few days, I had to wash it by slowly heating it in batches in a pot on a stove. I wish I had an old Burco boiler – my Mum used to use one for washing the bed linen. I will keep an eye out for one. Using pots meant that I had to do four batches. I have two big maslin pans I use for this and for dyeing, so after heating the first one, the second could be warming whilst the first was cooling sufficiently for me to handle it.
It was a pretty filthy fleece and the overnight cold water soak had really helped loosen the dirt, but I still had to give each batch two washes before rinsing twice.
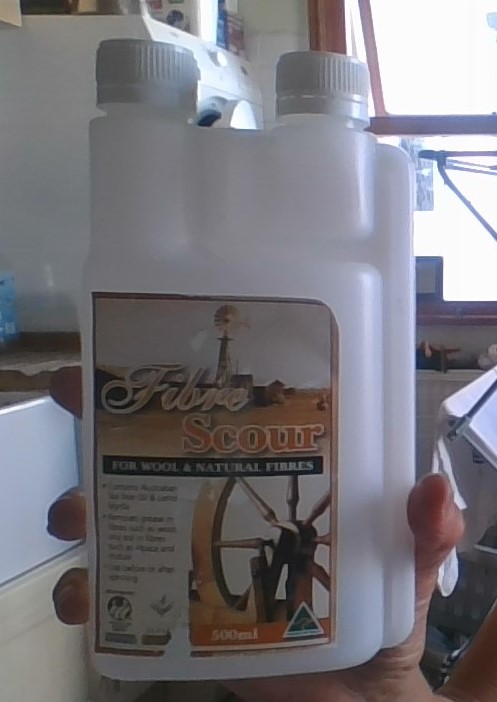
I’ve invested in both Fibre Scour and Power Scour for washing fleece, as well as working with washing up liquid. I’ve not tried Kookaburra or any other as I haven’t found them for sale in the UK. The results of both of the ‘professional’ scourers I have tested are very good, there is no doubt about it. But, and its a big BUT, is it financially worth it?
This was the first lot I have washed using Power Scour, but because I did all the fleece with this, I don’t have any of the same fleece washed in any other way to compare. However, the Power Scour has done a good job. It doesn’t foam up so is easier to use than washing up liquid. Price-wise per wash some people claim its no more expensive than using washing up liquid, but in the UK the 473ml (16 oz) bottle of Power Scour cost me £21! OK, they claim you only need a tablespoon to wash a pound of fleece, using around 2 gallons of water (that is 15ml to wash approximately 450g of fleece in 9 litres of water), but I think this will still work out more expensive than using washing up liquid.
UPDATE 11th August 2020 The Unicorn website recommend using 1 tablespoon of Power Scour to 2 gallons of water (15ml to 9 litres of water) when washing in a washing machine. As those of us in the UK don’t generally have top-loader washing machines this is not usually an option for us, but it is useful to know the water to detergent ratio as opposed to the fibre weight to detergent ratio.
2 gallons being equivalent to 9 litres is neat as that is the capacity of my maslin pans. My fleece was in batches of around 250-300g, so I used 10ml per batch). My frugal soul overrode my experimental spirit and I have to admit that I did the second wash in washing up liquid.
I also added a few drops of Tea Tree oil to the second wash for its antibacterial properties, and lovely clean smell. Fibre Scour already has Tea Tree oil as an ingredient which is a plus for me, as well as the clever bottle that measures the dose each time.
Power Scour ingredients are listed as:
Nonionic and Anionic Surfactants, Propylene Glycol or Ethanol, Copolymer, Lavender Fragrance & Filtered Water.
POWER SCOUR COST
Lets do the maths: At 15ml per wash you can get between 31 and 32 washes out of the 473ml bottle of Power Scour. If 15mls wash 450g fleece this means you can wash up to 14 kilos of fleece with one bottle (assuming you only do one wash using Power Scour).
My bottle of Power Scour cost £21 (including post and packing). Divide £21 by the number of washes (31) makes it about 68 pence per 450g wash, or £1.50 per kilo of fleece.
So how does this compare to washing up liquid?
WASHING UP LIQUID COSTS
Washing up liquid ranges between £5.64 per litre for Method, £3.56 for Ecover, £2.88 per litre for Fairy, down to £1.78 for supermarket own brands (all prices for Tesco website 30th July 2020).
Lets work with Fairy as it is pretty like Dawn, the one recommended by many spinners in the US. I will work with the regular sized 625ml bottle, not the giant one (it will offer a bit of a saving if you opt for that size, in the same way that buying a gallon of Power Scour should save on cost per wash).
I reckon you need a pretty good squirt of Fairy to wash even 100g fleece. I count 1-2-3 whilst squirting and find this about right. I’ve just measured this and it comes out as 20ml of washing up liquid (give or take a bit for the size of the nozzle and the viscosity of the liquid).
Lets do the maths again: At 20ml per wash you can get between 31 and 32 washes out of the 625ml bottle – so far so similar! However, here is the difference, if 20ml is needed to wash 100g fleece you can only wash up to 3 and a bit kilos of fleece with one bottle of Fairy, (assuming you only wash the fleece once).
A 675ml bottle of Fairy costs £1.80 at Tesco. Divide £1.80 by the number of washes (31) makes it about 6 pence per 100g wash, or 60 pence per kilo of fleece. Hmm, that seems a big difference; less than half the cost per kilo of Power Scour.
So unless my amounts or maths are totally off the mark, washing up liquid is clearly cheaper to use that Power Scour, even when the amount of washing up liquid used to wash a kilo of fleece is significantly more than Power Scour.
FIBRE SCOUR COSTS
Fibre Scour recommends 20ml to 10 litres of water – but does not give a fibre weight which I find really annoying – you can wash 10g or 500g of fibre in 10 litres! So lets opt for the 500g.
Lets do the maths: At 20ml per wash you can get 25 washes out of the 500ml bottle of Fibre Scour. If 20mls wash 500g fleece this means you can wash up to 12.5 kilos of fleece with one bottle (assuming you only do one wash using Fibre Scour).
My bottle of Fibre Scour cost £14.99 (including post and packing). Divide £14.99 by the number of washes (25) makes it about 60 pence per 500g wash, or £1.20 per kilo of fleece. Marginally cheaper than Power Scour, but no real economic challenge to washing up liquid.
Lets return to the fact that the results of both Fibre Scour and Power Scour are very good, there is no doubt about it. They also seem to make the washing a lot easier, removing the dirt more thoroughly and getting the stains out. But is it worth it?
CONCLUSION
In believe the reviews that compare the cost as ‘not that different’ are based on purchasing Power Scour in the US, where it is considerably cheaper than in the UK. US websites advertise it at around $19 for the 473ml bottle, whereas the cheapest I could find it in the UK was £19.99. $19 is about £14.50 at current exchange rates. Still pricey to my mind, but more in line with the Australian Fibre Scour which costs £12 for a 500ml bottle in the UK.
I wish I could afford to use either Fibre Scour or Power Scour for all my fleece as I do like the result. I’ve opted to purchase another bottle of Fibre Scour as it is a better financial option in the UK.
I look forward to a time when increased sales volume might mean that the ‘professional’ products come down to a more reasonable price. However, until then I shall be saving these for either extremely dirty (but what I hope are good quality fleece), or my ‘best’ planned and purchased special fleece, whilst continuing to use washing up liquid for everything else. I will mostly likely always use washing up liquid if a second wash is needed.
If there is a UK based chemical/cleaning company out there who would like to venture into ecological raw-fleece-washing territory it would be wonderful to hear from you.
There is more about my experiences scouring raw fleece here…
I’ve wanted a half-scale mannequin for several years, but have always been unable to justify spending the money. I made my own full-sized body double, and several other mannequins for my research, so have lots of experience making real-size ones, but wasn’t sure how to start with a half-scale one.
Luckily I happened upon Leila’s website Grow Your Own Clothes, where she has a great tutorial about making your own half-scale mannequin. I then saw that she has a pattern for a sewn and stuffed on on Etsy. I thought that would be a bit weird, but having taken a good look and having done a lot of work on fitting clothing to the body I realised I could make that! I bought the pattern – thank you Leila for putting it out there, and assembled the materials. https://growyourownclothes.com/2015/08/06/mini-stuffed-dress-form-pattern/
Yes it is fiddly, and you need to concentrate. There are lots of little pattern pieces that have a tendency to blow off the table if the window is open, so I don’t think its something to take on if you can’t leave things out to work on unless you are very well organised. Do read the whole thing through before starting so you get the gist of what you are going to do. The tips and hints given in the pattern are extremely helpful and the instructions are very comprehensive and easy to follow.
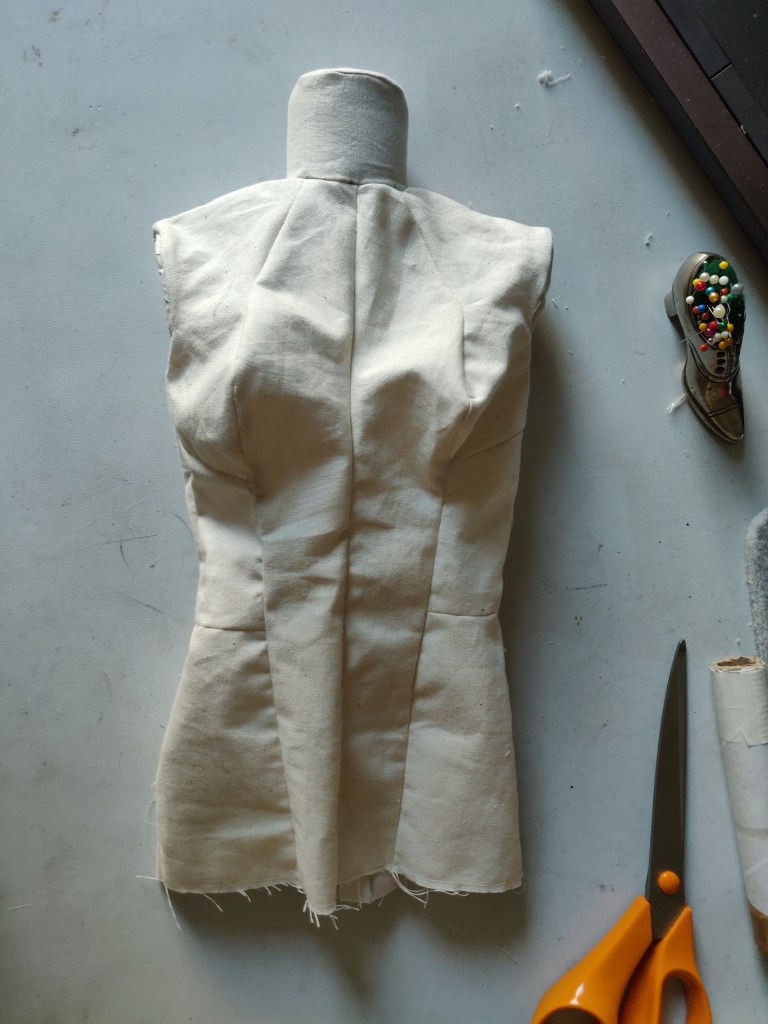
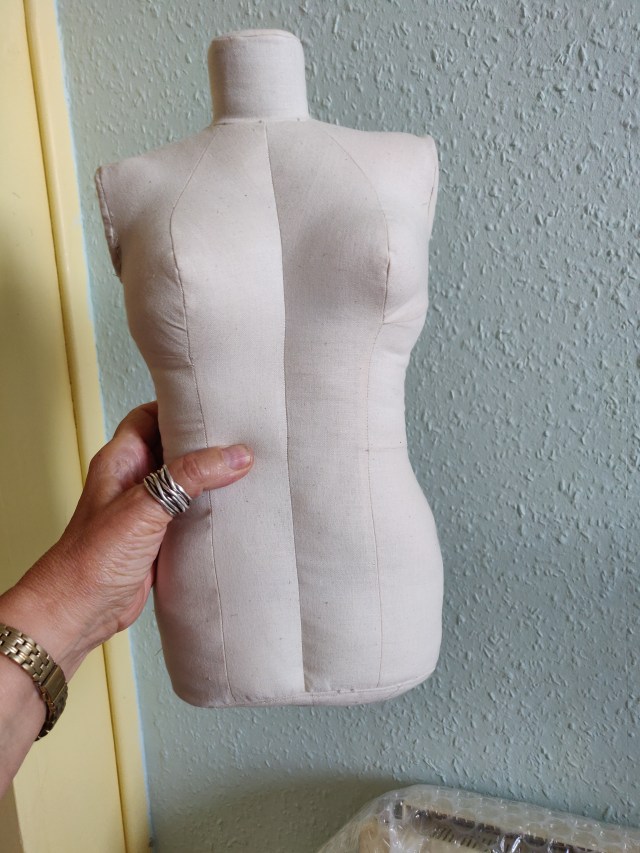
The sewn shell, ready for the base to be put on
Its really important to be as accurate as possible cutting out and sewing the seams. I managed to be reasonably accurate, but can see where I could have done better.
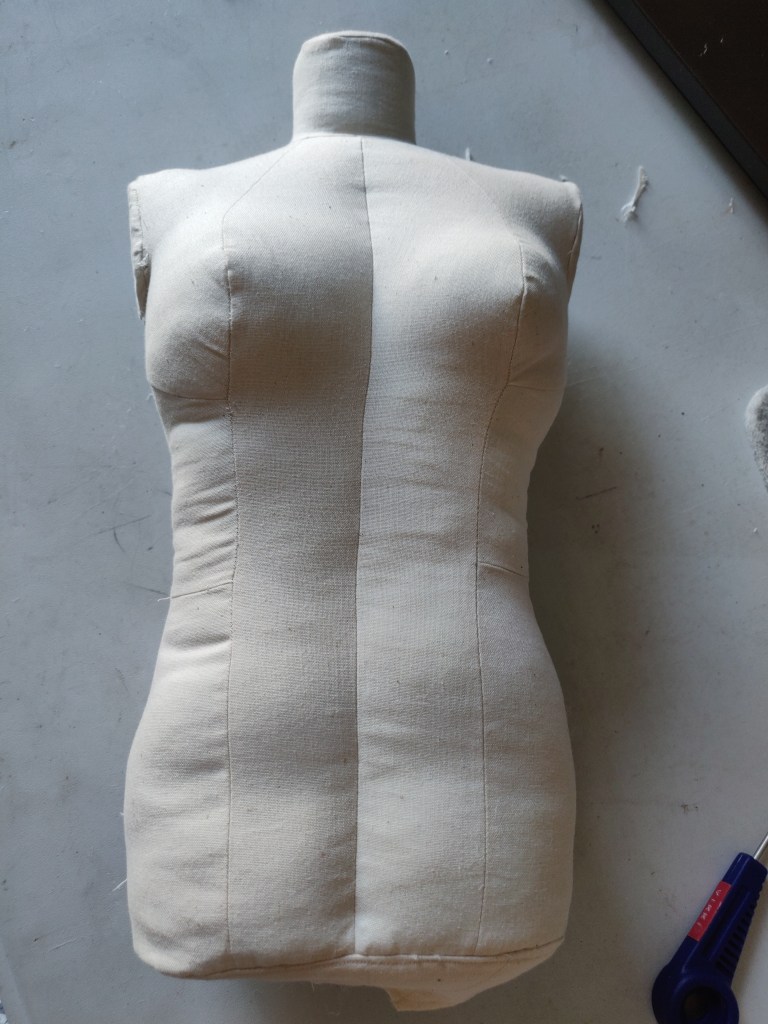
Its a very clever design with a central panel to hold the shape better and a pole insert.
Stiffing is quite a challenge. I can again see where I could improve, and may unpick the base and rework this at a later date, but I am to excited to do this now. I luckily had a sack of carded polyester wadding that I used, but stuffed the shoulders and some other areas I felt might benefit from the behaviour of the fibre with wool that I carded myself. I might re-stuff with all wool – or at least do the next one with wool
Partly stuffed, with the base in place now.
At this point I was a bit frazzled and had burned my finger on the mini-iron and stabbed myself in the palm with the point of a very sharp pair of scissors, so I decided to call it a day. Today I completed the mannequin and am thrilled with the result.
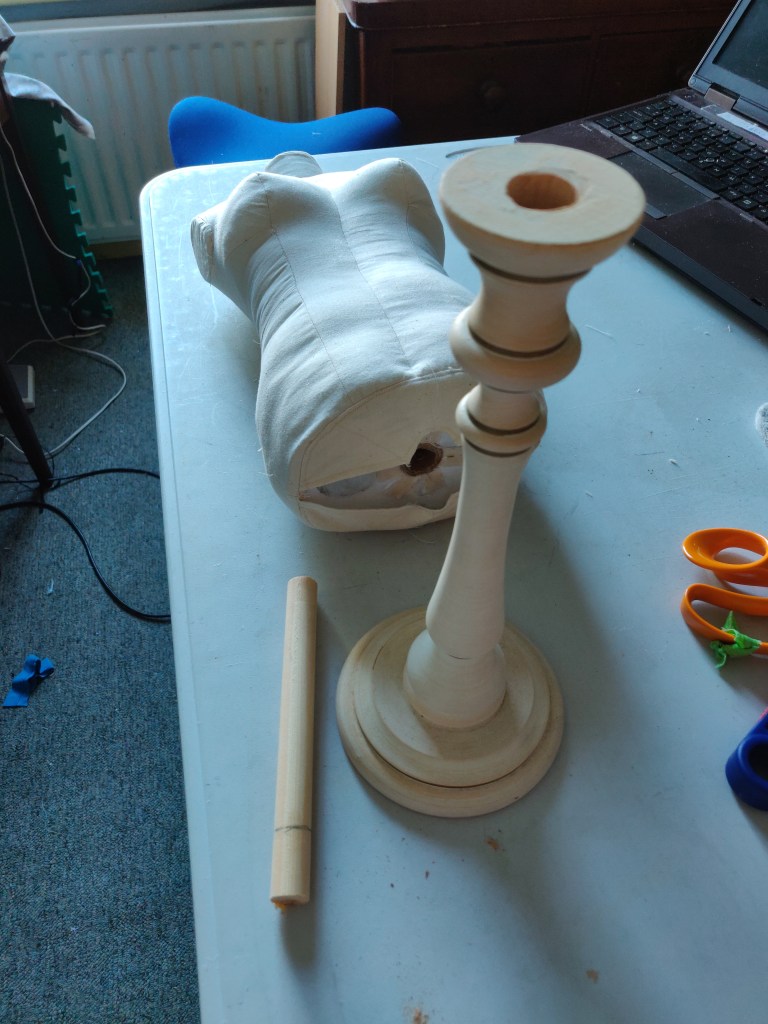
The suggested stand is a cardboard one, but I have just broken the top of a wooden lamp, and realised that this would make a great stand.
The lamp base and dowel that will make the stand.
Almost ready to go on the stand. Just needs the base sewn together.
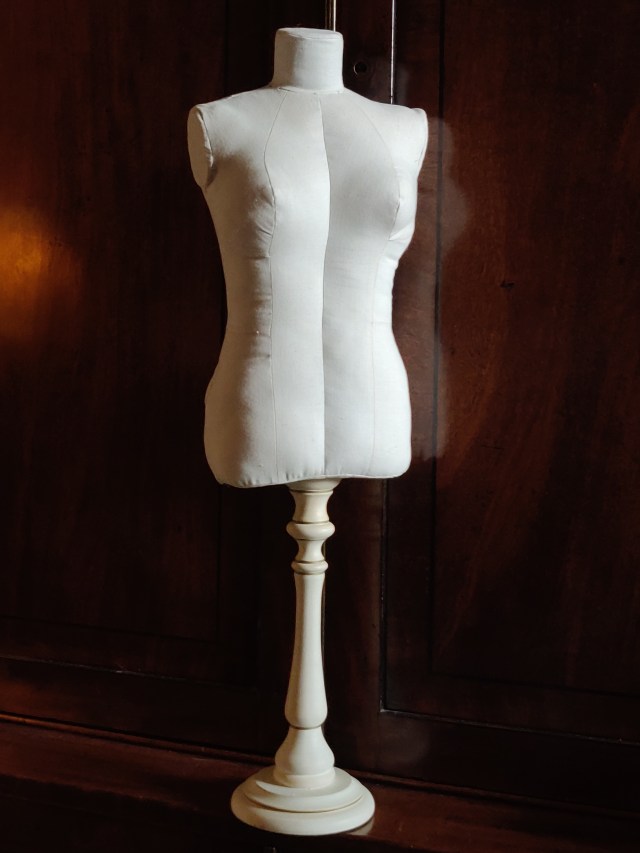
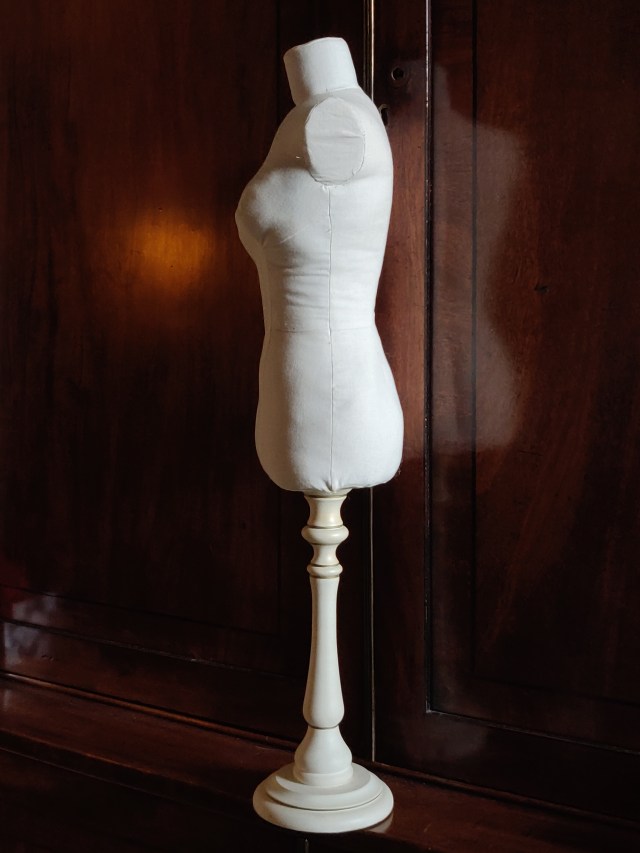
The finished mannequin.
I am pleased, but as I say I am my own worse critic, so can see all the things I wish I had done better. I plan to make another one from the pattern to perfect it. For the moment I am chuffed though.
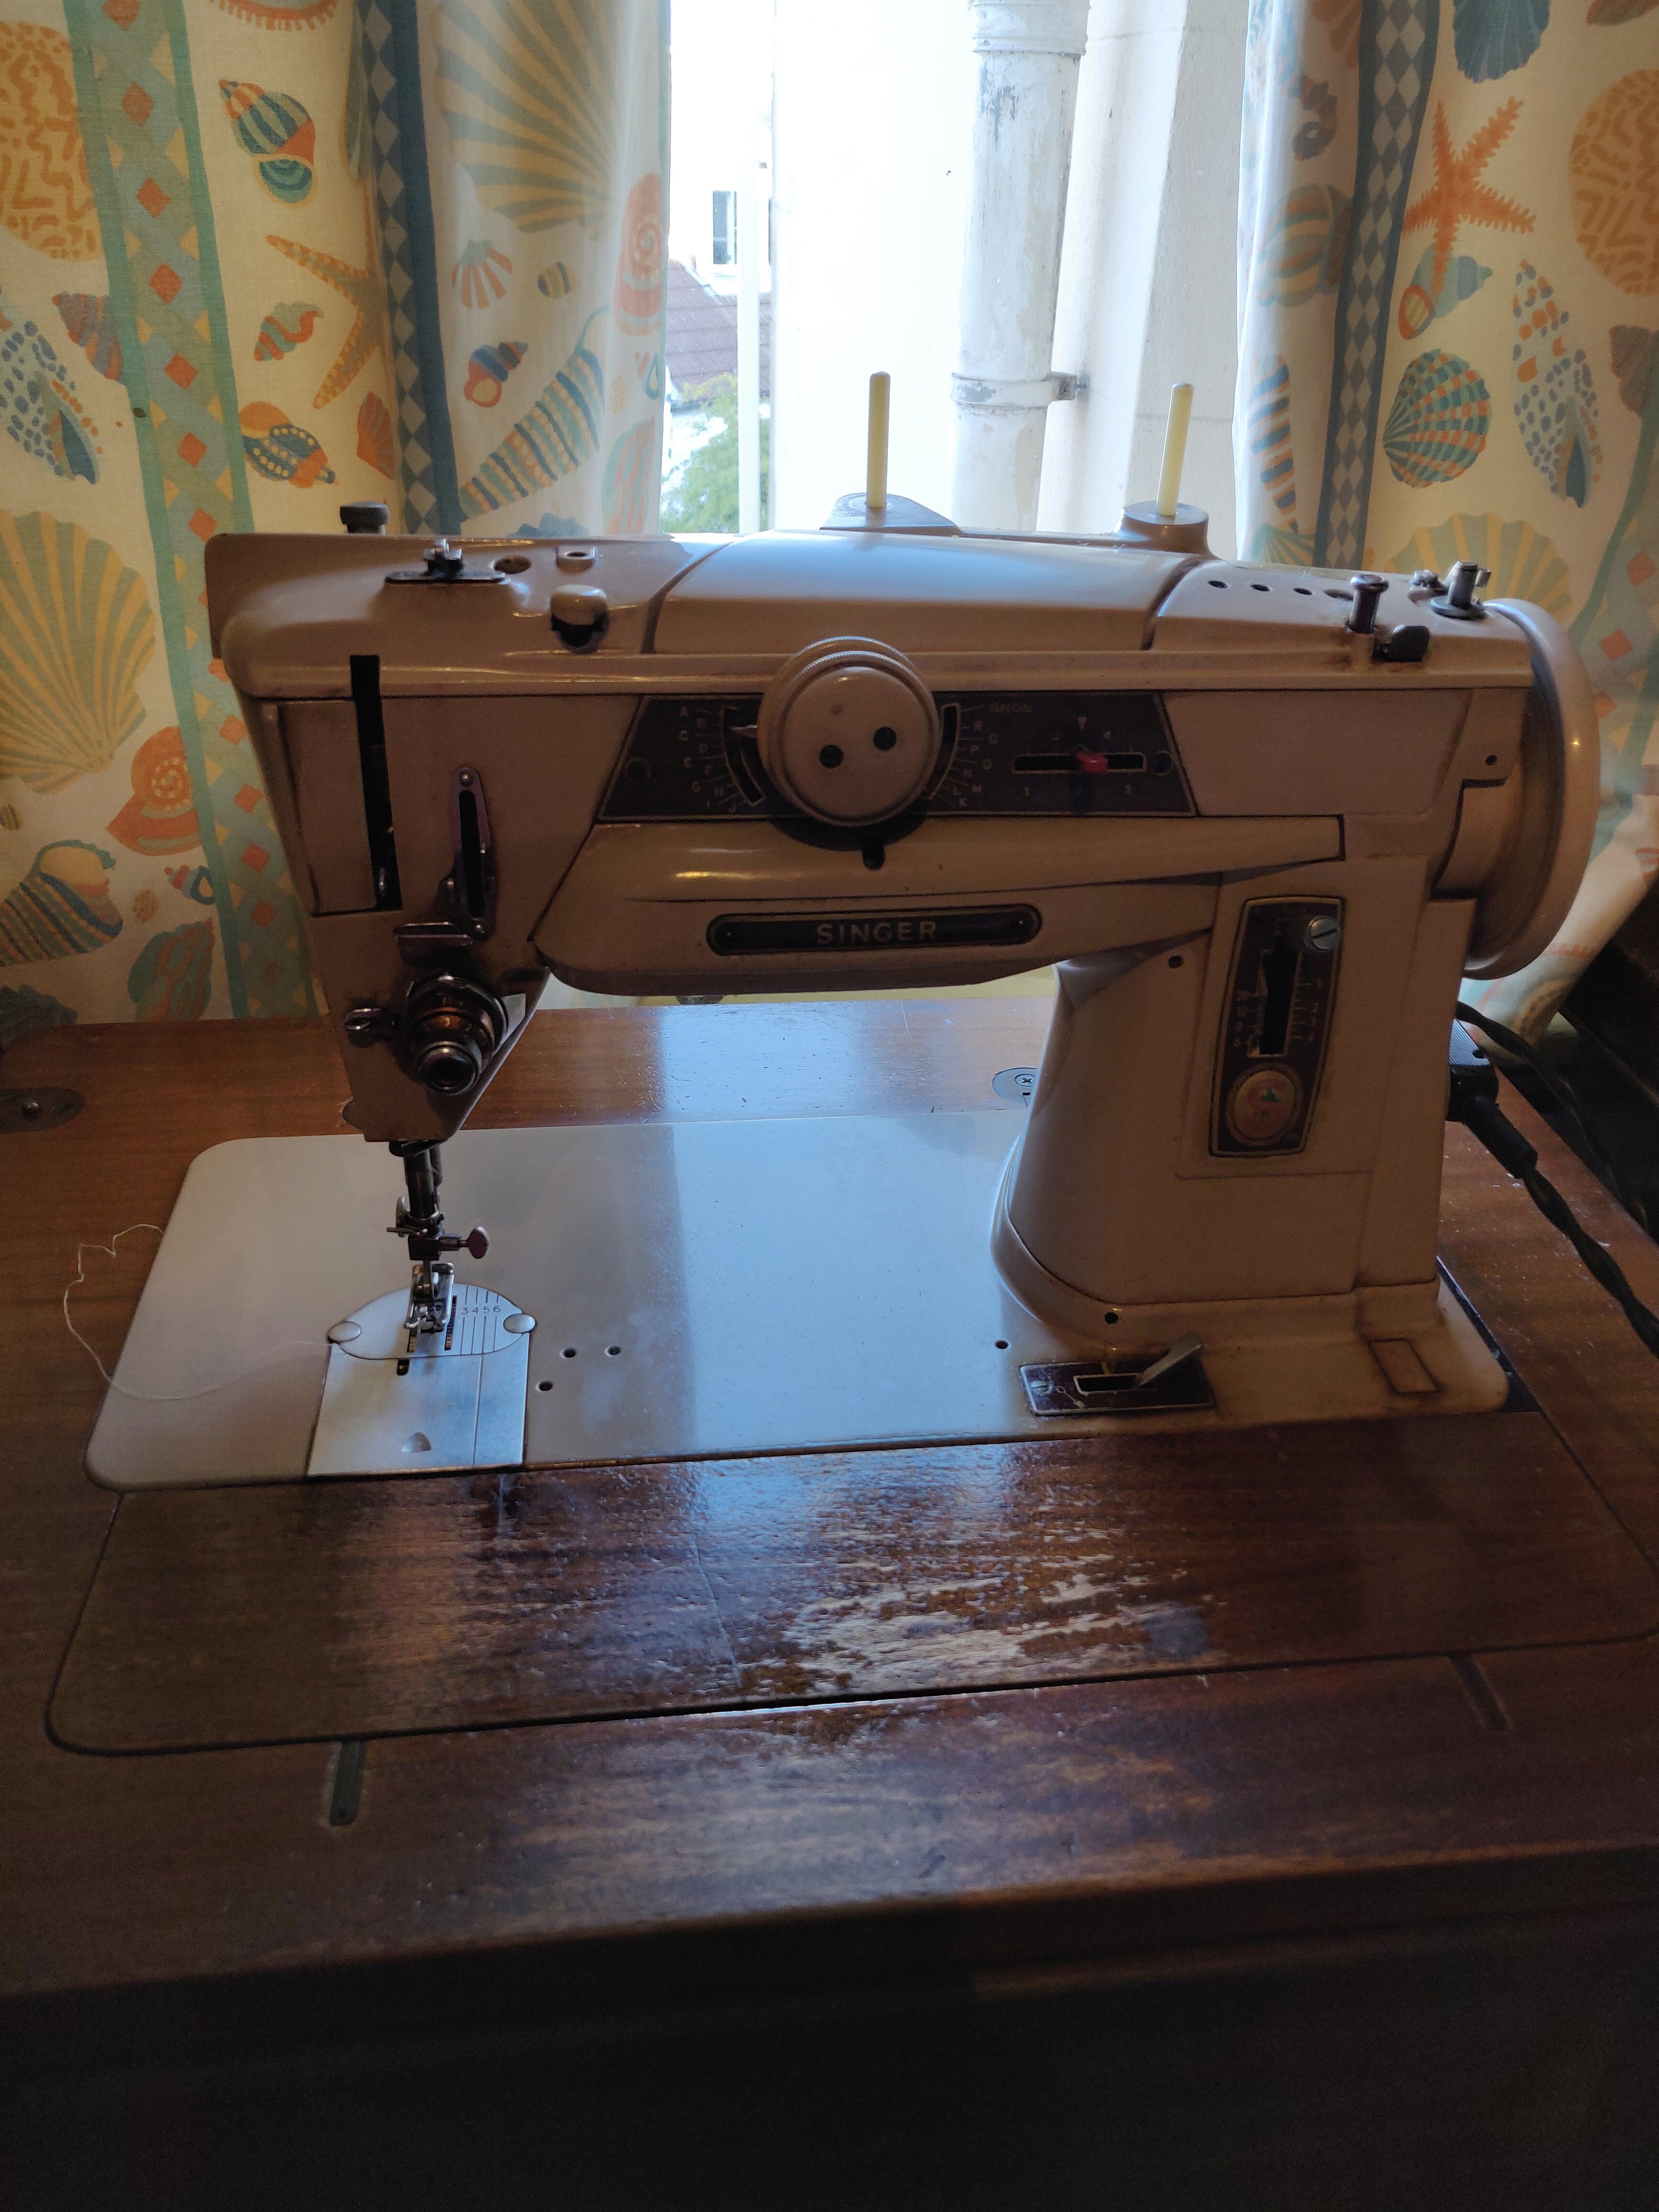
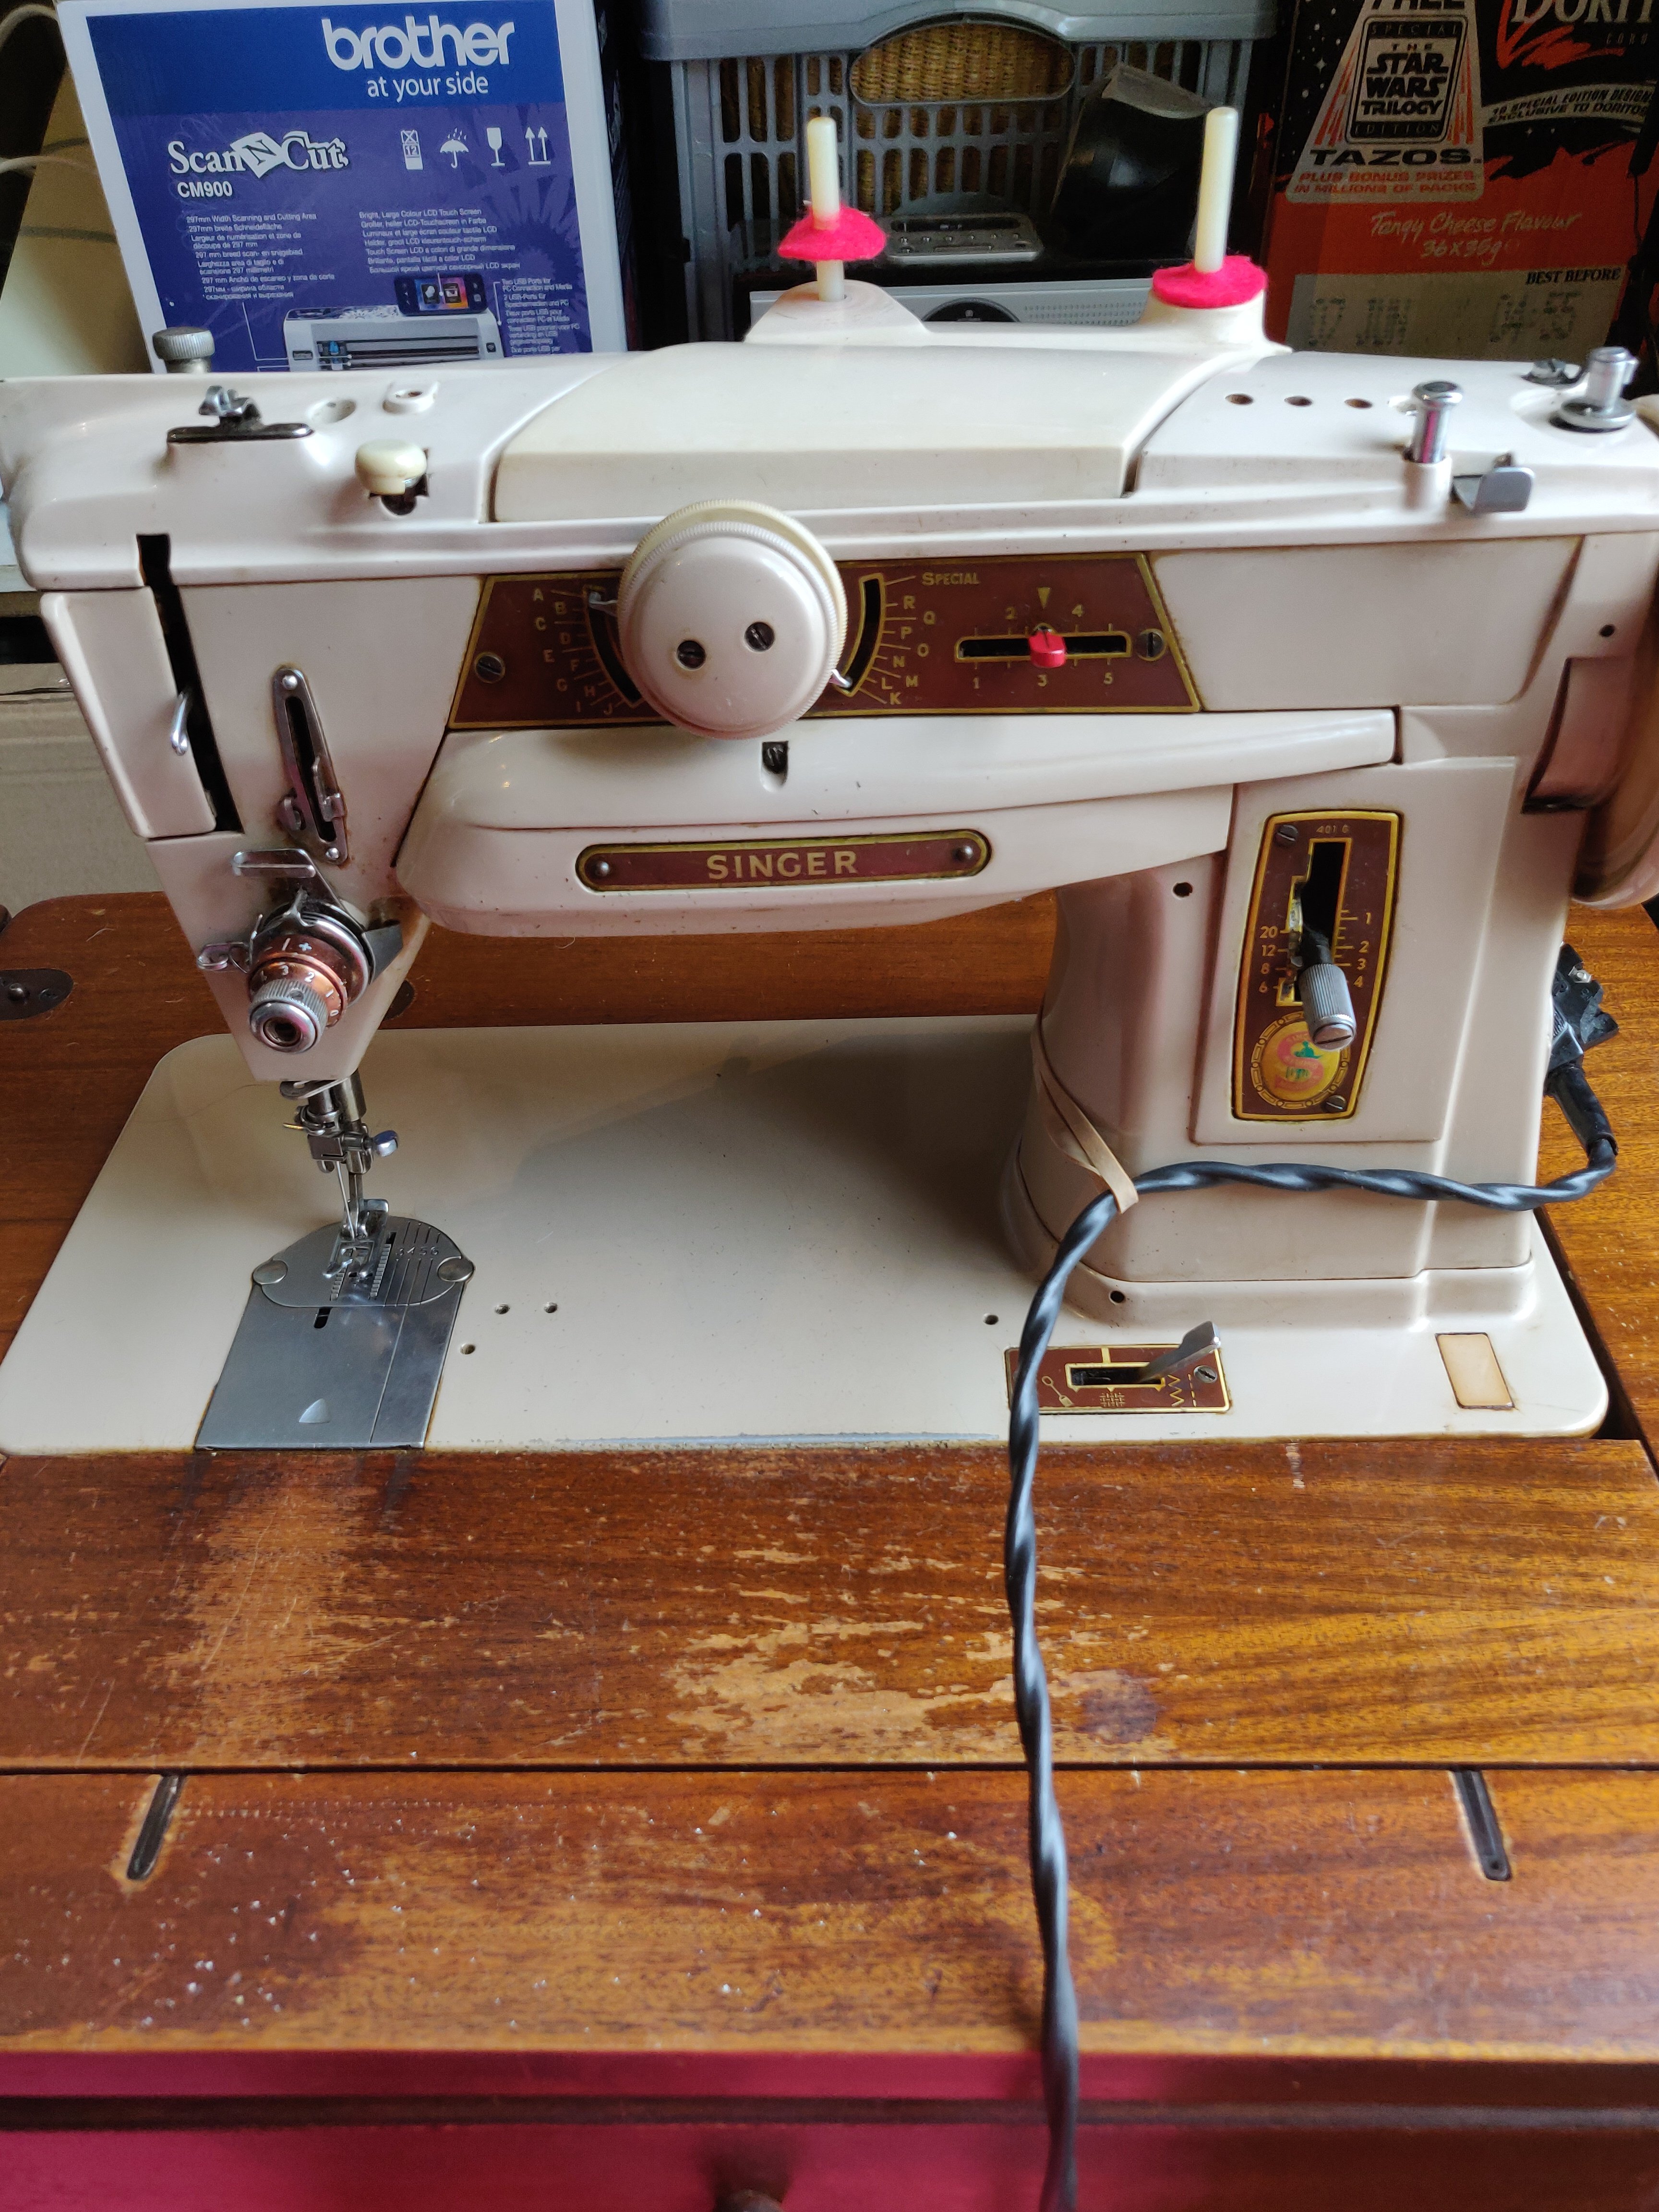
I have been toying with the idea of buying a Singer slant shank machine for a while, and during lockdown I took a punt and bought one reasonably local on eBay. Not the smartest move you might say, sight unseen and all that. I spent quite a time scrutinising the photos very carefully, read up about the machine, and asked lots of questions of the seller. Call it a treat to myself.
Updated with some photos just now, 16:00 4th July
Above, as it arrived, a bit grubb
And below, after a good clean up
Finally I went to collect it – social distanced collecting methods in use and no stopping en route. Its outside is a bit grubby, but its working and has all its accessories down to the lint brush and set of screwdrivers. Its obviously well used, it was owned by a dressmaker before, but I would guess not used for several years. However, its got service labels and having all its accessories indicates to me that it was well cared for and valued. It came in a drop down table, which was perfect as wanted one in a table, but not a massive cabinet.So far I’ve opened it up and cleaned its insides, removed as much old gummy oil – or as I can reach – and given it a thorough oil with light sewing machine oil. The double direction pattern dial was gummed up, and this gentle cleaning and oiling helped to loosen it up so that I could (very carefully) encourage it to move, and now it works freely. Its fascinating to see how the selection mechanism works, not that I am an expert at mechanics, but I can see the little paddle moving and the rise and fall of the selector post (probably the wrong name). I am itching to try out all those amazing built in patterns. I can’t right now as you will see in the next paragraph.The original clam-shell foot pedal is with it, and it did work – sporadically. After a while there was a nasty smell (reminded me of when my Bernina 1030 went into melt down, and when my Brother 950i knitting machine and very, very vintage Kenwood Chef did the same) and the machine would not stop running. Luckily the plug was close to me, so I whipped it out to the socket before any damage was done.My clever son opened the pedal and told me I should have cleaned that out (didn’t even think of it, sorry), and then he replaced a blown capacitor – he is pretty nifty at this and has a stock of electrical bits. The pedal now works – but the connection from the pedal lead to that ‘banana’ plug is dodgy. In addition some of the old plastic has broken away inside the pedal and the plug has a chunk missing which worries me. I’m not confident around electricity having had a few experiences that unnerved me, (see above). He offered to repair the lead and plug (he thought Sugru) and will in time, but I decided to order a replacement so that I could use the machine until then. I will compare them to find which gives the best speed control as some reports say new ones are not as sensitive.The motor seems OK, and my son will clean it at some point. So far the machine has displayed a lovely straight stitch – equal if not better than my Bernina 1030, and far better than the Jones 125.I did hanker after a Singer 411g or 431g but I think the 401g will satisfy me. It was only the chain stitch of these I wanted, but reading about it it sounds to require lot of fiddling to get it right and so that do you leave the machine set up just for that? Seems a waste to me, so I’ve let that wish go for the moment. I also think I remember that my Janome Coverstitch machine will do chain stitch, so maybe that is something to explore. I’m not even sure why I want chain stitch – I’m just a machine nerd (maybe?).Want this space for more chats about the Singer 401g that has joined my machine stable. Its going to be sewing frontline masks once the new pedal arrives.
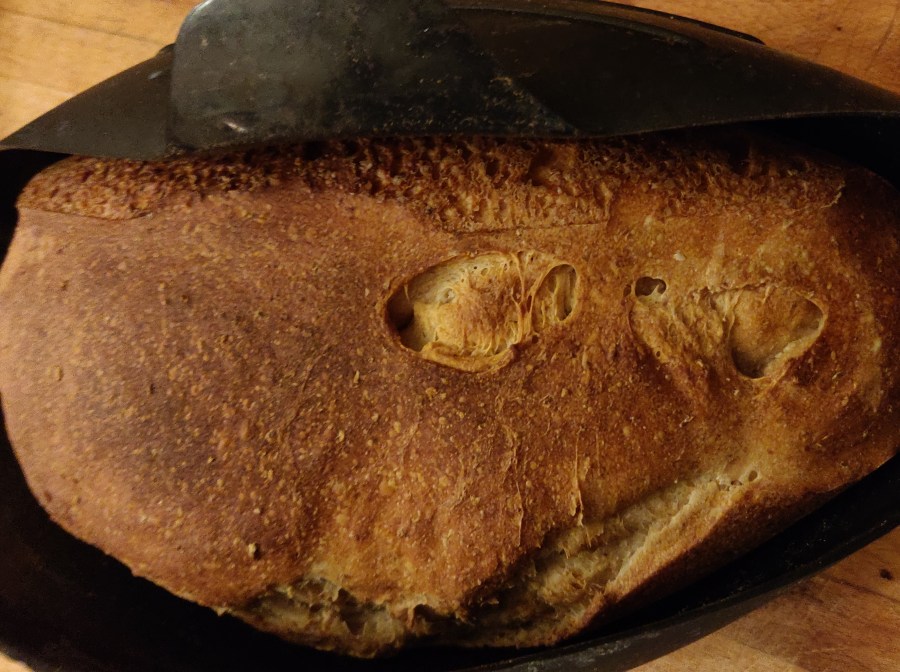
The sourdough starter I made from raisin yeast liquid is still going strong. I started the yeast off at the start of lockdown, so mid March-ish and then made the starter in April.I keep the starter in a large clip-top Kilner jar and have not cleaned it out yet; it smells wonderful when you open it. Many loaves later it is bubbling away madly still. The raisin yeast liquid is now in the fridge and has been used twice to add some zing to the starter. I refresh it with sugar and warm water and a day or two on the worktop as a reward.I make bread about every 5-6 days and keep the starter in the fridge in between times. I’ve also (somewhat unsuccessfully) made apple sourdough cake. It was a bit stodgy, but tasty.Over the weeks I have established a couple of methods that are pretty foolproof for me. One is long, slow and satisfying one is fast, easy and satisfying.Long and slow:I take the starter out of the fridge in the morning, and feed it with 50g plain flour and 50g warm water and leave it on the work top for an hour or so – or until I remember, and this can be 3pm sometimes. 30 minutes before I want to knead the bread I mix 400g of white bread flour (or 100g whole meal and 300g white) with 180g water. This can is lumpy and not pretty, but is called ‘autolysing’ the dough, and I find it helps with the process.Covering the bowl with a damp tea towel prevents crusty flour forming.When its time to knead, I give the starter a light stir and tip 200g into the bowl of flour and water and mix it all together. Feed the starter again and pop it back in the fridge for next timeI hand knead it on a floured worktop for 10-15 minutes which is incredibly therapeutic for arthritic hands, and also for edgy tempers. After about 10 minutes I sprinkle 10g of salt on the dough and knead that in. If there is a lot of wholemeal flour in the dough I might also add a 1/2 tsp of vitamin C powder to help it rise.Once its smooth and soft I return the dough to the (floured) bowl, and cover it with a wet cloth and a plastic shower cap, then put it on the worktop (or somewhere warm if the weather is chilly), and forget about it for hours on end.Sometime later, in today’s case 8pm, I knocked back the dough, shaped it into two loaves and popped them into the Lekue bread moulds I use. The wet cloth and shower cap go back over the loaves and I tonight I ended up baking the bread at 10:30pm. On other nights I might put the shaped loaves in the fridge (wet cloth and shower cap in place), and cook the loaves the next morning.Quite fast and easy:Feed the starter, leave it for an hour to bubble up. Put 400g bread flour, or a combination as described above, into a Kenwood chef, (or similar mixer), add 180 g warm water and pour in 200g of starter.Feed starter again and return to fridge.Mix with the dough hook for 10 minutes, adding 10g salt half way through. Remove the hook and put the bowl (covered with wet cloth and shower cap) somewhere warm to rise. Once doubled in size, knock back and shape, leave to rise again for 30-40 minutes and then bake. I use the Lekue moulds for this as well – always covering with wet cloth and shower cap as before.Easy- Peasyusing a bread machine:Feed the starter, leave it for an hour to bubble up. Put 400g bread flour, or a combination as described above, into a bread machine pan, add 180 g warm water and pour in 200g of starter. Set machine to the longest dough programme (this is wholemeal on my Panasonic machine). Add 10g salt towards the end of the first knead (I set a timer to remind me otherwise I forget and have to reset the machine for an extra knead to incorporate this).Feed starter again and return to fridge.Once the machine finishes the dough programme, tip out the dough and shape, leave to rise again for 30-40 minutes and then bake, or put the shaped loaves in the fridge overnight and bake in the morning. I use the Lekue moulds for these loaves as well – always covering with wet cloth and shower cap as before.The Lekue silicone loaf moulds are great, they hold the shape of the loaf well, making a nice rustic looking loaf, and keep the dough moist during risking and baking.I’ve even made this loaf with only one rise and shaping into the moulds with an overnight rise, not quite as light bread, but very edible.
I organised an online face-mask-making workshop yesterday, and the links below are to the instructions and pattern for the mask we made. You can read more about making different types of masks on my DIY mask making page. If you just want to get stuck in, please use the links below to download the pattern and instructions and make cotton face masks for your family and to donate to key workers. The pattern has an opening to allow a filter to be inserted.
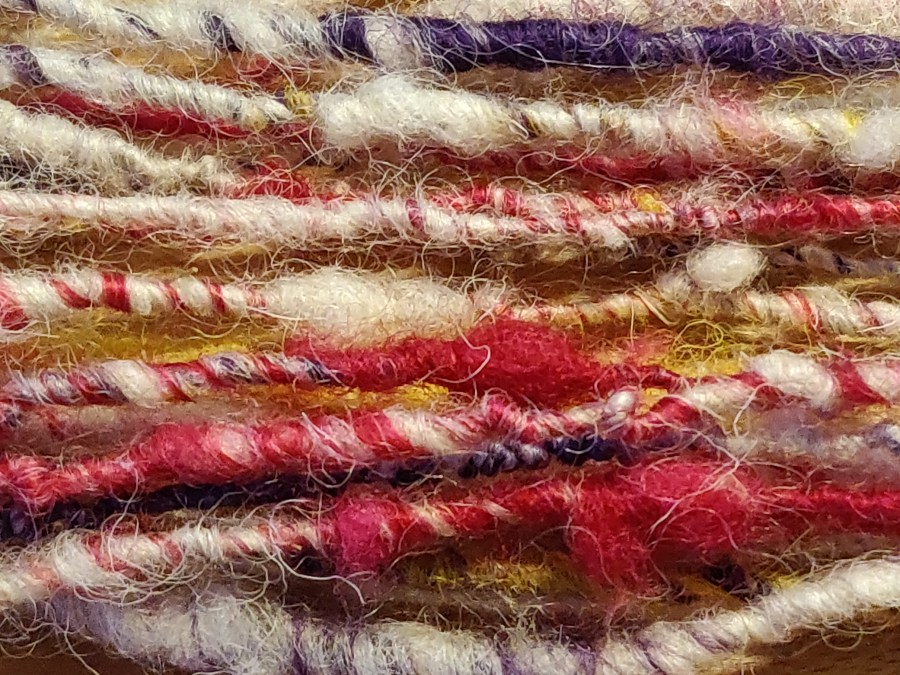
Last night I blended some rather lumpy Southdown fleece I was trying to use up with some dyed Shetland. It was just for fun – no plan involved, just testing out my DIY blending board. When I sat at my wheel – watching ‘Hidden’, I couldn’t think what to do with it. Then I remembered seeing Lexi Boeger’s method of coreless- core-spinning in her book ‘Hand Spun’. I thought the strong colours would work well against the natural if spun in this way, so I had a go.
According to Lexi the principle is to only work with a small amount of fibre at a time, and to spread the fibres wide into a trianglular web. You spin the core with the fibres at one edge of the triangle, whilst simultaneously holding the other part of the web at right angles to this so that it can wrap around the core between your drafting hand and the orifice. Its bit like patting your head and rubbing you tummy at the same time – but once I got going I enjoyed it. There were a few messy bits, which I attribute to the lumpy Southdown myself!
I love the way the colours wrap around the natural core
I’m not sure its truly core spinning, but its on the way there and I do like the effect. The yarn was very over-twisted, but after a good soak in hot water and hanging with a light weight to dry naturally it is fine now.
Due to the virus situation the workshops have been closed at the University where I work, and we are ‘remote teaching’ from now on. That is quite a challenge for a practical subject like knitted textiles.
One thing I have enjoyed over the years of teaching first year knit design students is their excitement and enthusiasm when they realise that they can make their own yarns. Normally I would be running a hand spinning workshop for them next week, but obviously not anymore. We have two spinning wheels and I take in a box of drop spindles. Cartons of fibre are pulled out of cupboards and spill all over the floor, its a lovely day with some wild yarn developments taking place. I think its a great way to encourage them to explore the raw materials of textiles, and also to introduce them to yarn design.
But sadly this year its not to be! So I decided that before they left I would demonstrate ‘pencil spinning’ using two commercial yarns. Even this simple method was received with excitement, so I have made two short videos for the students, but have shared them on YouTube for everyone and put them on here as well. Bear in mind they were made for the students, following a demonstration so I refer to this, and the focus is on making small amounts of marl yarn for hand knit design sampling.
They have taken yarns away with them, so I hope to see that they have applied their wonderful creativity to making new and colourful yarns.
A new edition of Knit Step by Step has been published this month. With new content including step-by-step instructions (with lots of lovely photos) of how to work the exciting on-trend chunky ‘arm knitting’. All wrapped in a smart new cover it looks great!
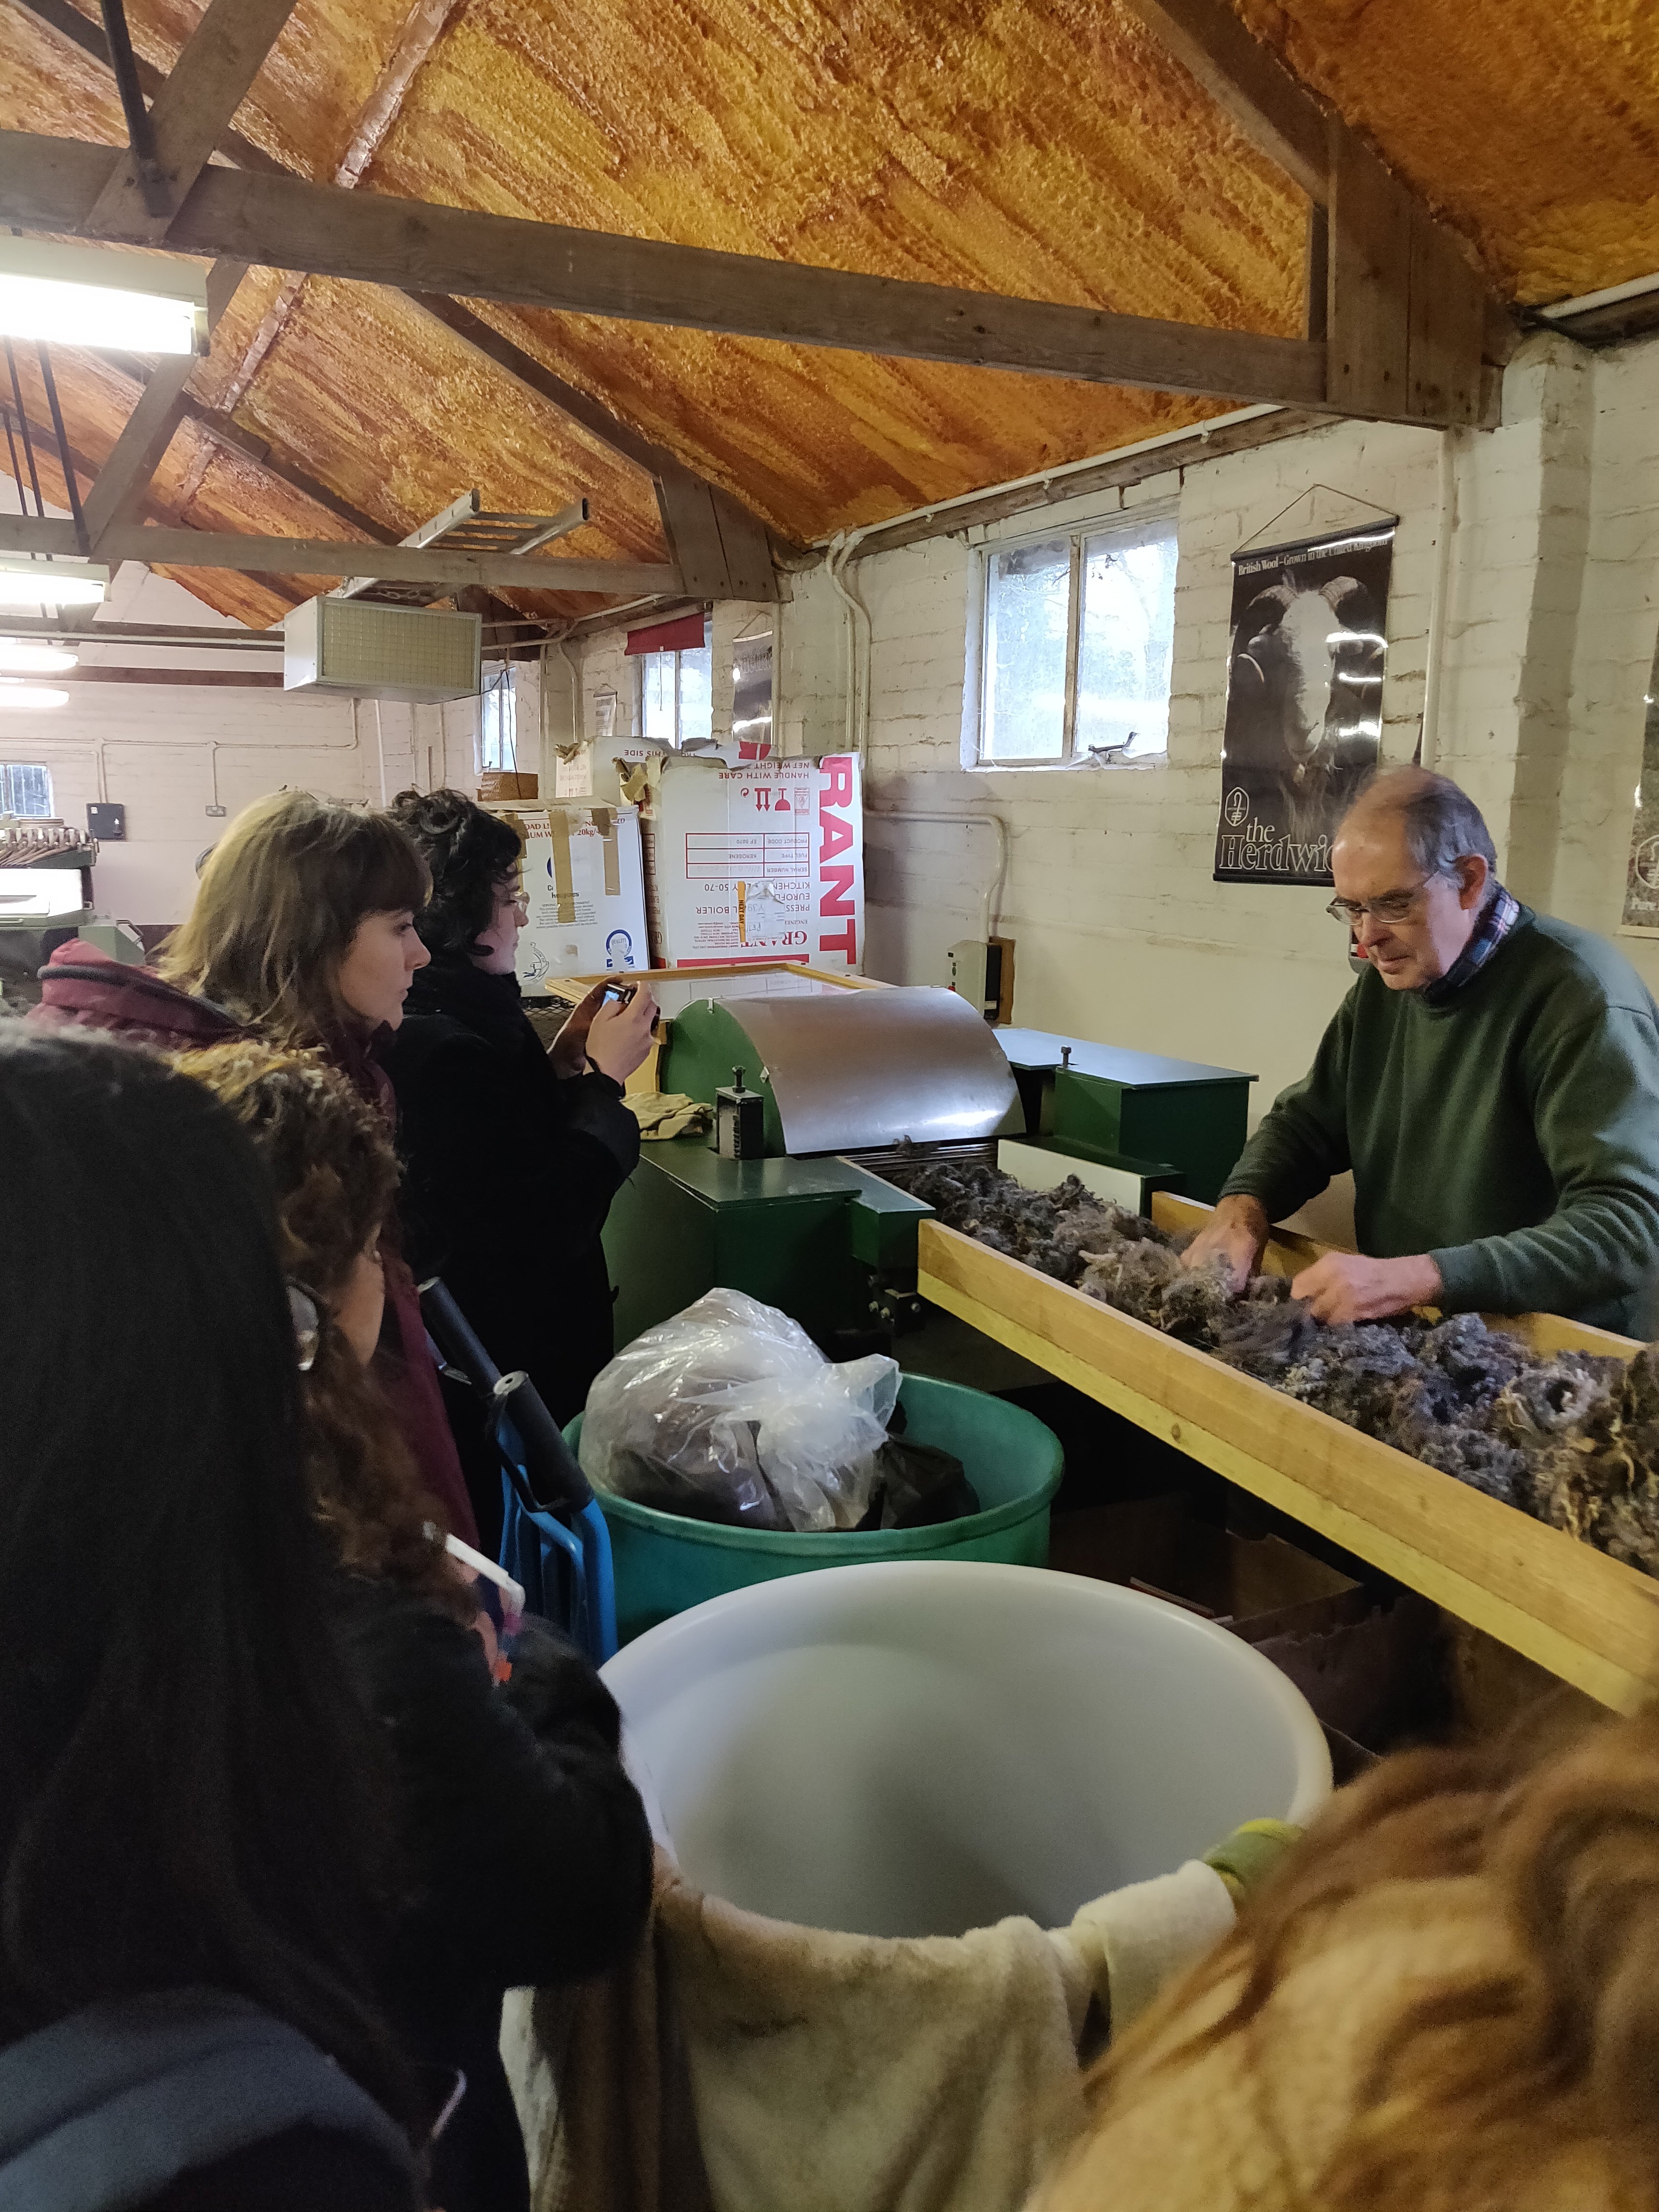
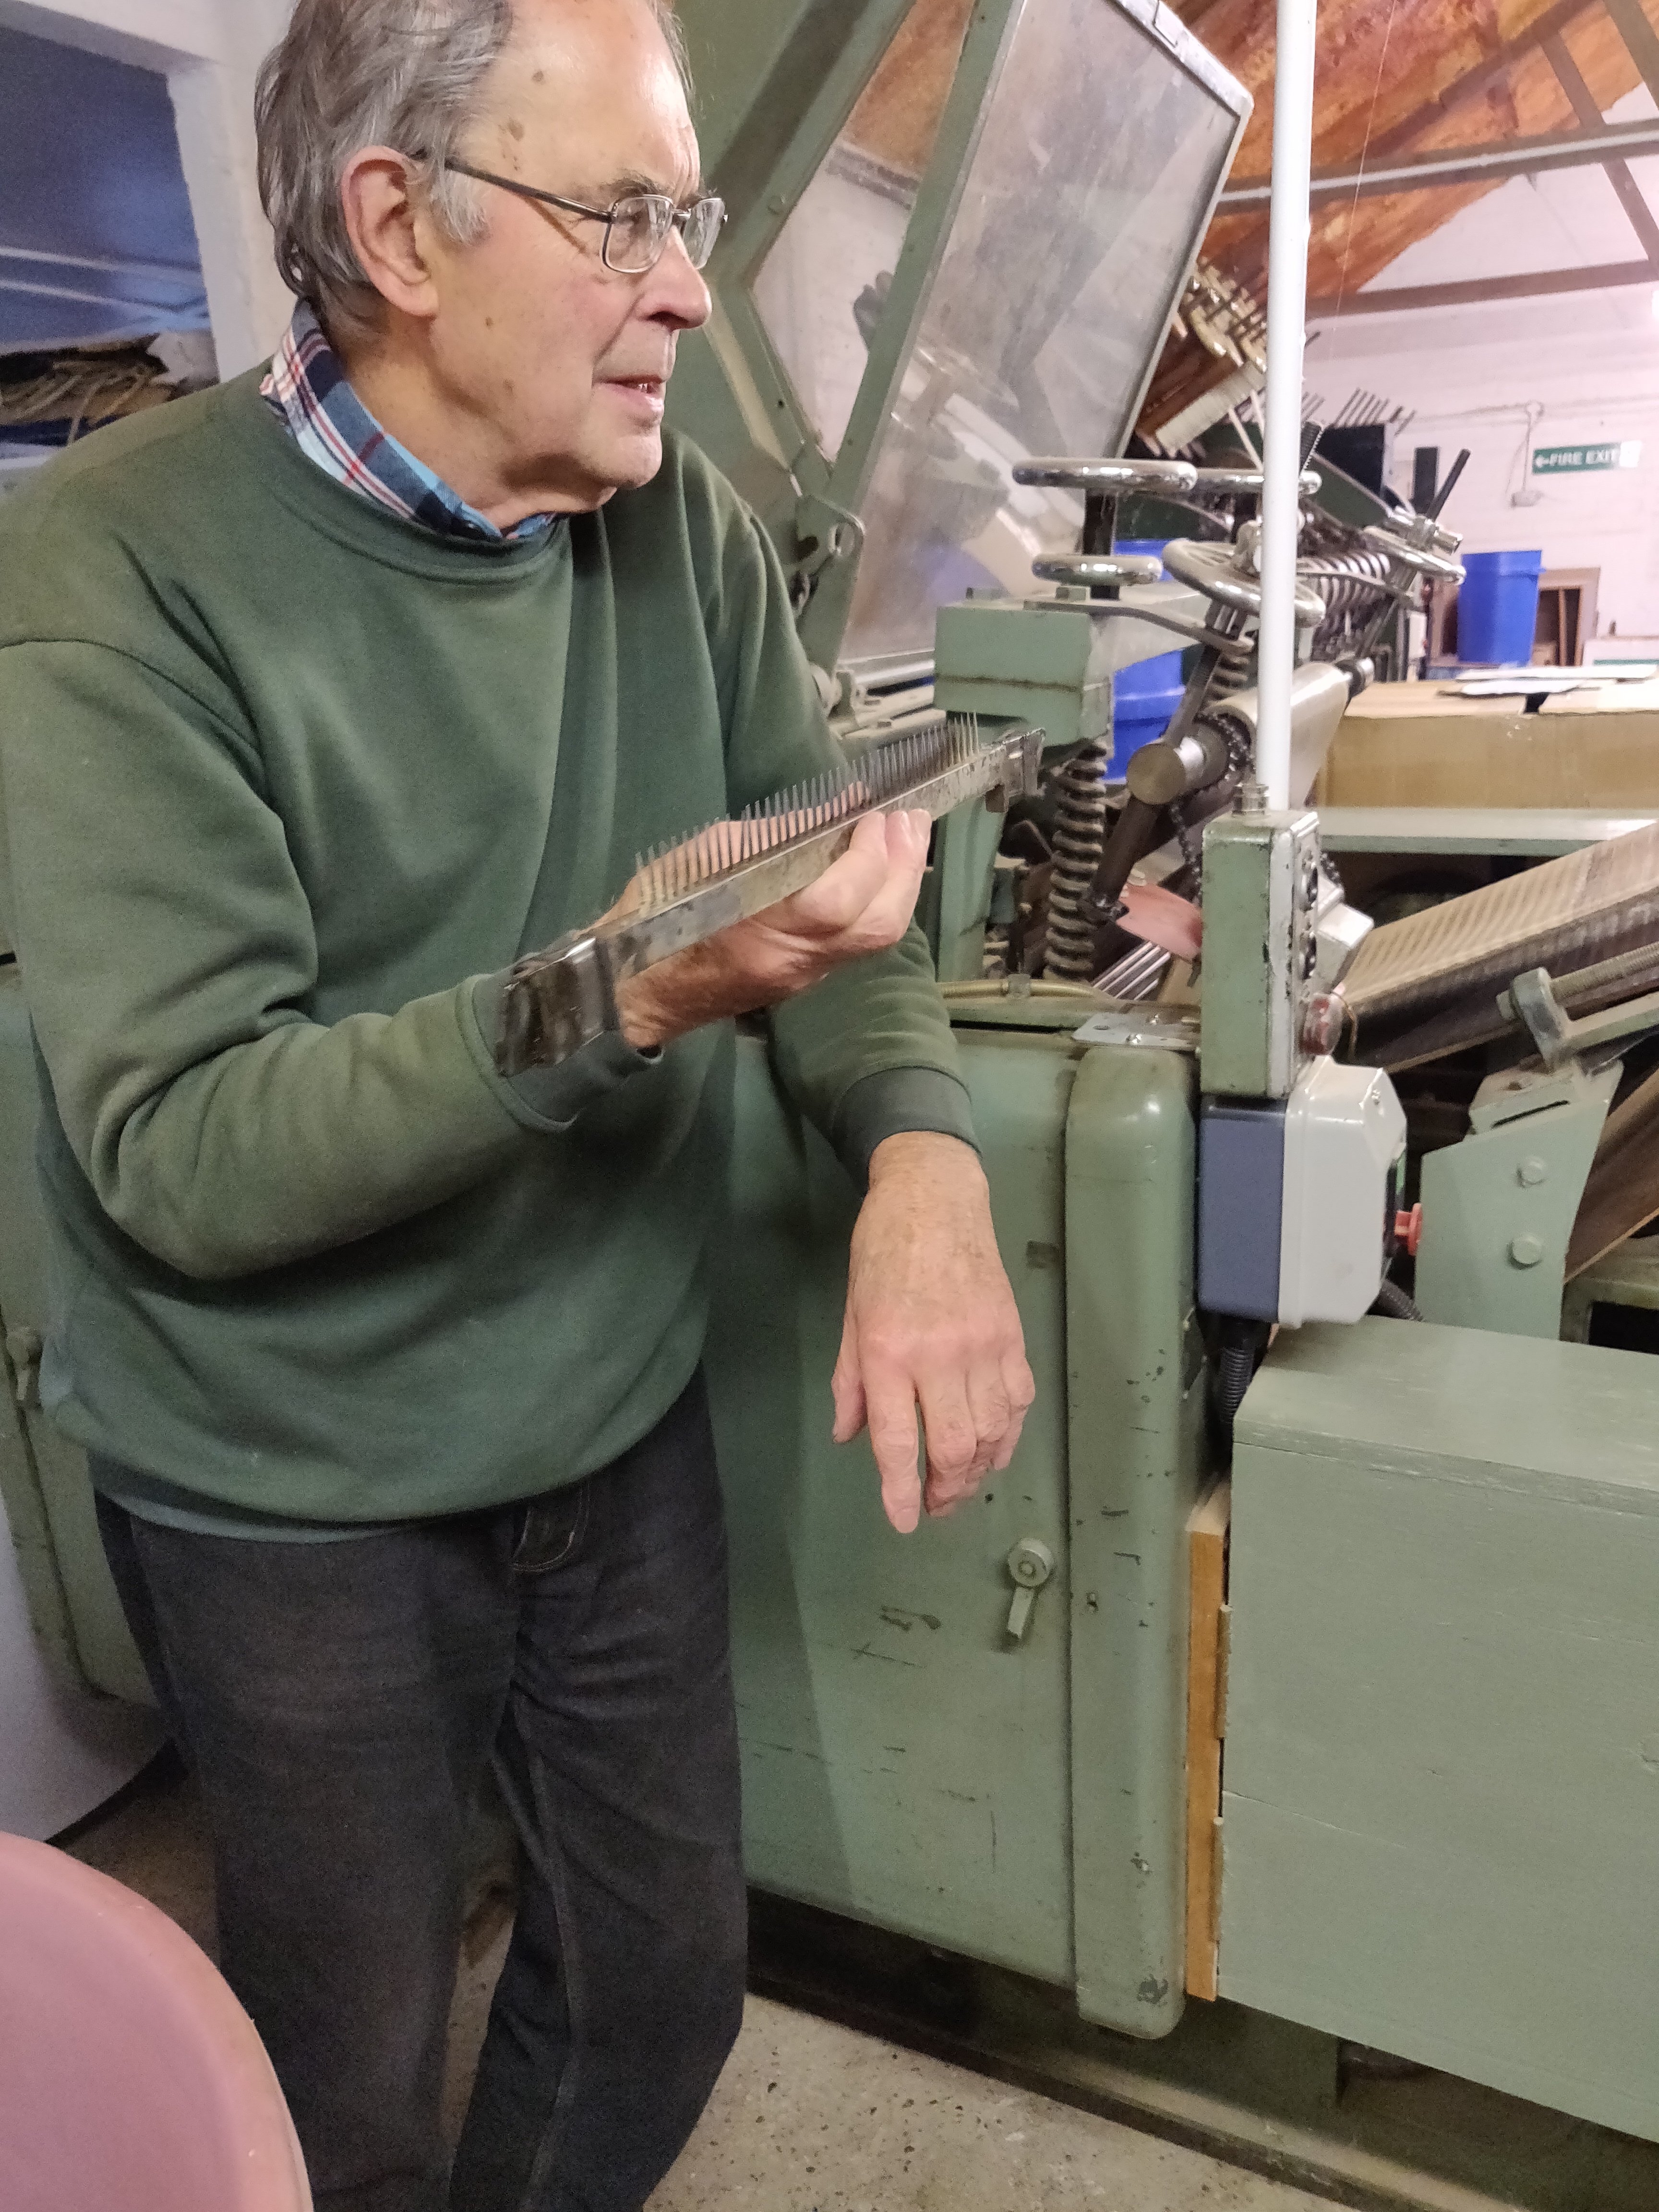
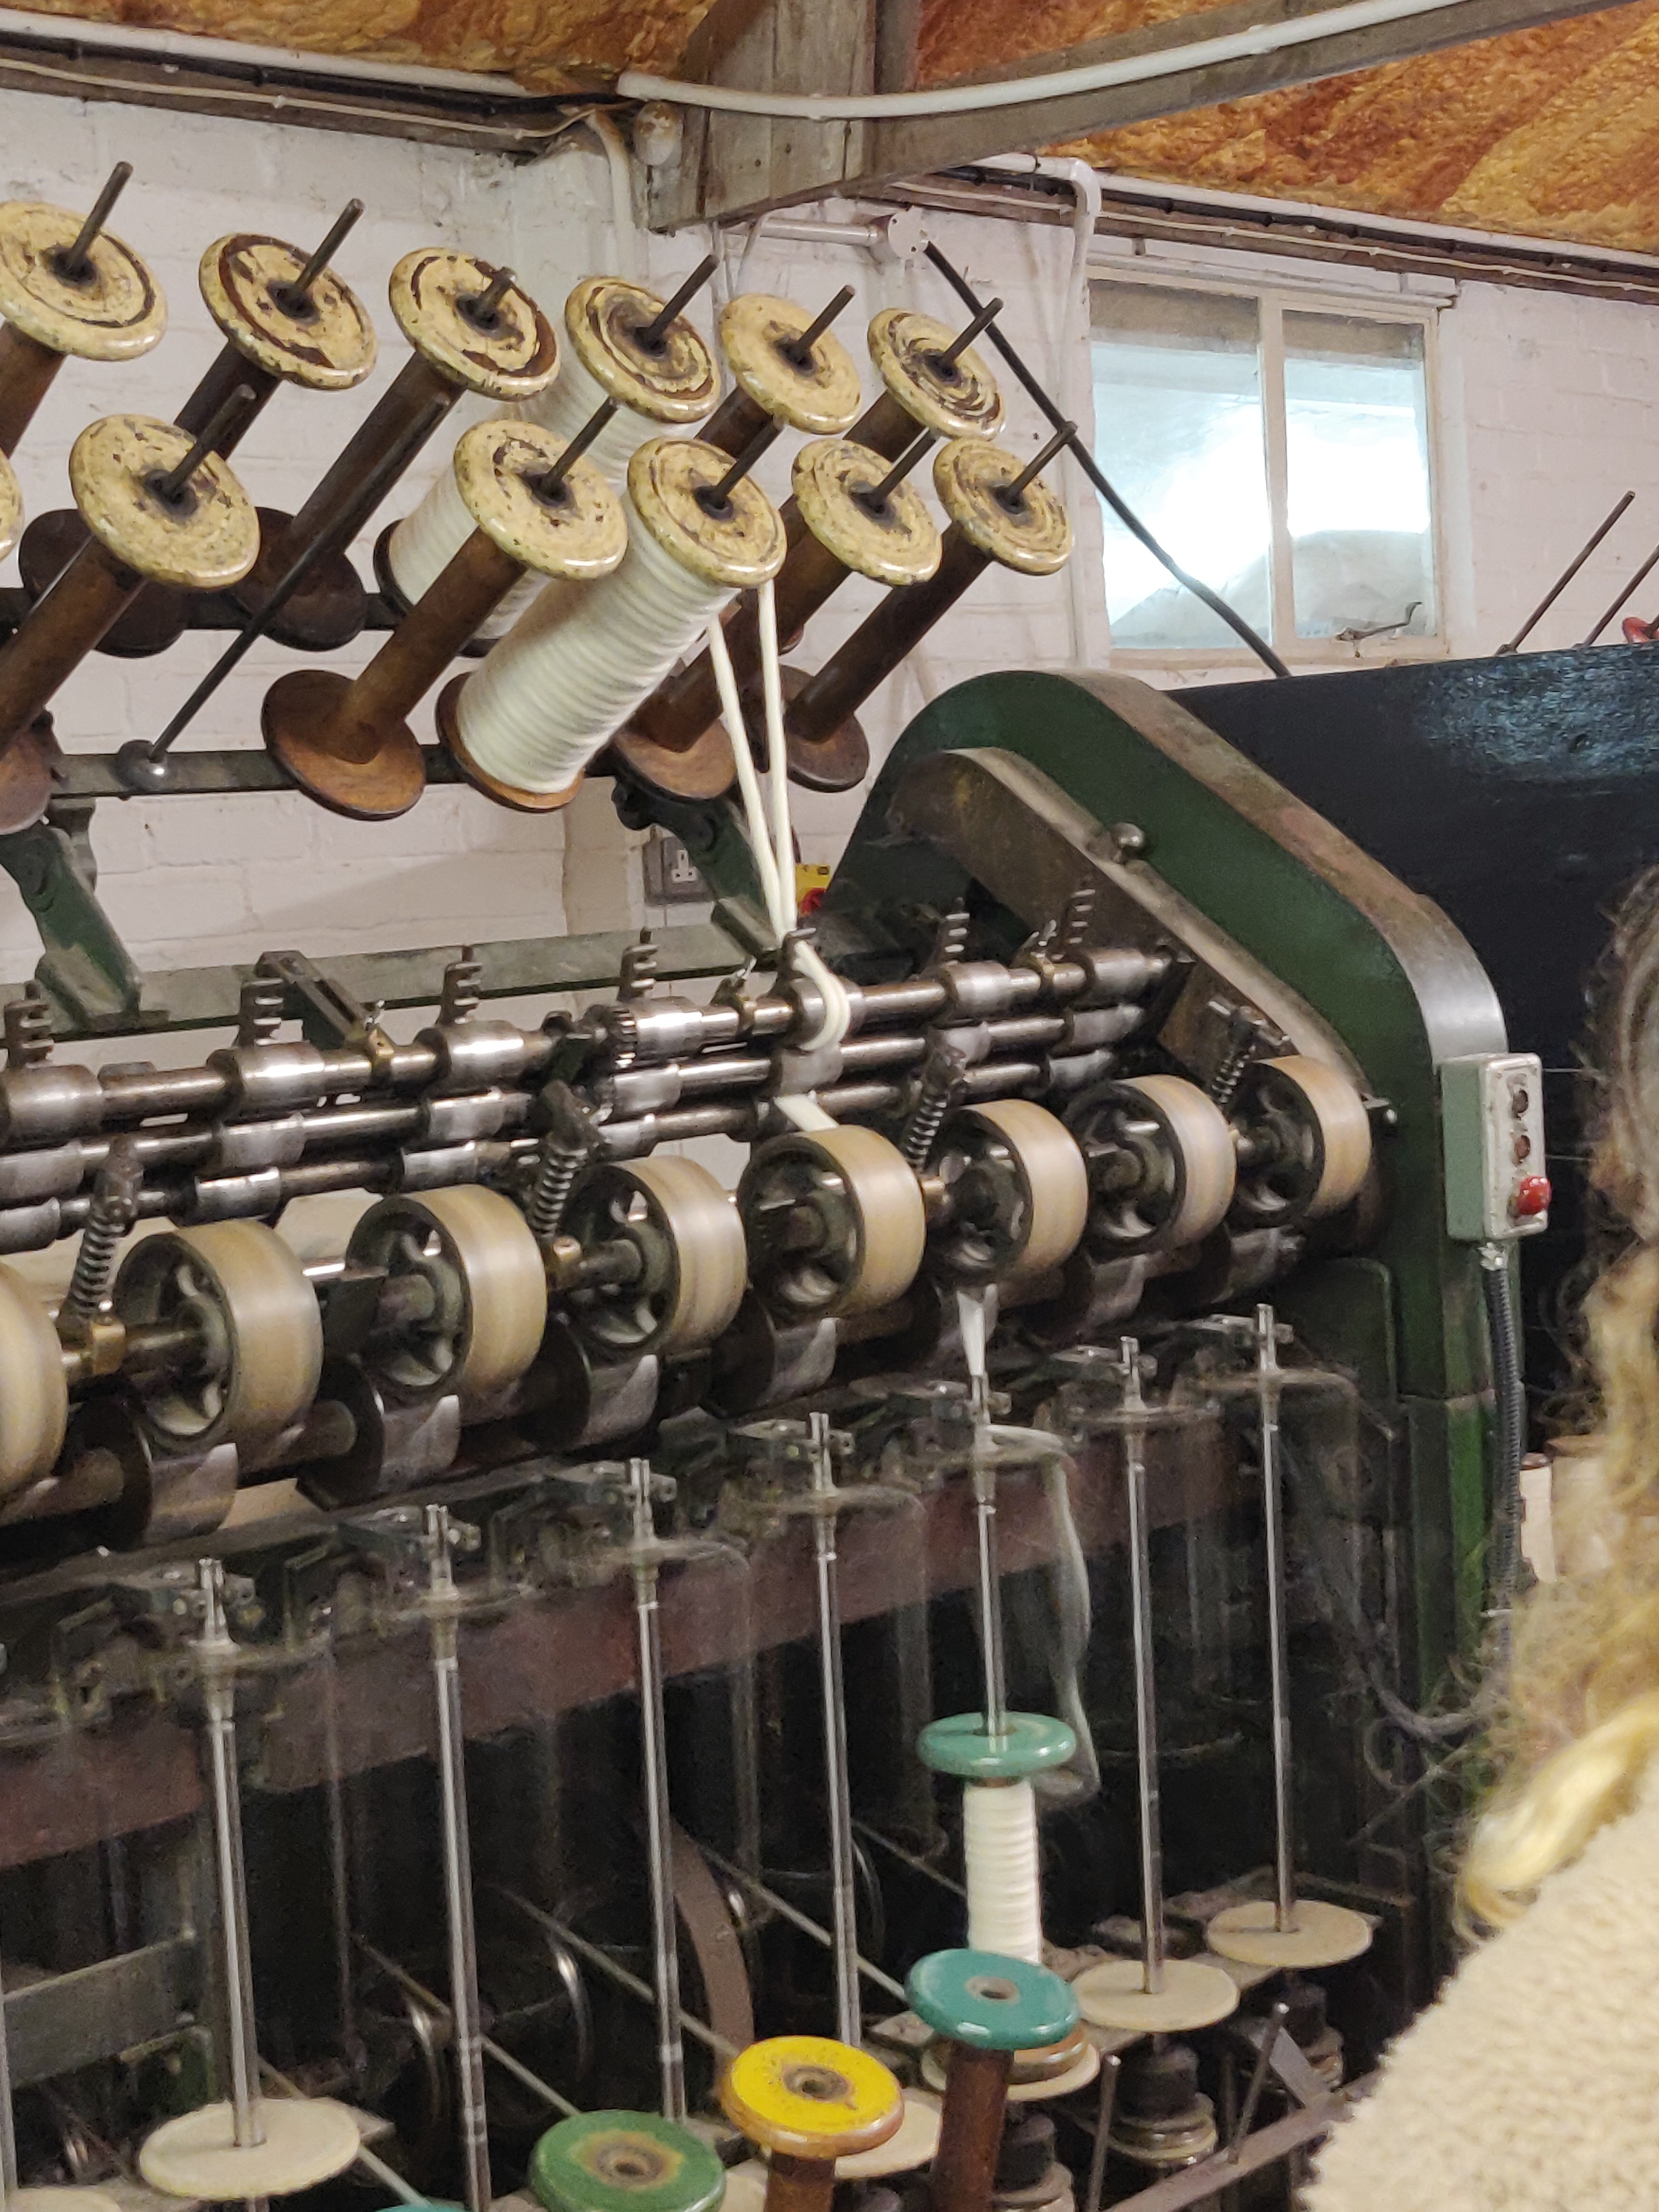
Today I accompanied a group of students on a visit to Diamond Fibres in Horam, Sussex. The company processes wool for worsted spinning, rather than woollen spinning, so concentrates more on longer staple fleece.
Starting in the sorting shed, we were shown round by Roger, the owner, and given a really thorough introduction to the processes involved in changing raw fleece into yarn.
There was a Wensleydale fleece on the picker, which Roger explained had already been washed once at 60 degrees to remove the first lot of dirt and oil and then dried. After picking, which would open up the compressed curls that the first wash had not reached, it would be re-washed and dried before further processing. He reckoned that it may in fact require a third pick and wash.
The students were looking tired just at the thought of this!
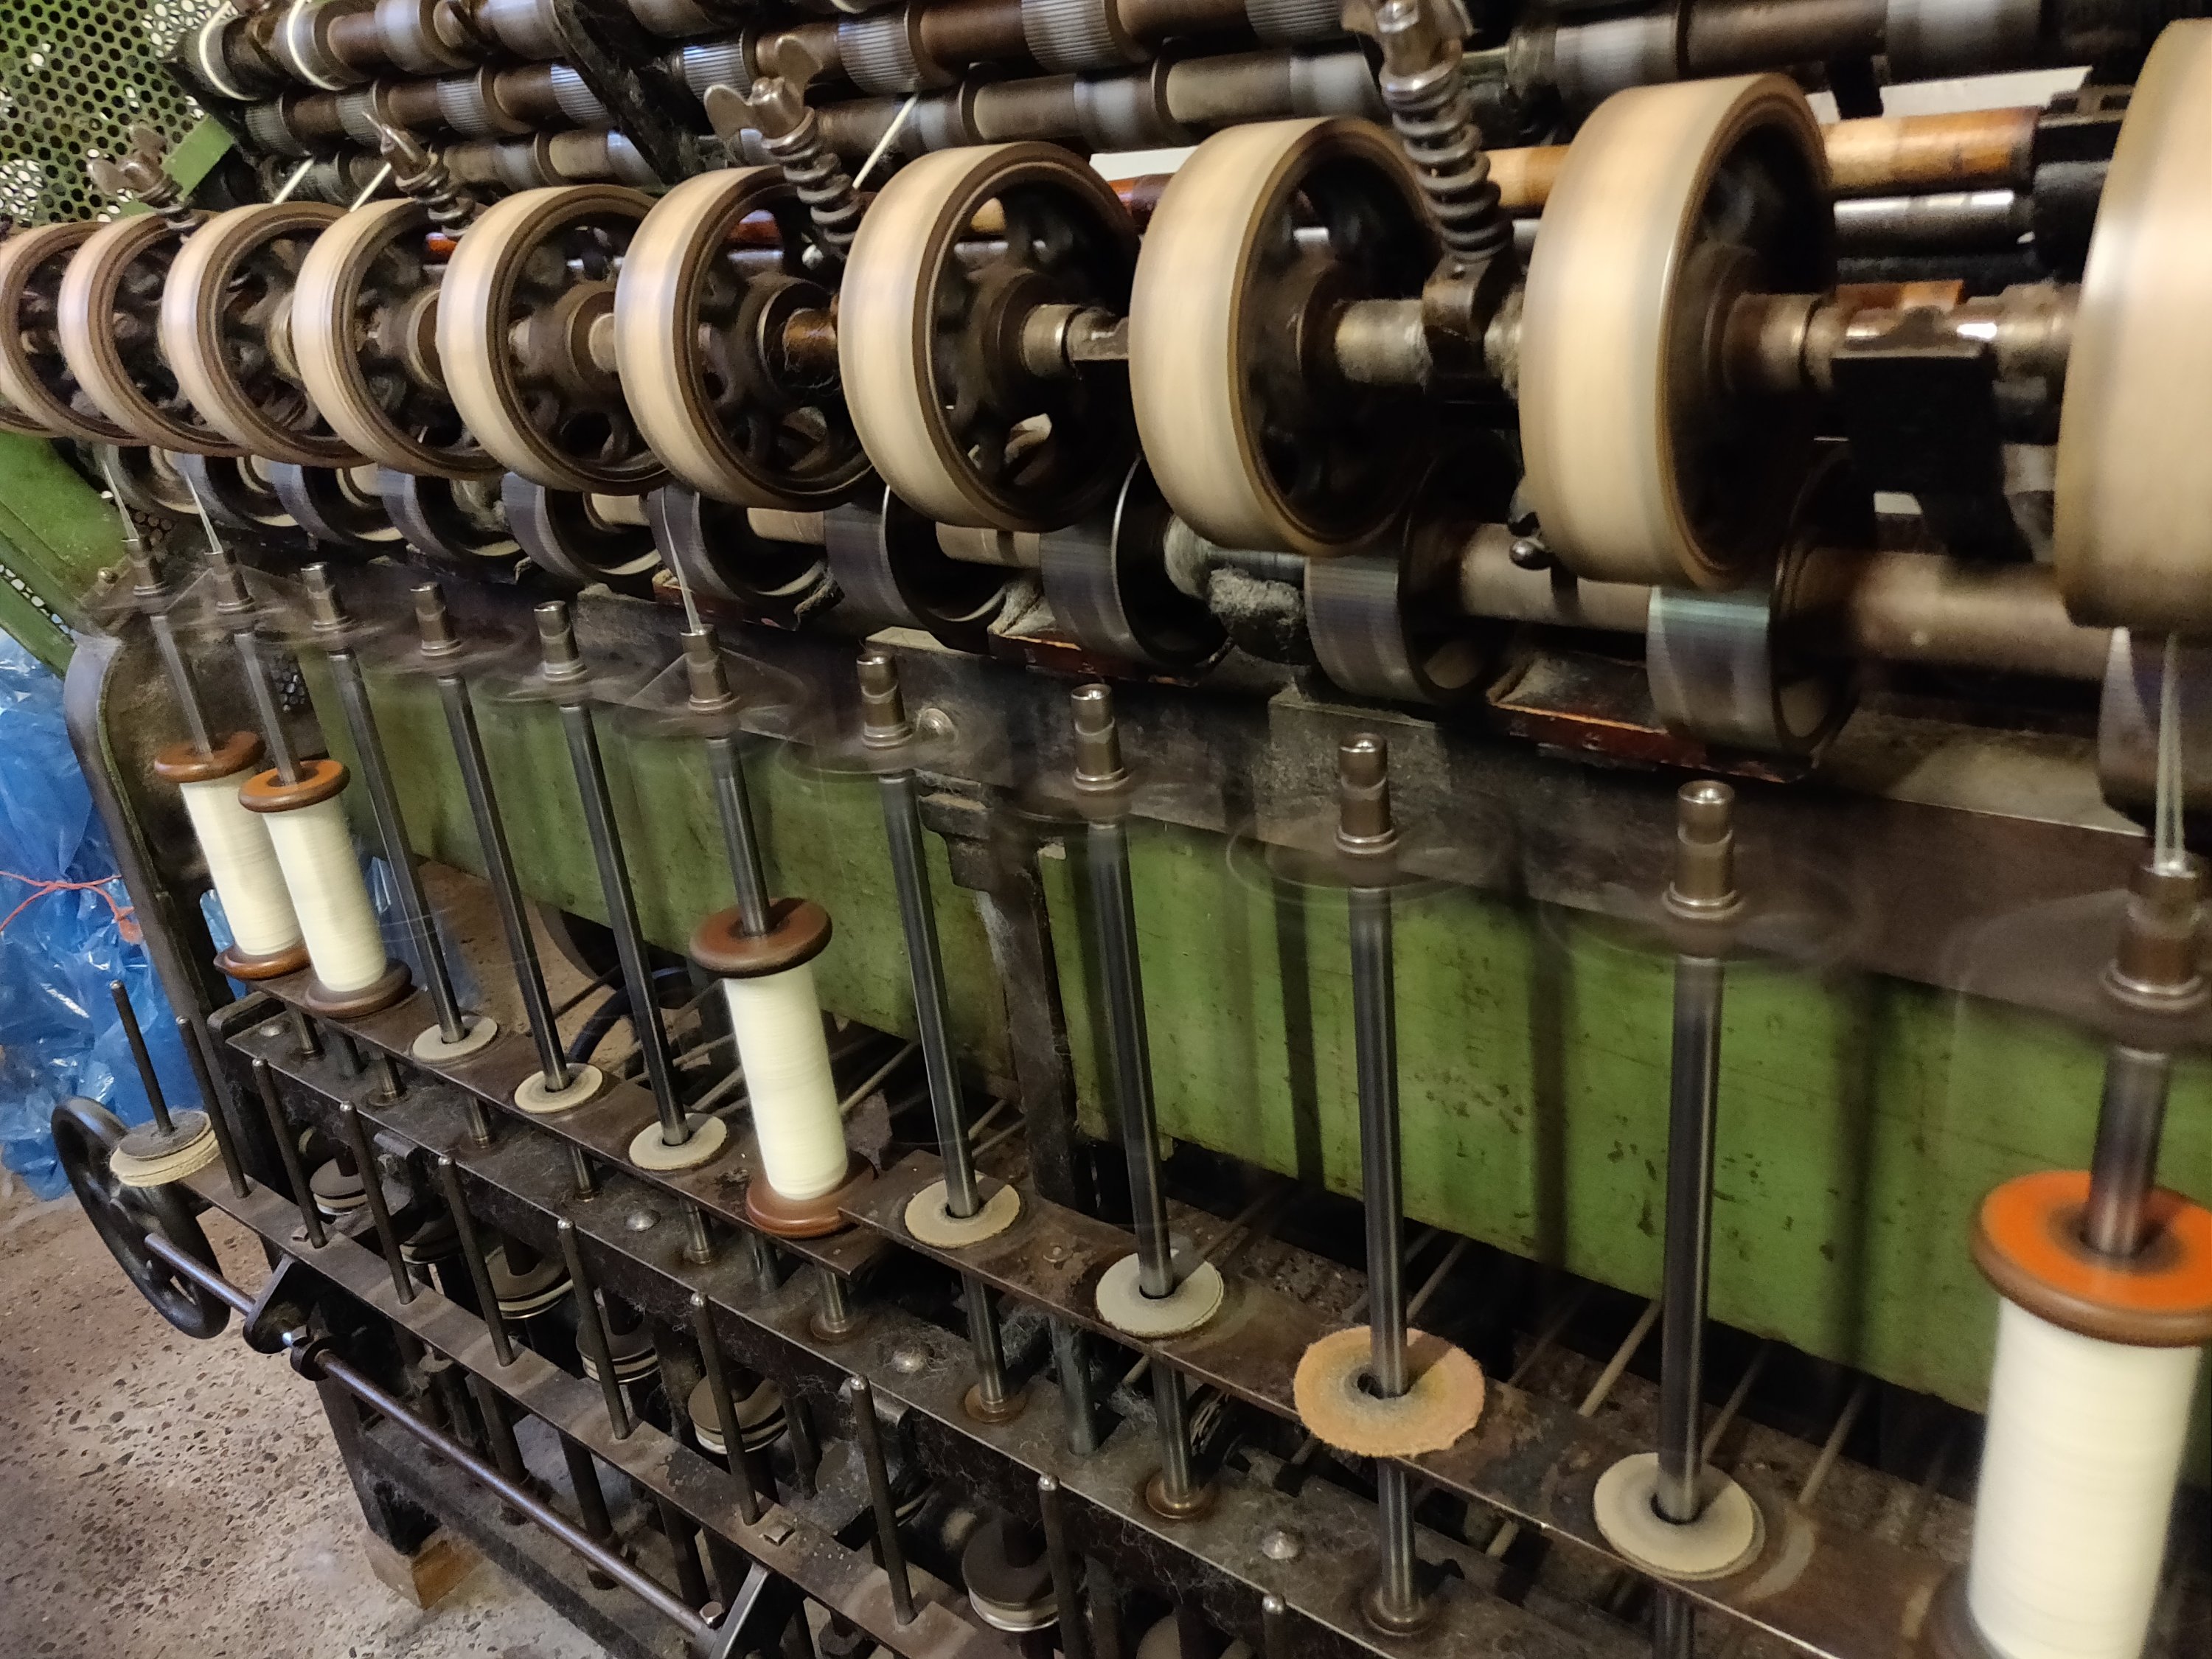
Following picking, the next process is carding the fibres to start aligning them in parallel into a continuous ”sliver’ of fibre. Unlike my meek little hand carder, they have a carding machine with 16 drums of metal, not wire, teeth. At this stage, any short fibres will still be in the sliver, it isn’t until combing that these will be removed.
The sliver begins to look more like something that is spinnable, but there are still thin and thick sections along its length. To eliminate these and even out the sliver it goes through ‘gilling’. Diamond have two of these machines. The first one has wider spaced teeth, and is used at this point, whilst the second is much finer and bulks up and evens out the sliver later on after combing.
When the sliver goes into the gilling machine, two are fed in at once, producing one thicker sliver of uniform thickness.
The fibre will in all likelihood go through a second gilling, during which the output sliver gradually bulks up, according to the machine settings, to achieve the required grams per metre.
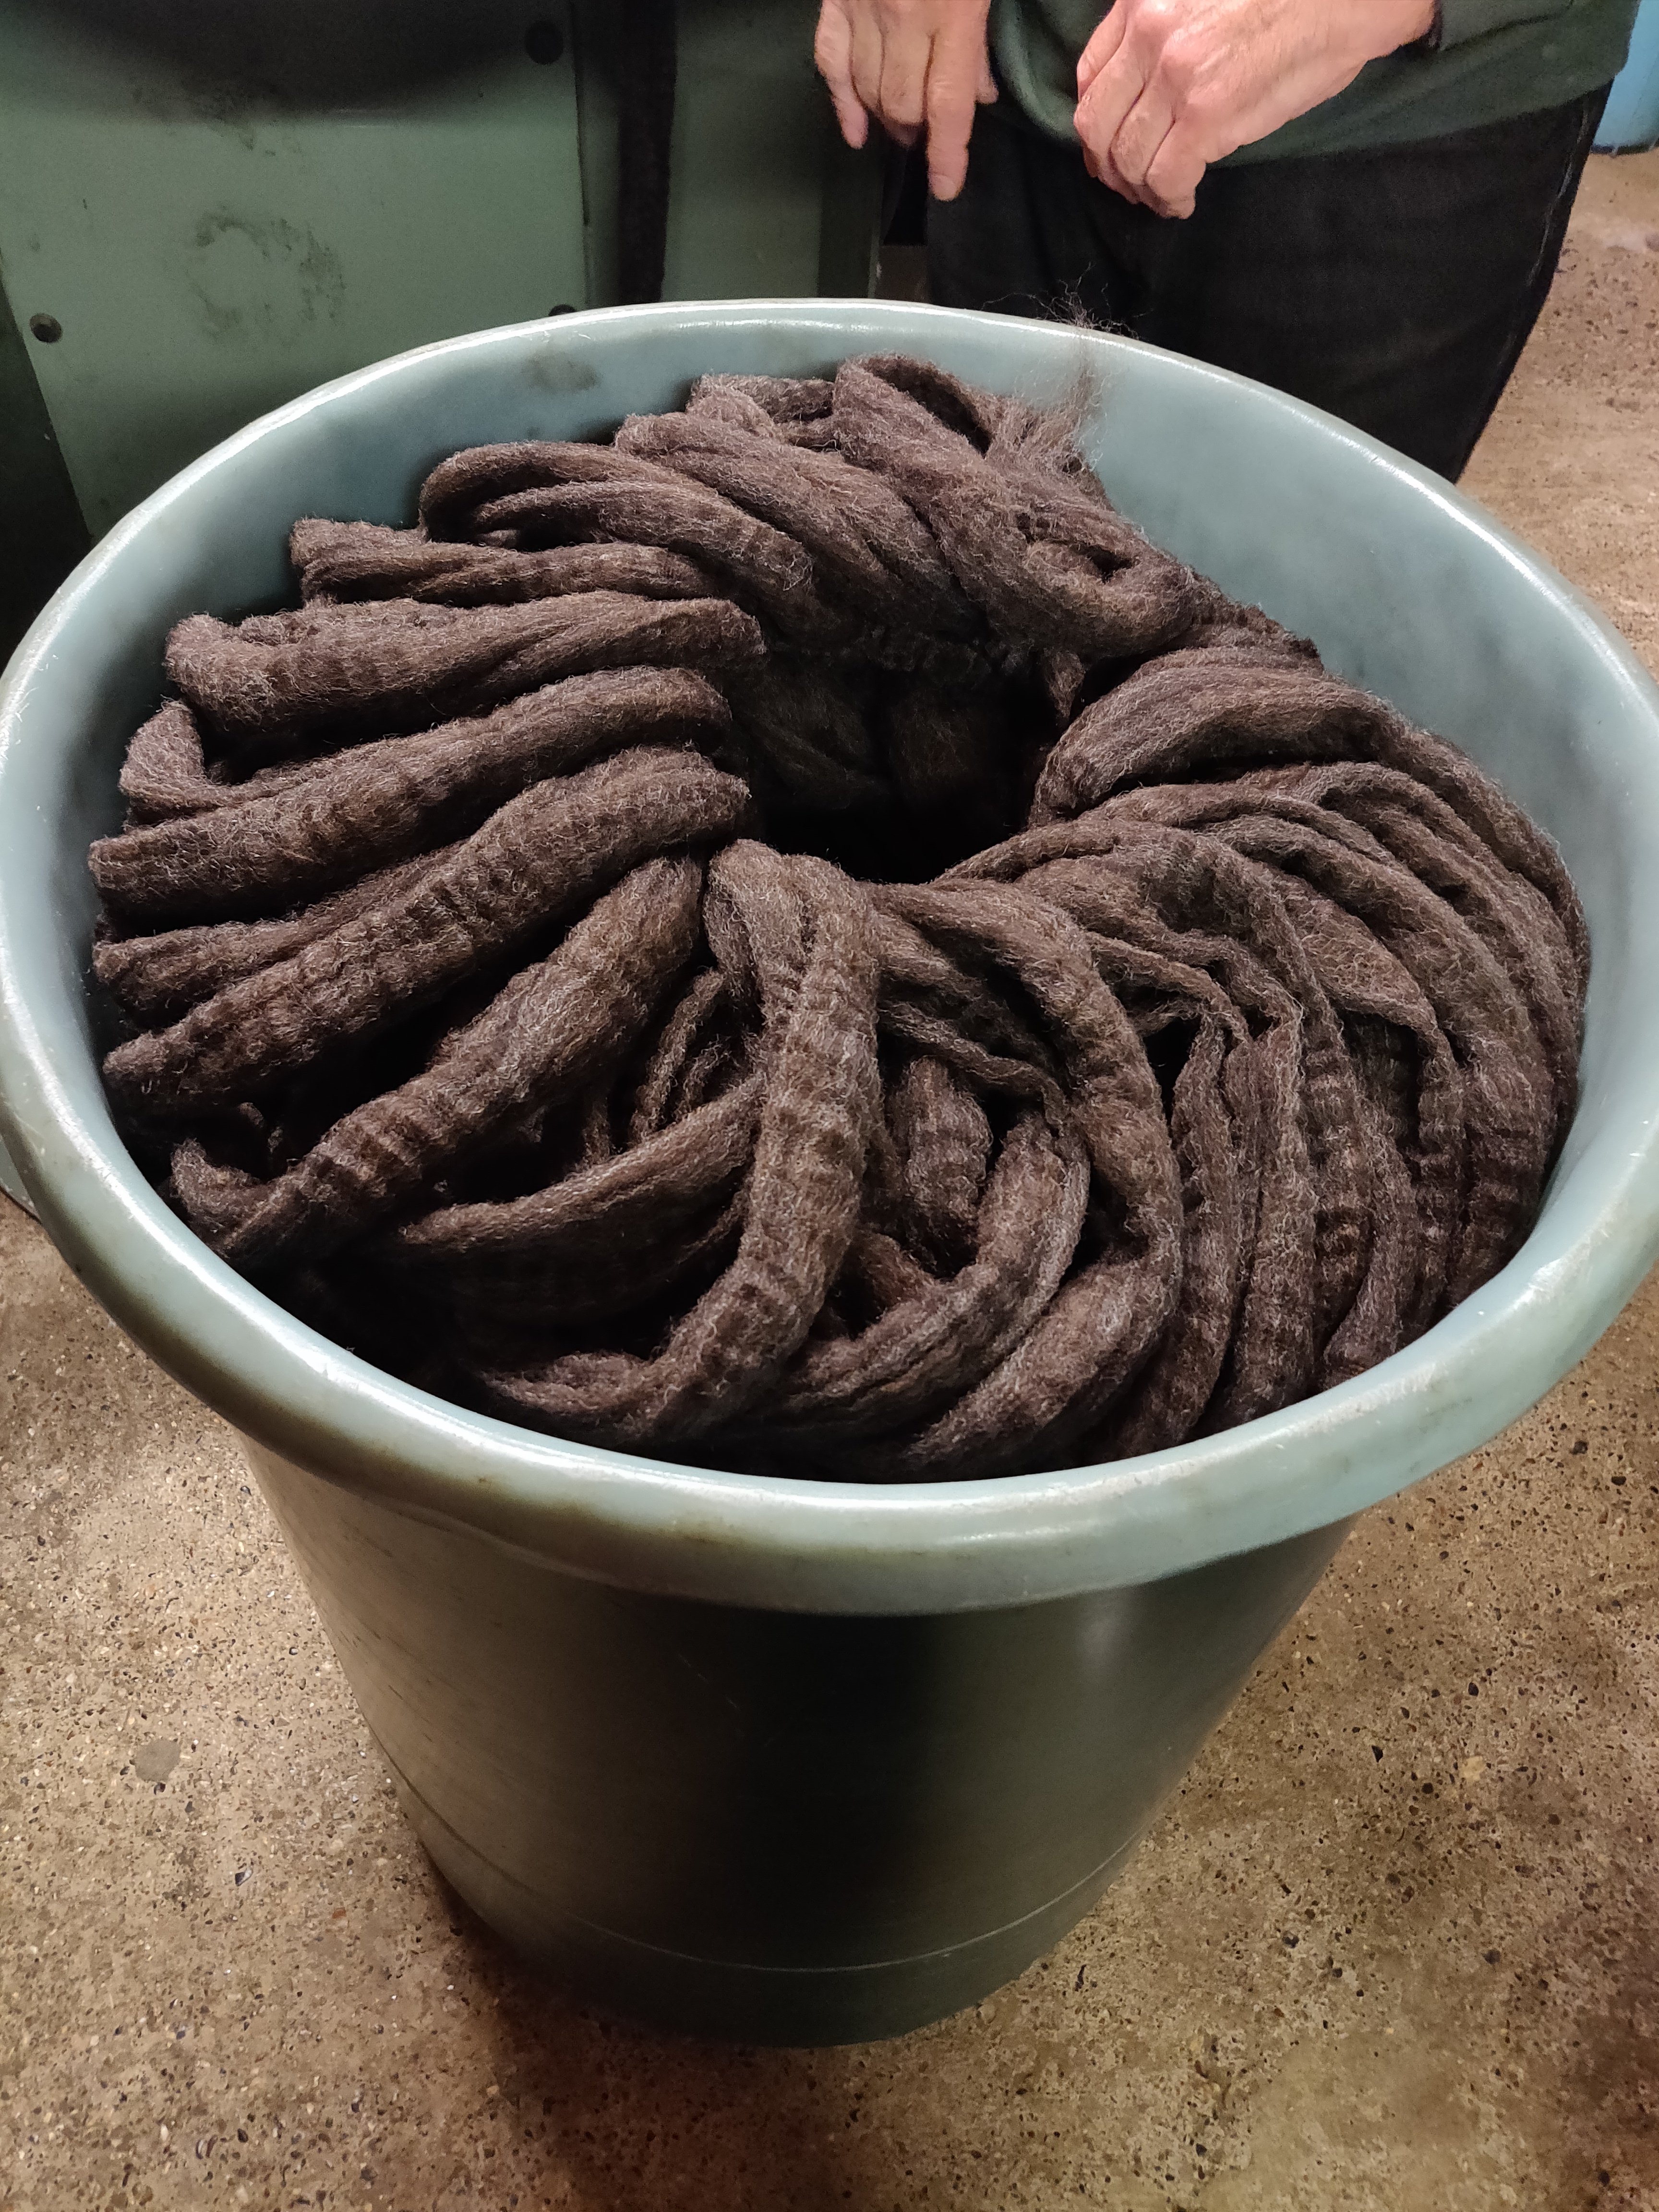
If the requirement is for carded roving for hand spinning, this will be the last process. It may even be stopped earlier on, depending on what condition fibre is required.
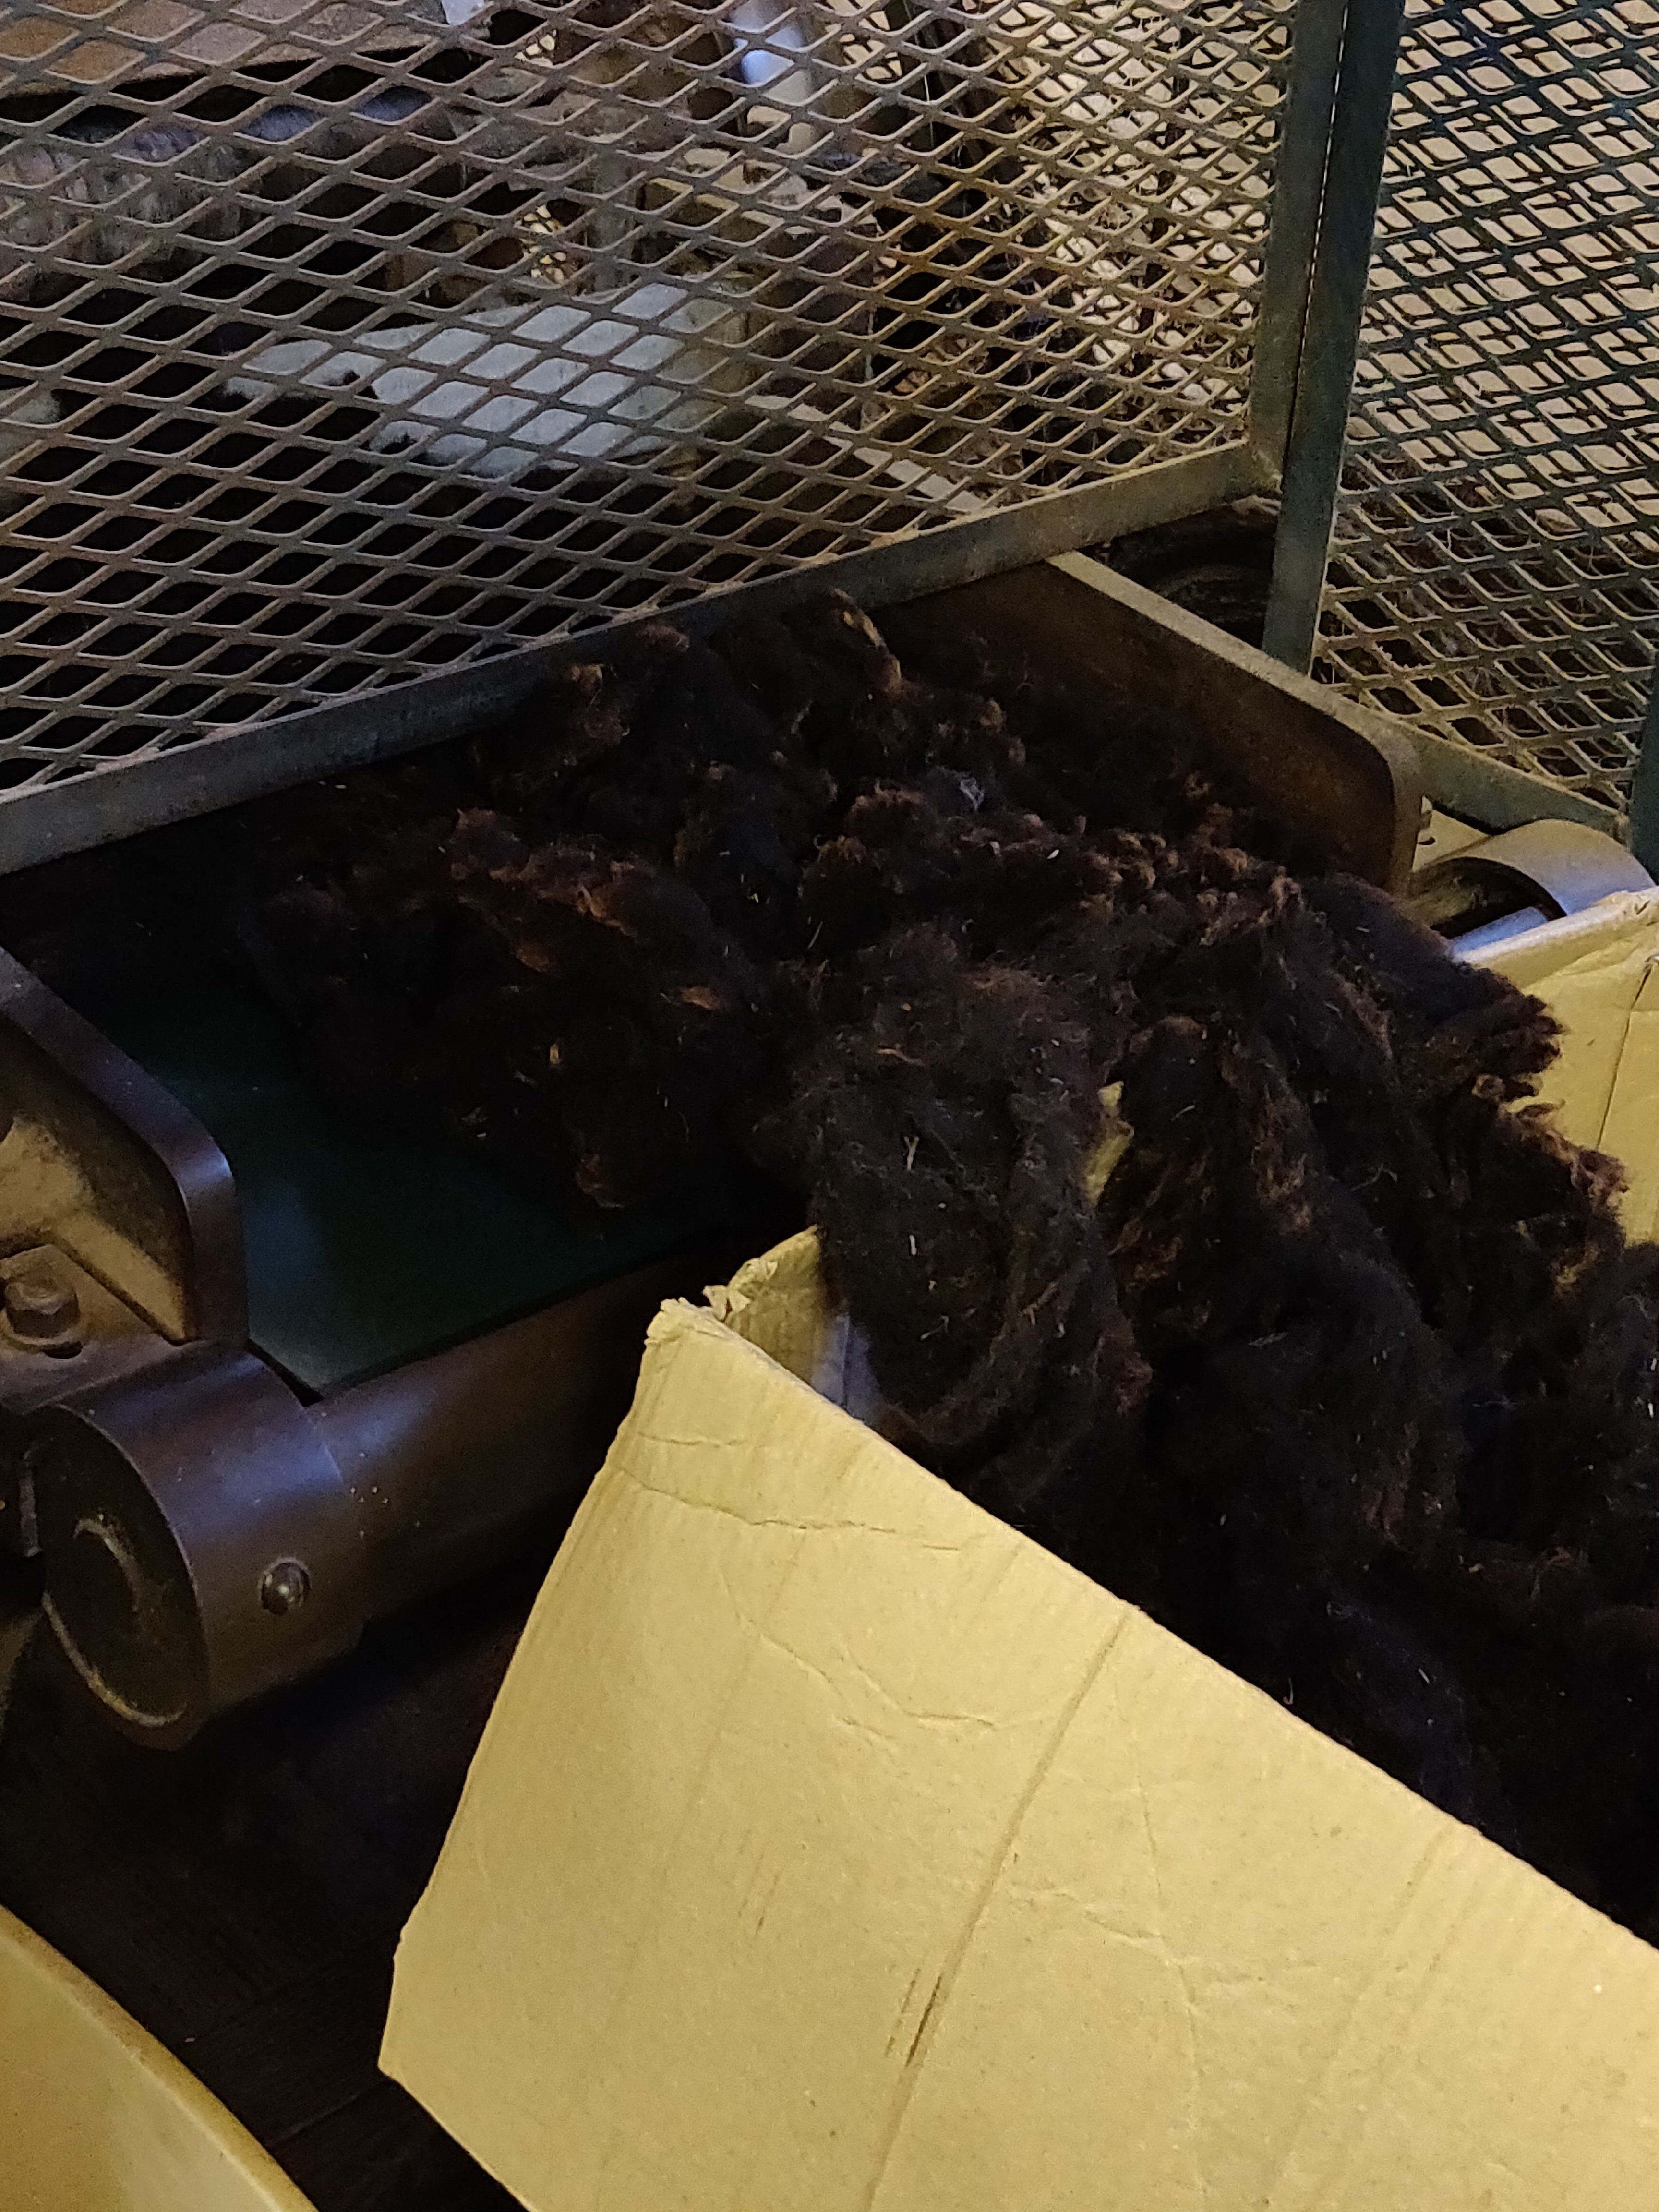
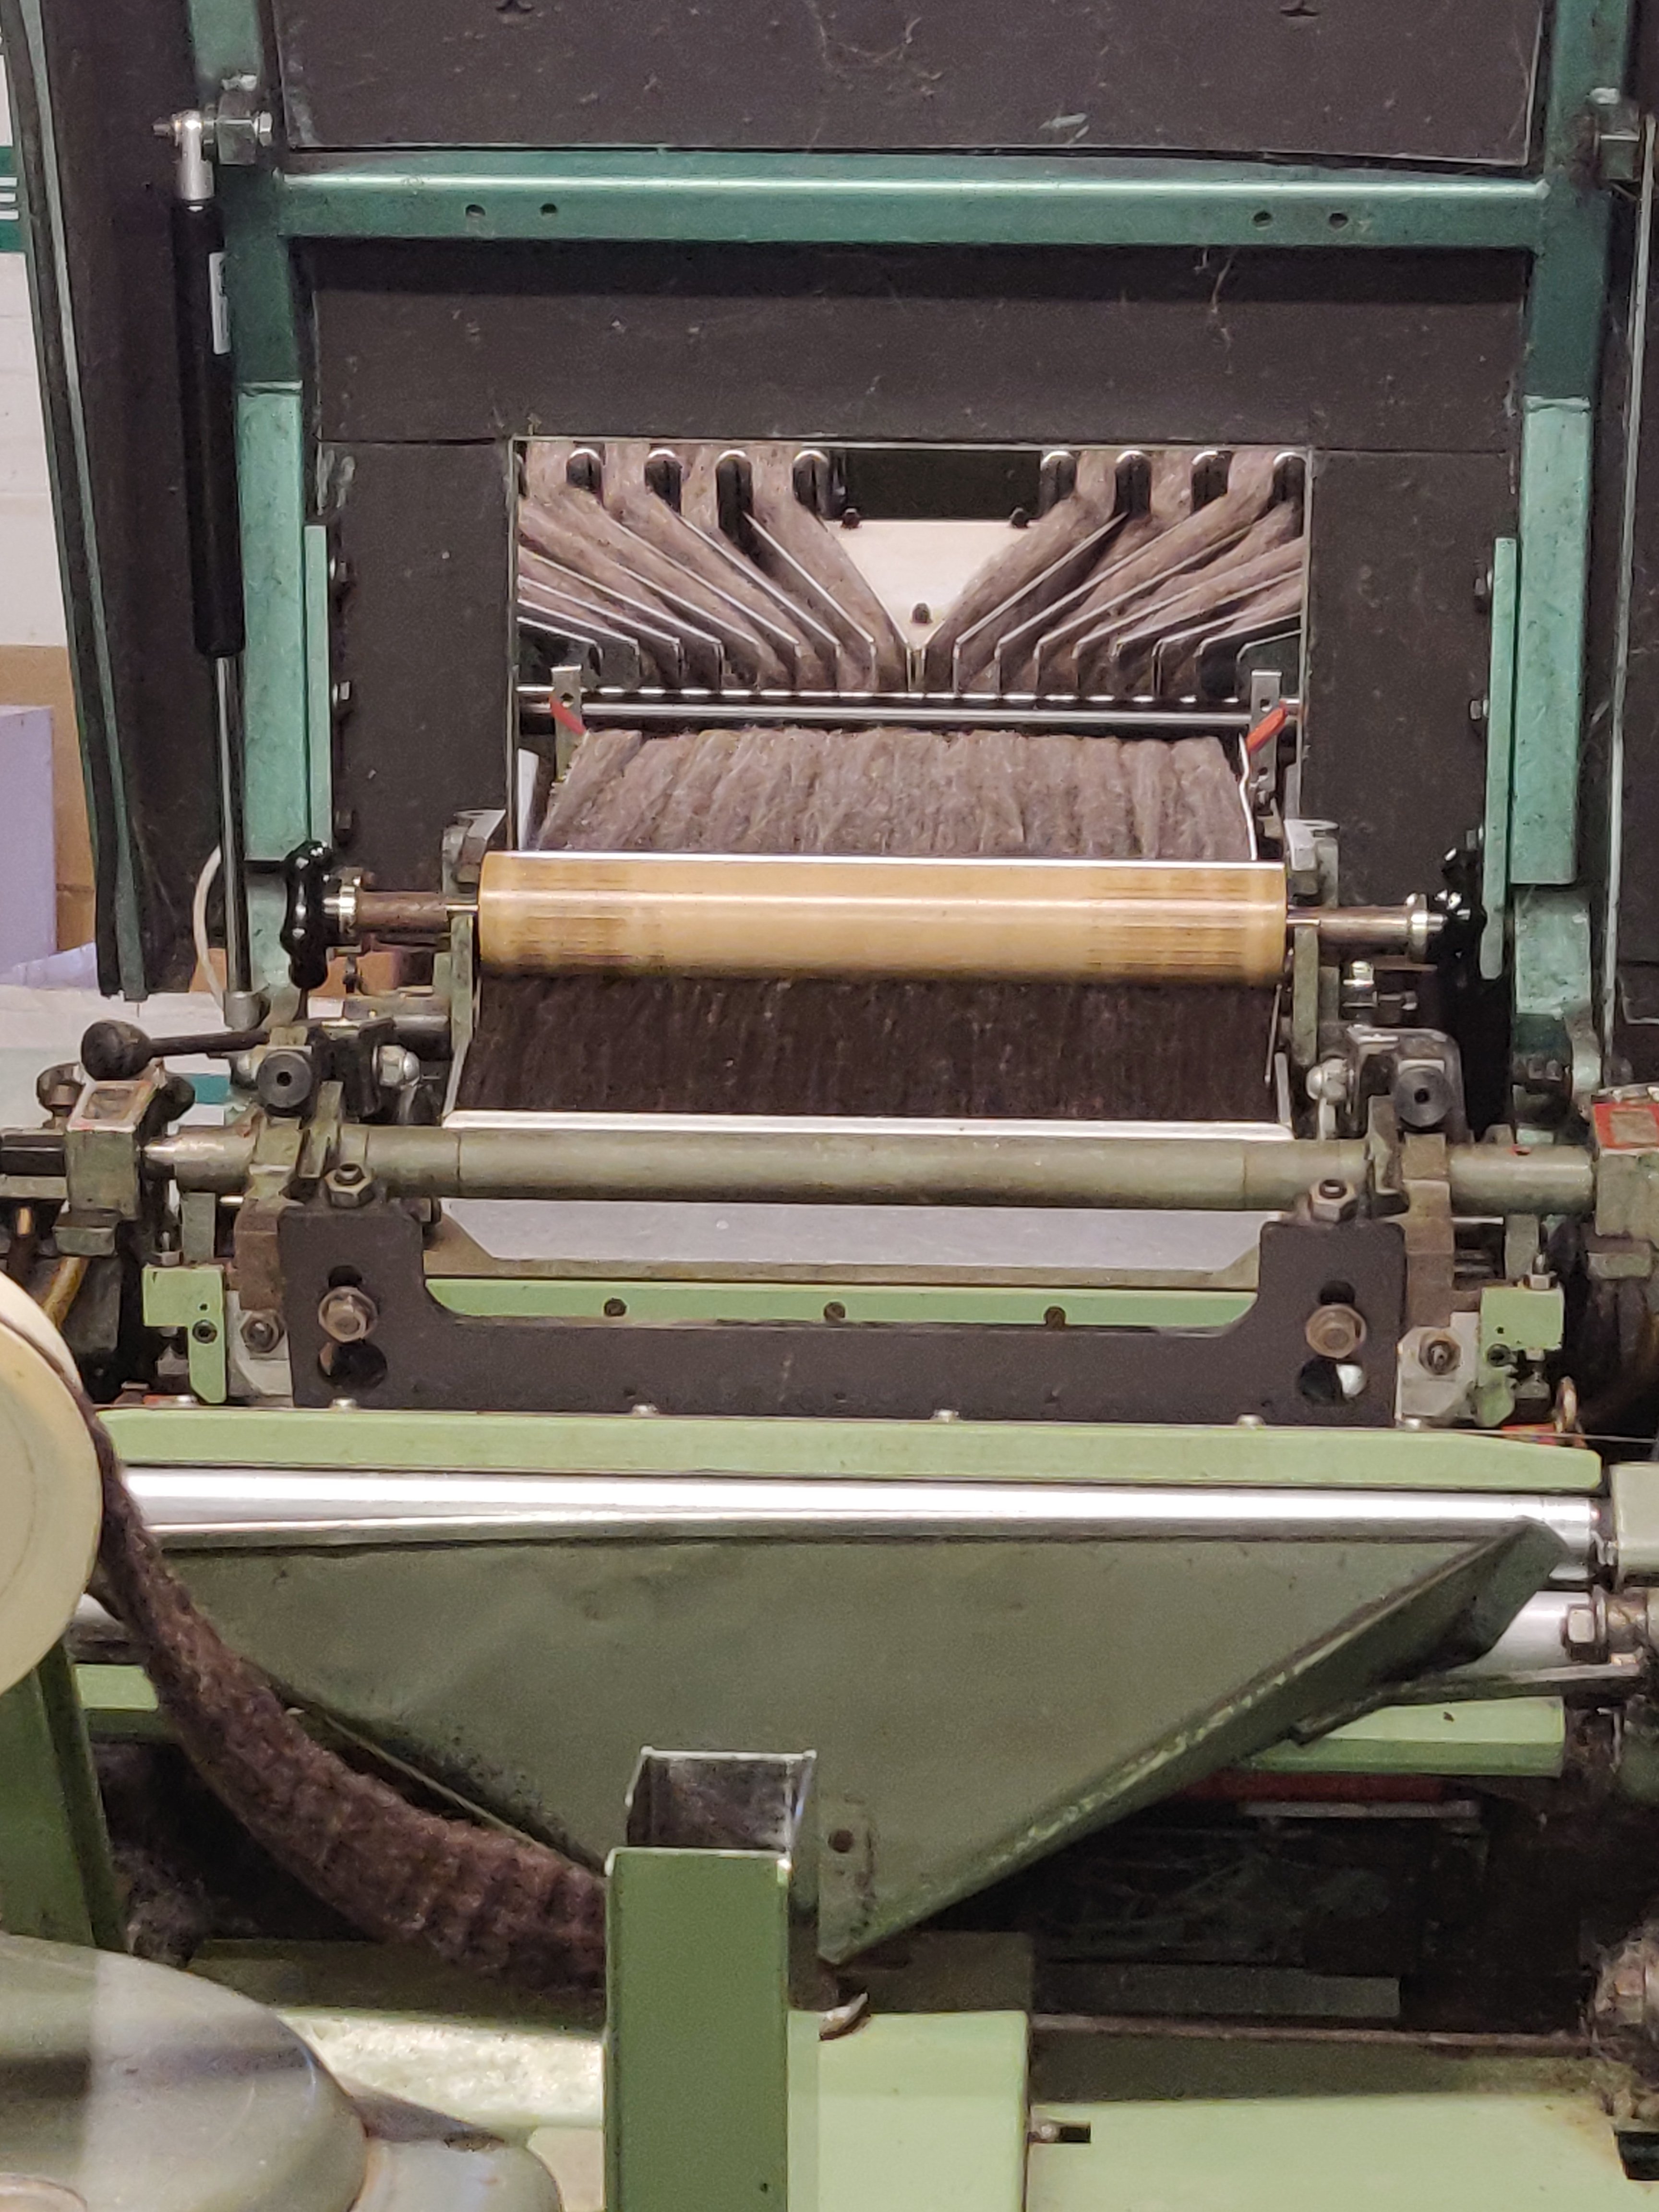
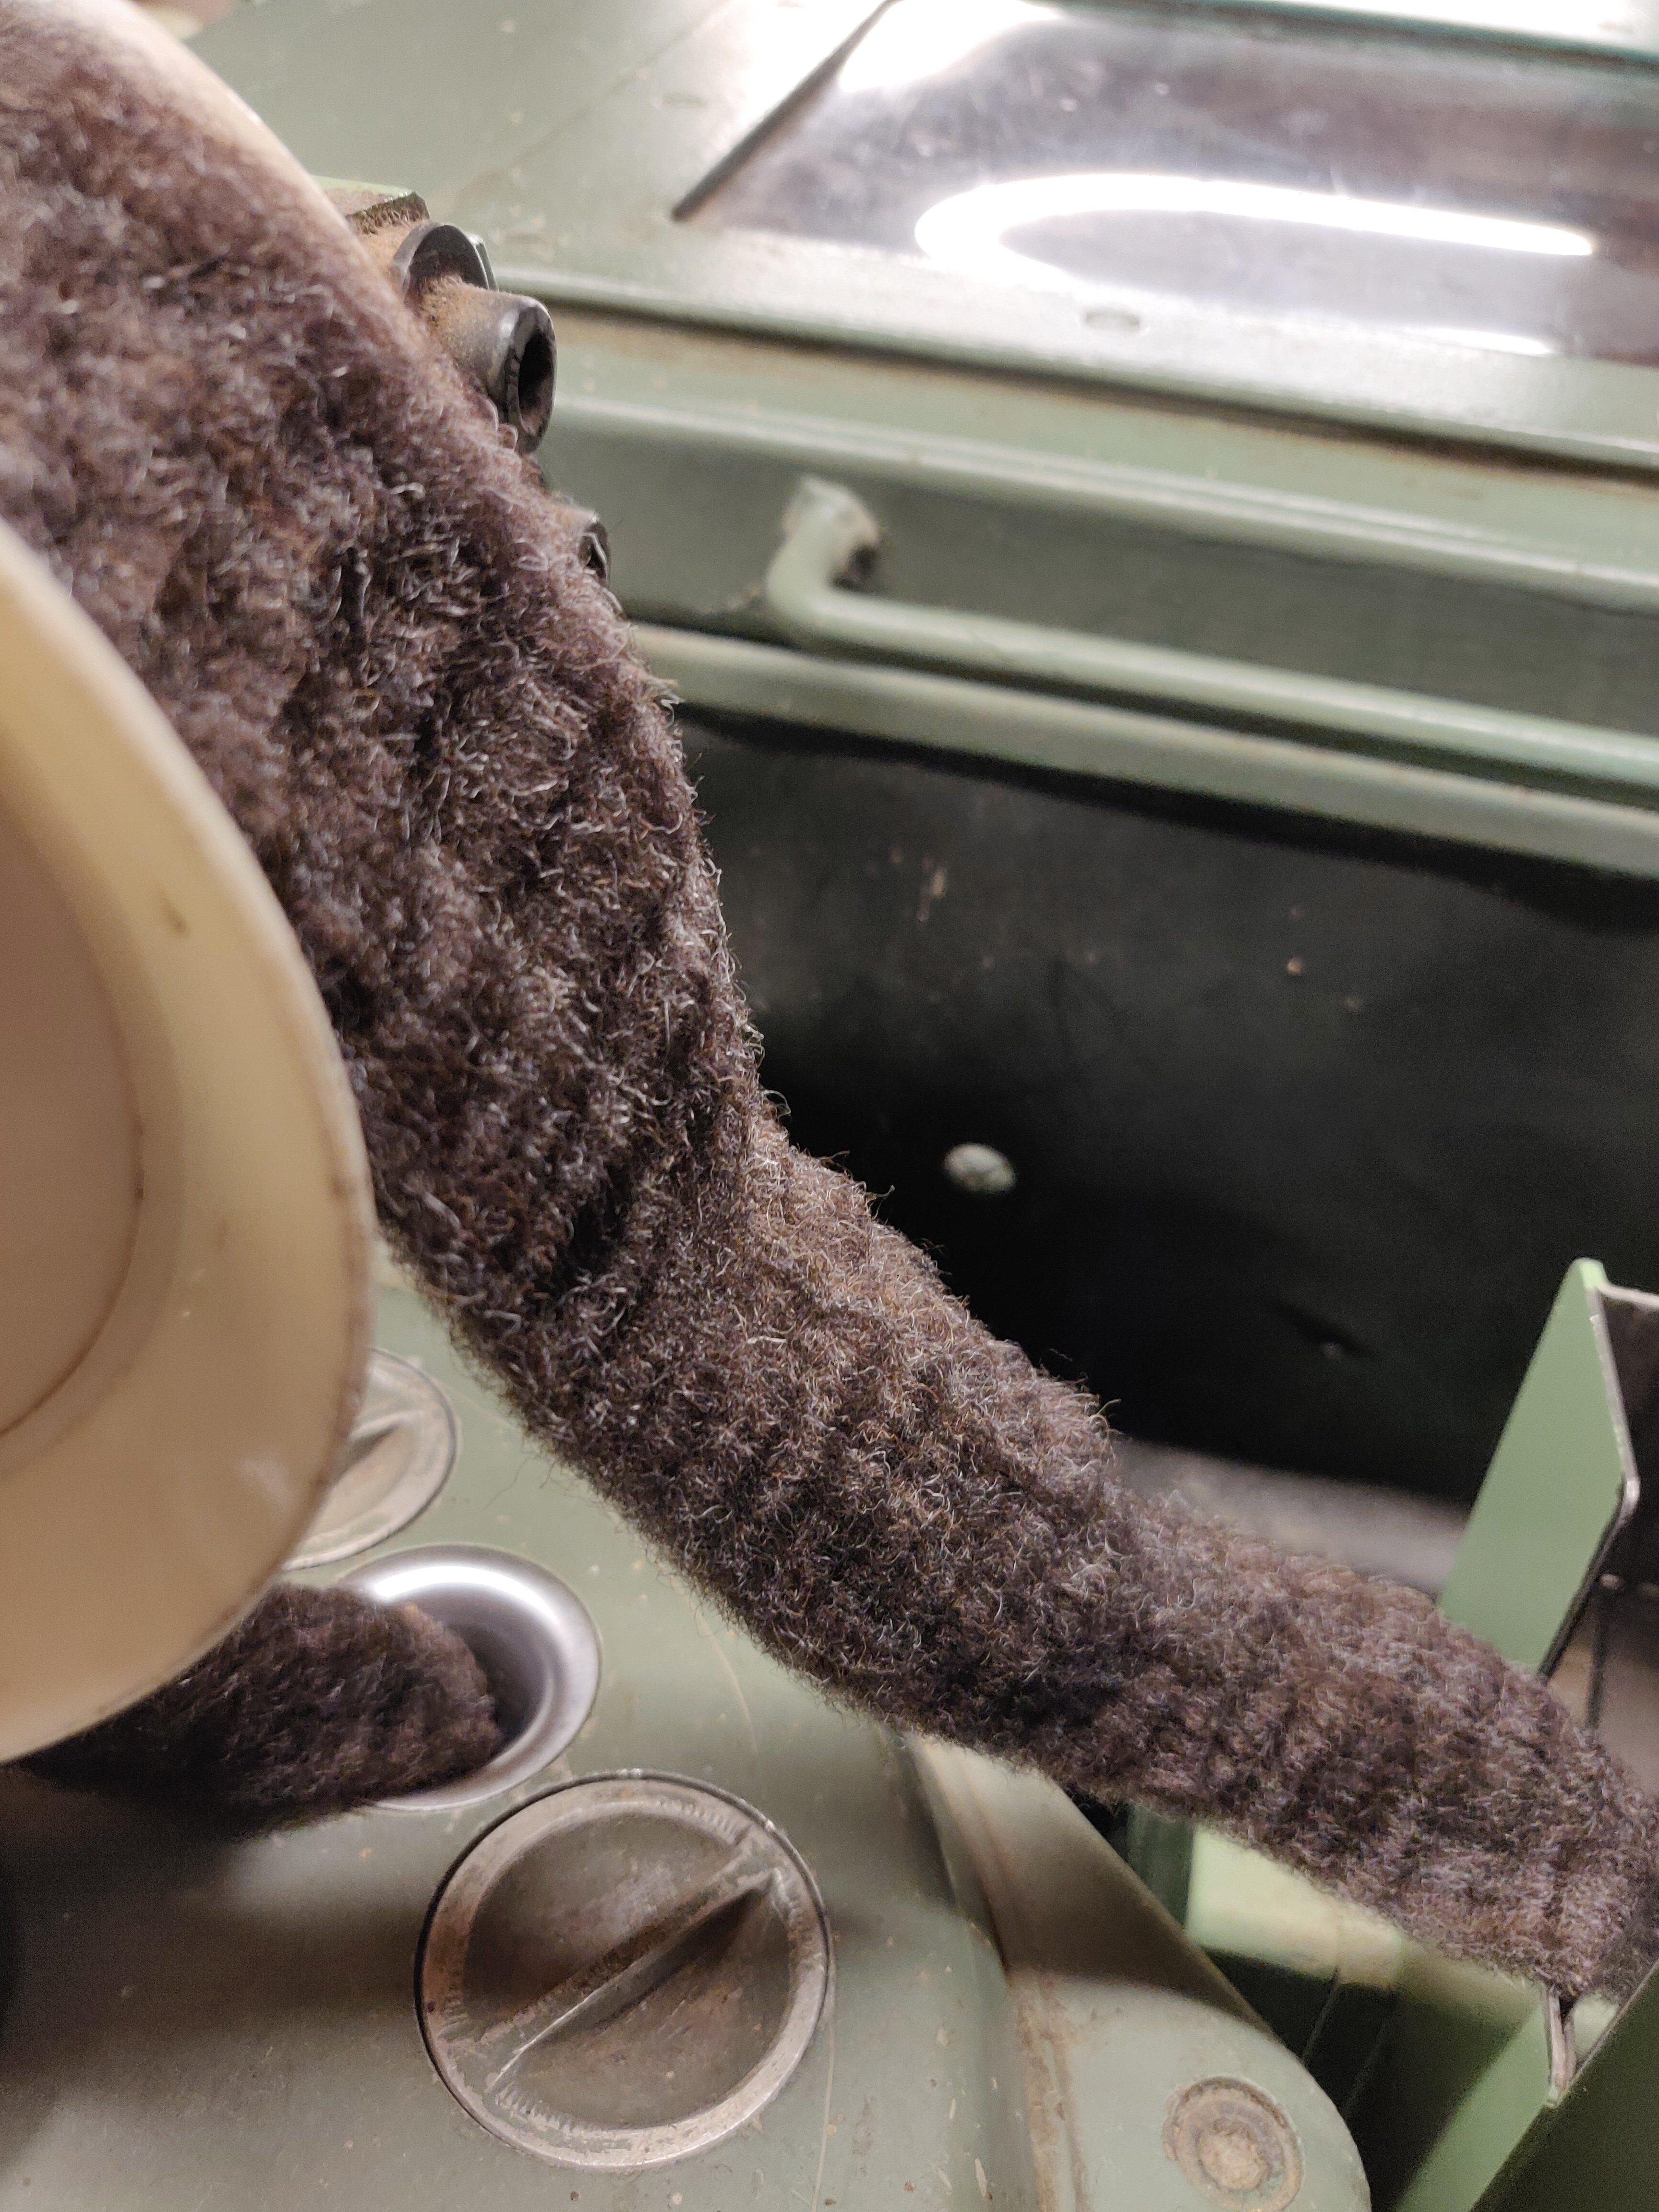
If however, the desired outcome is combed sliver, then it has to go through the combing machine. This takes up to sixteen slivers side-by-side through the combs, crimping the final sliver to compress the fibres together and prevent breakage. It looks like doll’s hair emerging from the machine. Any remaining short fibres, nepps, noils or debris fall out into a waste bin beneath the combs.
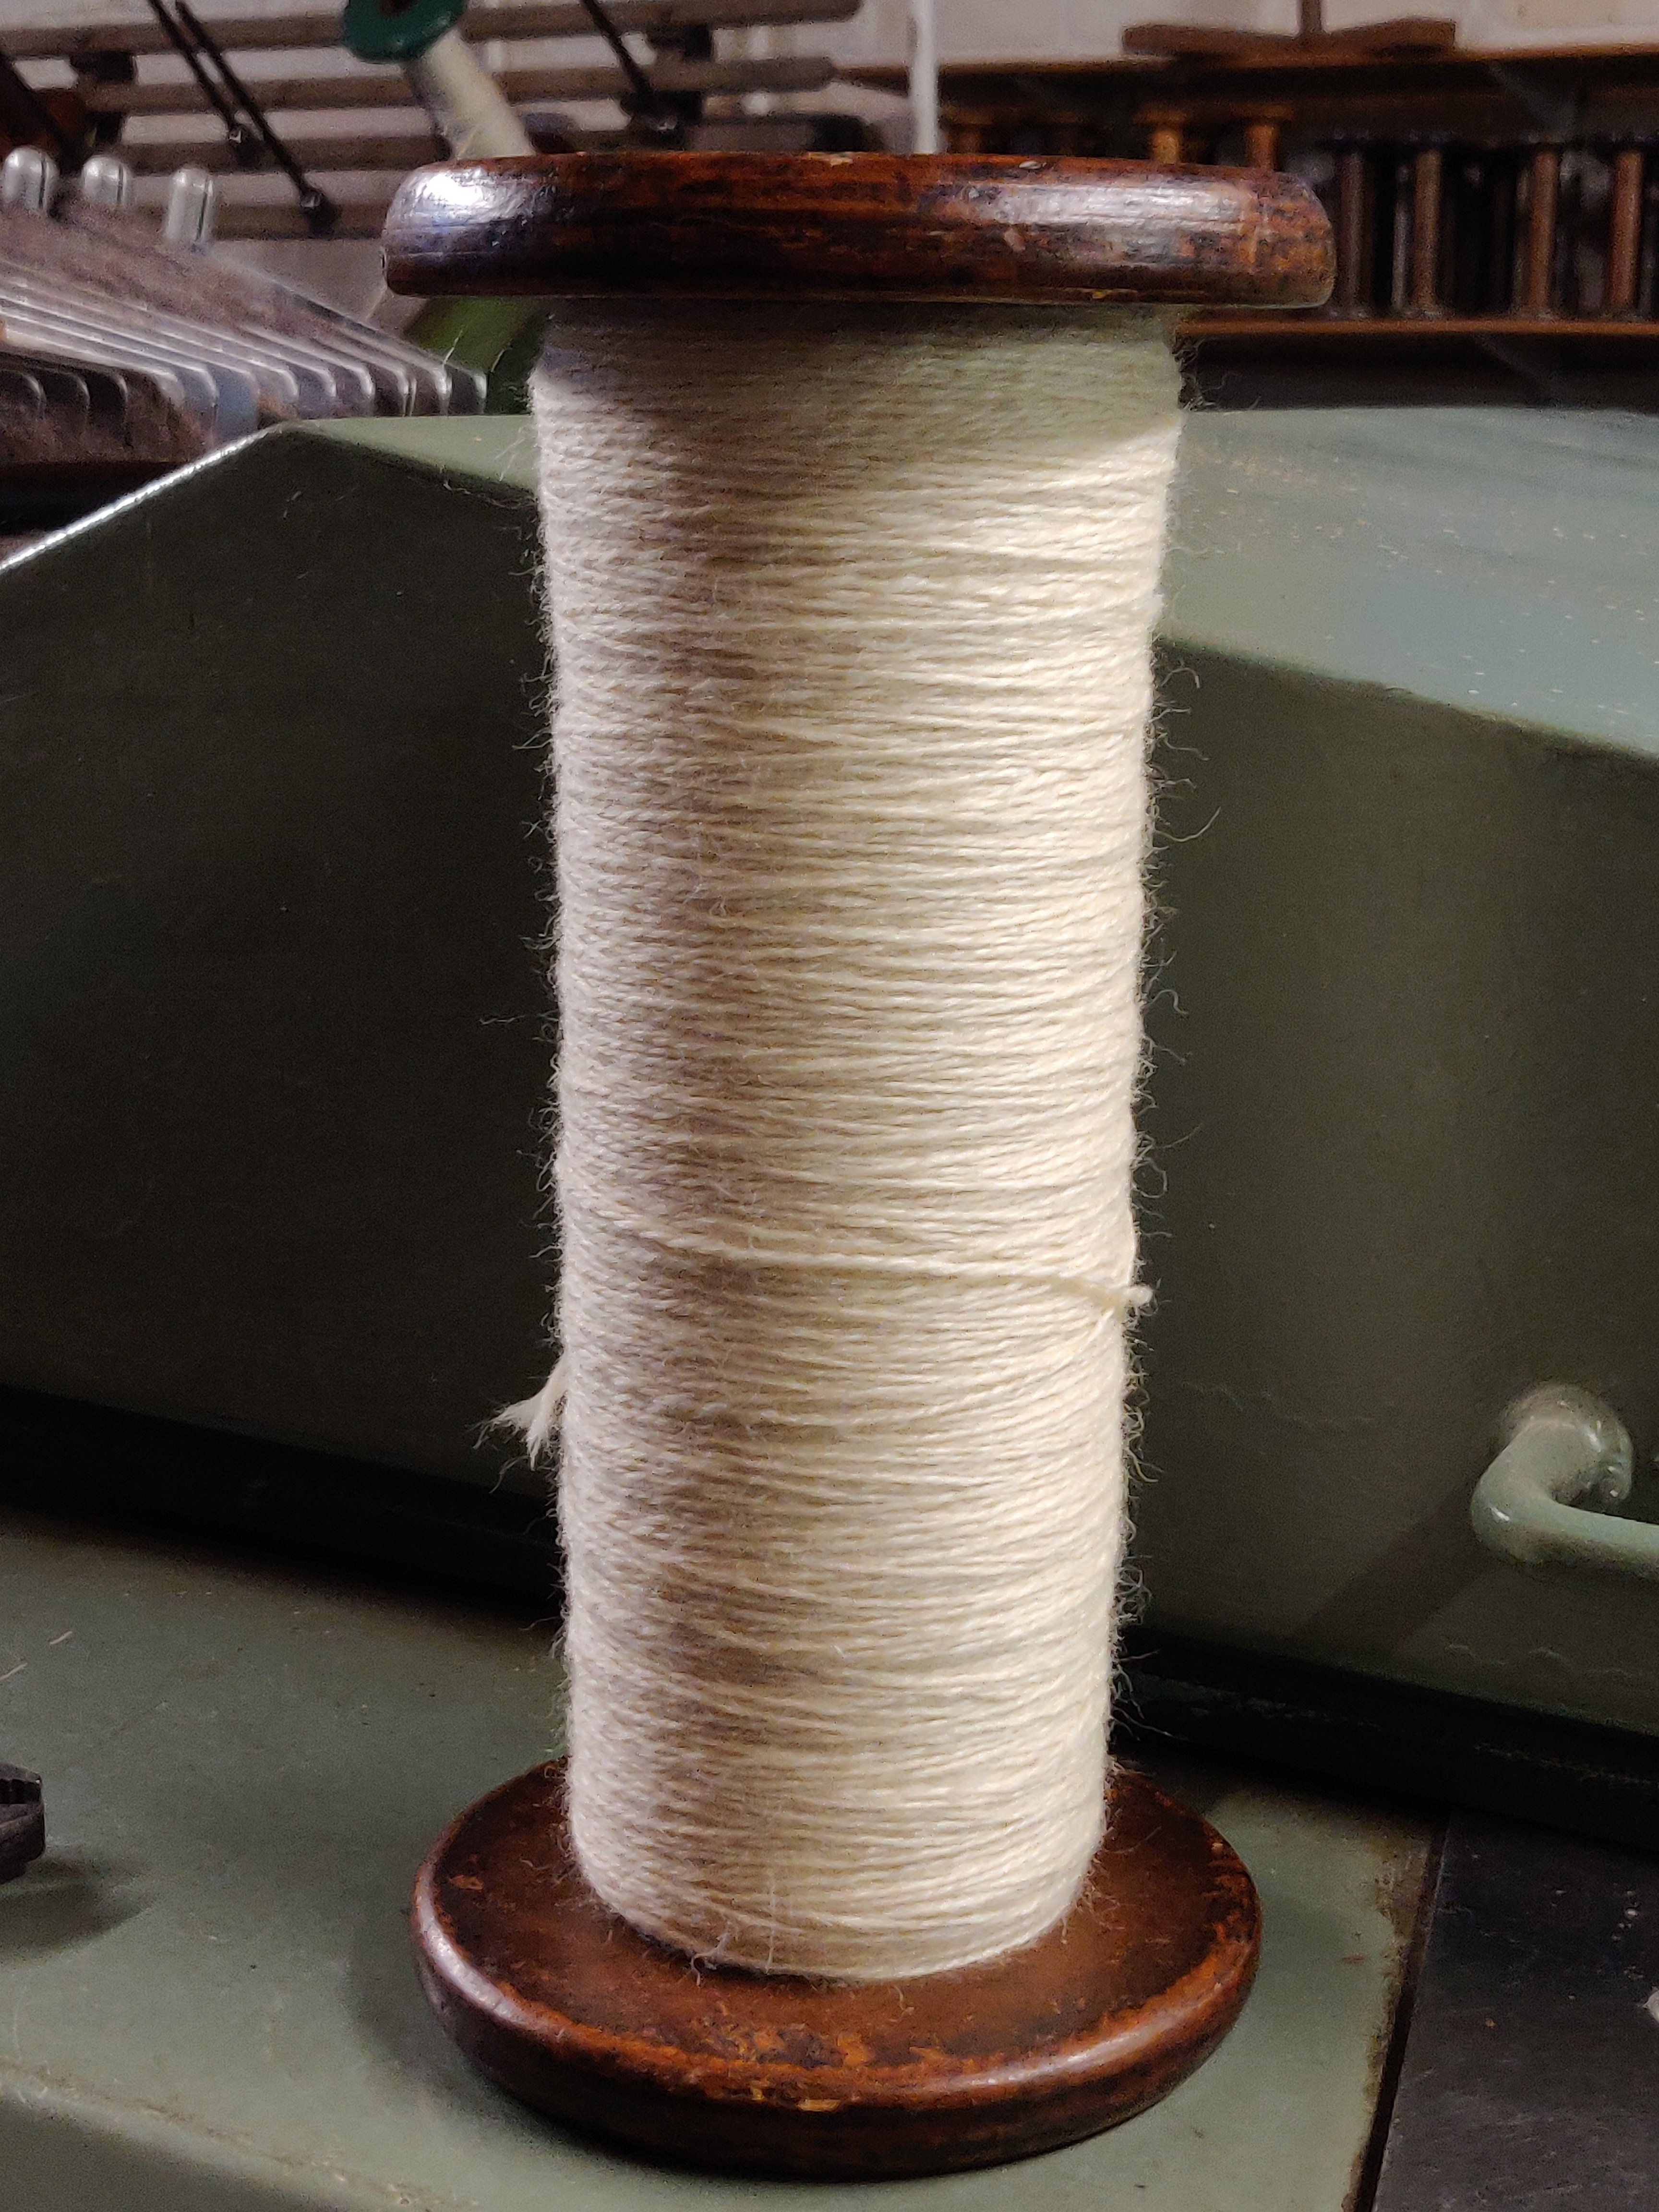
This combed sliver has become slightly uneven during the combing process, and this is when it goes through the finer gilling machine to produce a consolidated, even sliver ready to have a small amount of twist introduced, (about four turns per inch) to make a softly twisted roving.
This roving is then drafted out into a thinner roving, and finally drafted and spun into singles weighing approximately 0.2g per metre. Amount of twist can be controlled to produce softer or firmer yarns at both singles and plying stages.
The singles can be plied into 2, 3, 4 etc ply yarns according to need. 2 ply tends to be flat, 3 ply rounded, and 4 ply has a square profile. To make a cable yarn, 2 x 2ply can be twisted together.
2ply yarn made from two of the 0.2g/metre singles would weigh approximately 0.4g per metre. This would yield something like 250 metres per 100g, which is within the DK category of yarn, and will be between 12-14 WPI.
Of course, as Roger pointed out, natural fibres do not conform as precisely as synthetics do, so there are highly likely to be variations in weight to length of a hank of yarn depending on humidity and other physical conditions when it is weighed. Oh the joy of natural fibres, thats why we love them!
I think the students now really appreciate how much work goes into making the yarns they pick off the yarn-store shelf. One even went so far as to say that they would never again complain about yarn being so expensive!


 I make bread about every 5-6 days and keep the starter in the fridge in between times. I’ve also (somewhat unsuccessfully) made apple sourdough cake. It was a bit stodgy, but tasty.Over the weeks I have established a couple of methods that are pretty foolproof for me. One is long, slow and satisfying one is fast, easy and satisfying.Long and slow:I take the starter out of the fridge in the morning, and feed it with 50g plain flour and 50g warm water and leave it on the work top for an hour or so – or until I remember, and this can be 3pm sometimes. 30 minutes before I want to knead the bread I mix 400g of white bread flour (or 100g whole meal and 300g white) with 180g water. This can is lumpy and not pretty, but is called ‘autolysing’ the dough, and I find it helps with the process.
 Covering the bowl with a damp tea towel prevents crusty flour forming.When its time to knead, I give the starter a light stir and tip 200g into the bowl of flour and water and mix it all together. Feed the starter again and pop it back in the fridge for next timeI hand knead it on a floured worktop for 10-15 minutes which is incredibly therapeutic for arthritic hands, and also for edgy tempers. After about 10 minutes I sprinkle 10g of salt on the dough and knead that in. If there is a lot of wholemeal flour in the dough I might also add a 1/2 tsp of vitamin C powder to help it rise.Once its smooth and soft I return the dough to the (floured) bowl, and cover it with a wet cloth and a plastic shower cap, then put it on the worktop (or somewhere warm if the weather is chilly), and forget about it for hours on end.Sometime later, in today’s case 8pm, I knocked back the dough, shaped it into two loaves and popped them into the Lekue bread moulds I use. The wet cloth and shower cap go back over the loaves and I tonight I ended up baking the bread at 10:30pm. On other nights I might put the shaped loaves in the fridge (wet cloth and shower cap in place), and cook the loaves the next morning.
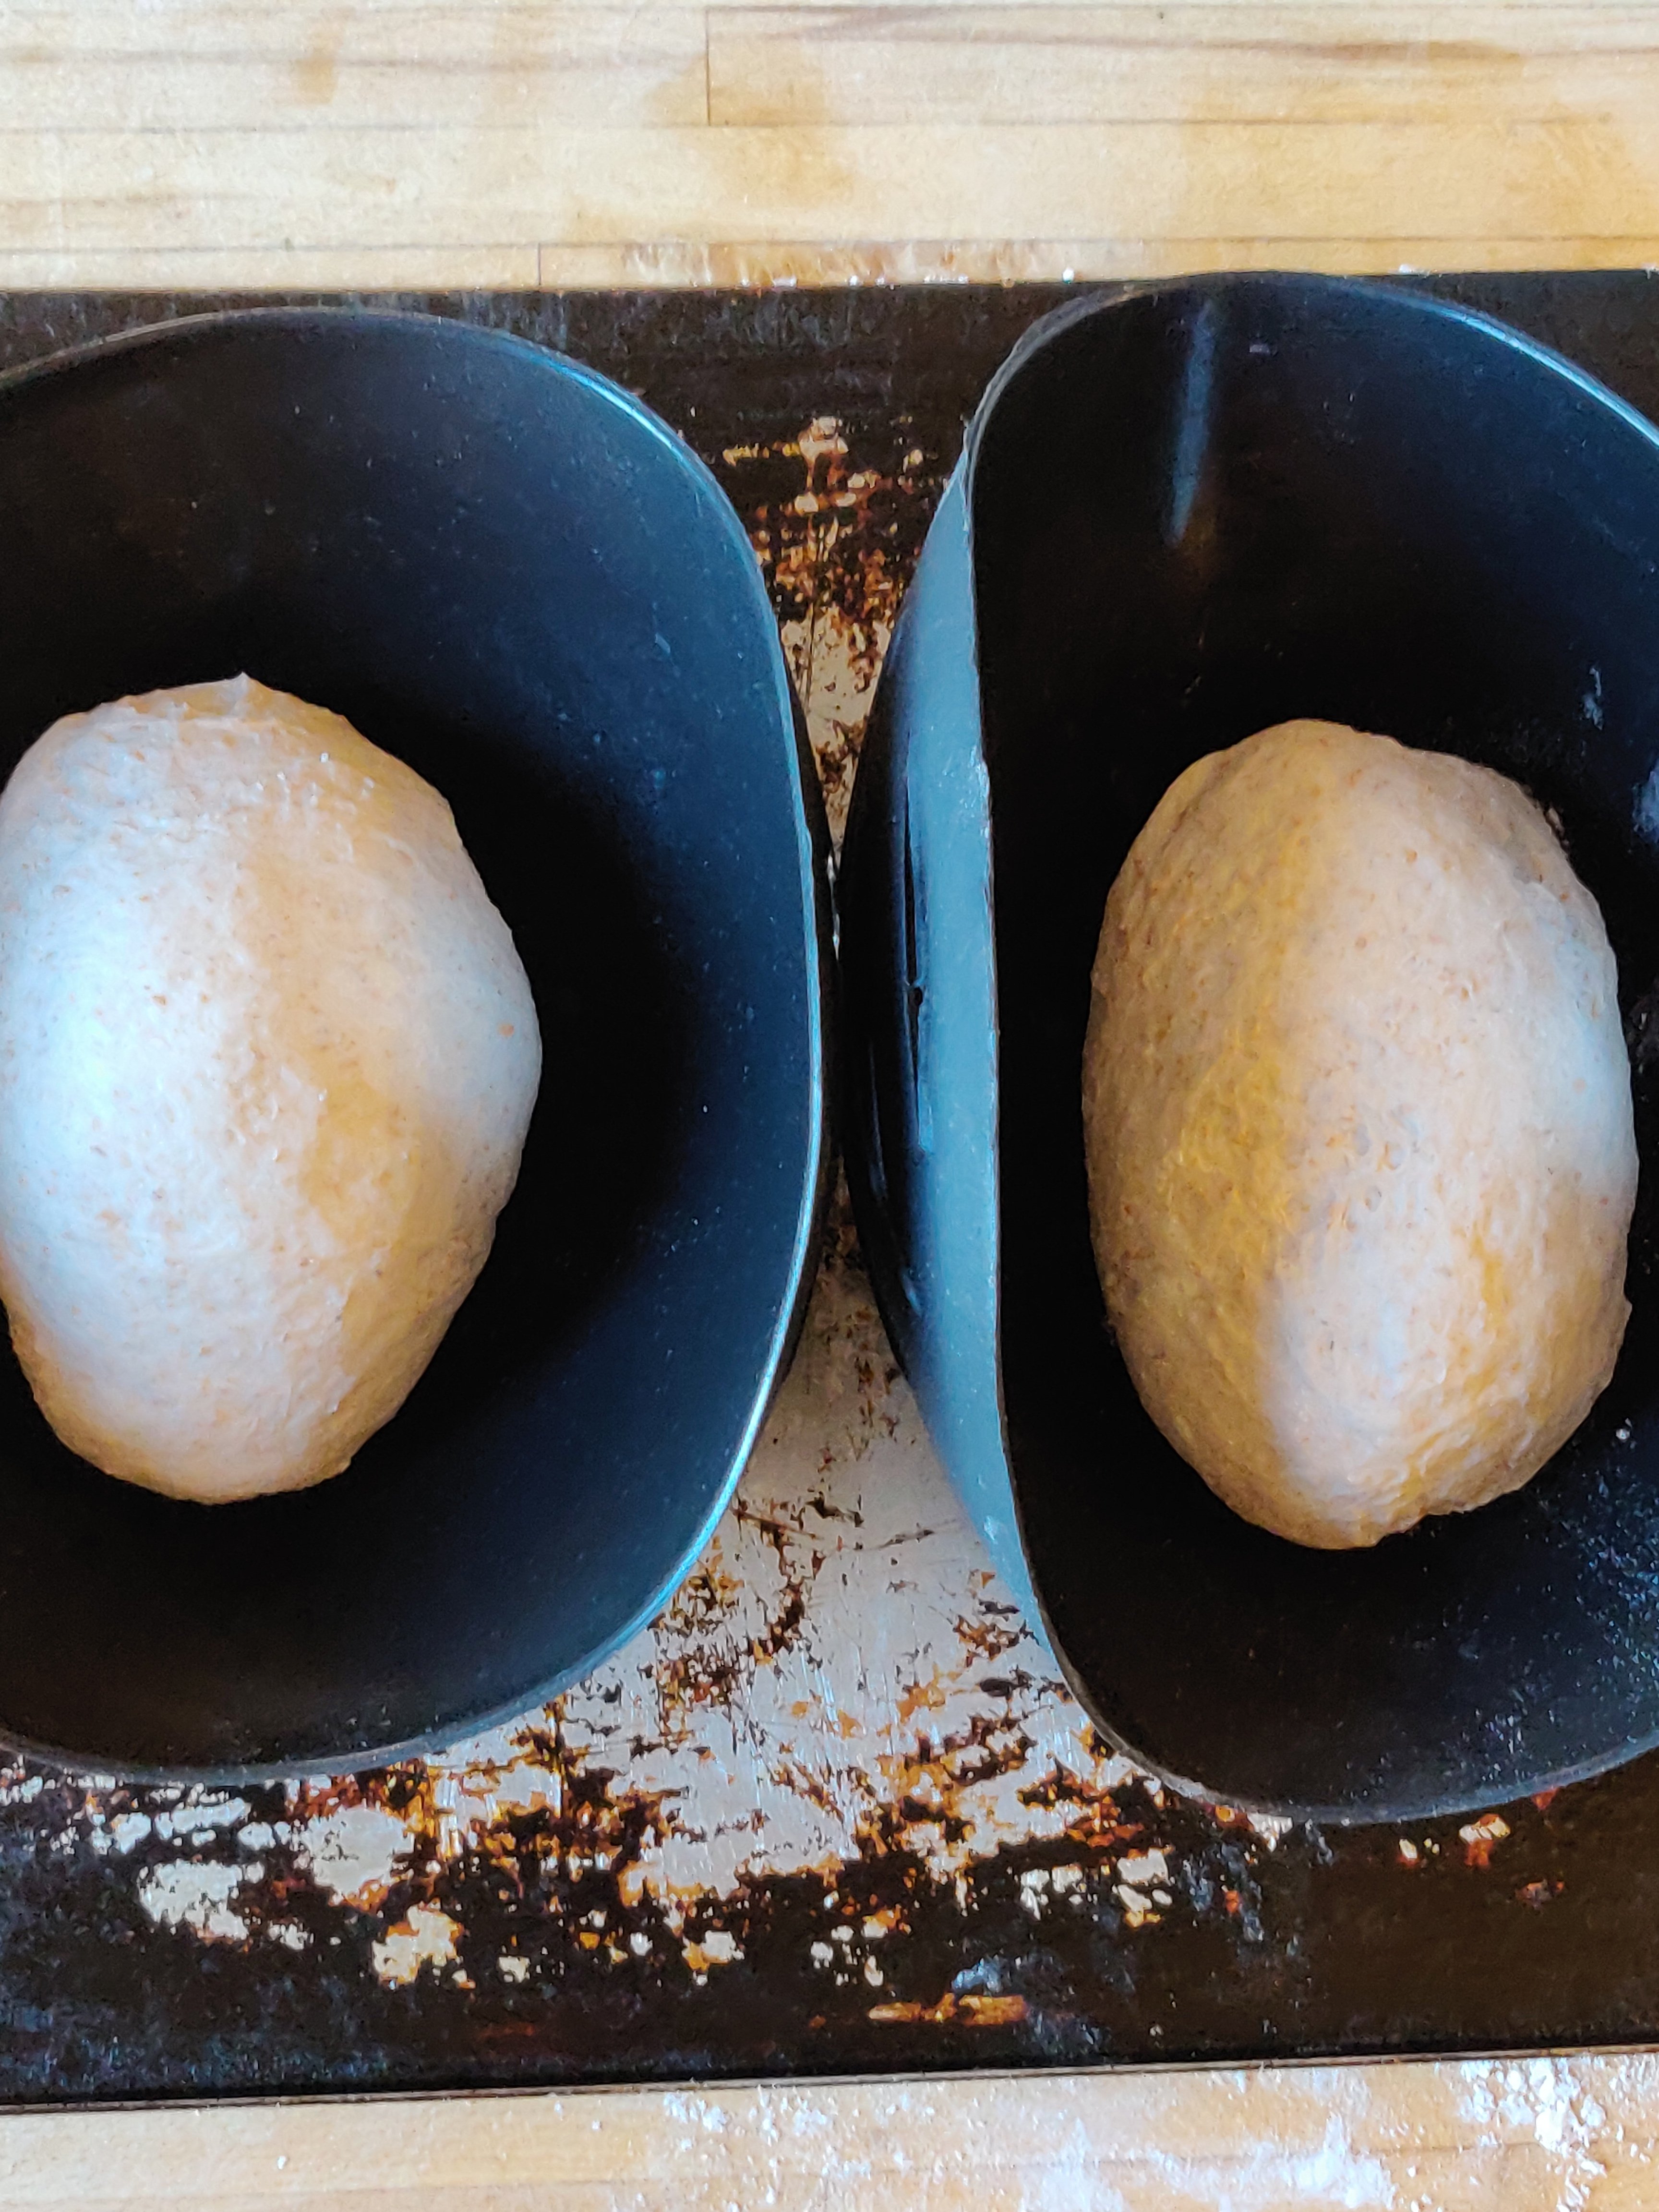
 Quite fast and easy:Feed the starter, leave it for an hour to bubble up. Put 400g bread flour, or a combination as described above, into a Kenwood chef, (or similar mixer), add 180 g warm water and pour in 200g of starter.Feed starter again and return to fridge.Mix with the dough hook for 10 minutes, adding 10g salt half way through. Remove the hook and put the bowl (covered with wet cloth and shower cap) somewhere warm to rise. Once doubled in size, knock back and shape, leave to rise again for 30-40 minutes and then bake. I use the Lekue moulds for this as well – always covering with wet cloth and shower cap as before.Easy- Peasy using a bread machine:Feed the starter, leave it for an hour to bubble up. Put 400g bread flour, or a combination as described above, into a bread machine pan, add 180 g warm water and pour in 200g of starter. Set machine to the longest dough programme (this is wholemeal on my Panasonic machine). Add 10g salt towards the end of the first knead (I set a timer to remind me otherwise I forget and have to reset the machine for an extra knead to incorporate this).Feed starter again and return to fridge.Once the machine finishes the dough programme, tip out the dough and shape, leave to rise again for 30-40 minutes and then bake, or put the shaped loaves in the fridge overnight and bake in the morning. I use the Lekue moulds for these loaves as well – always covering with wet cloth and shower cap as before.The Lekue silicone loaf moulds are great, they hold the shape of the loaf well, making a nice rustic looking loaf, and keep the dough moist during risking and baking.
 I’ve even made this loaf with only one rise and shaping into the moulds with an overnight rise, not quite as light bread, but very edible.