After a year’s wait I have finally completed the fleece-drying rack

I planned this project of a collapsible fleece-drying rack over a year ago. Setting is always difficult as it requires a lot of space and works best if air can circulate to as much of the fibre as possible. I toyed with the idea of folding herb drying racks, but the ones I found were small, flimsy and expensive. I’ve seen others use those plastic crates with open mesh sides, but couldn’t find any of those locally, plus they take up space when not in use. 

So I decided to design and make my own. My brief was:

freestanding

reasonably lightweight and portable

widely spaced shelves

a large surface area so that the fleece could be opened up to speed drying

collapsible so could be folded down and packed into a bag when not in use

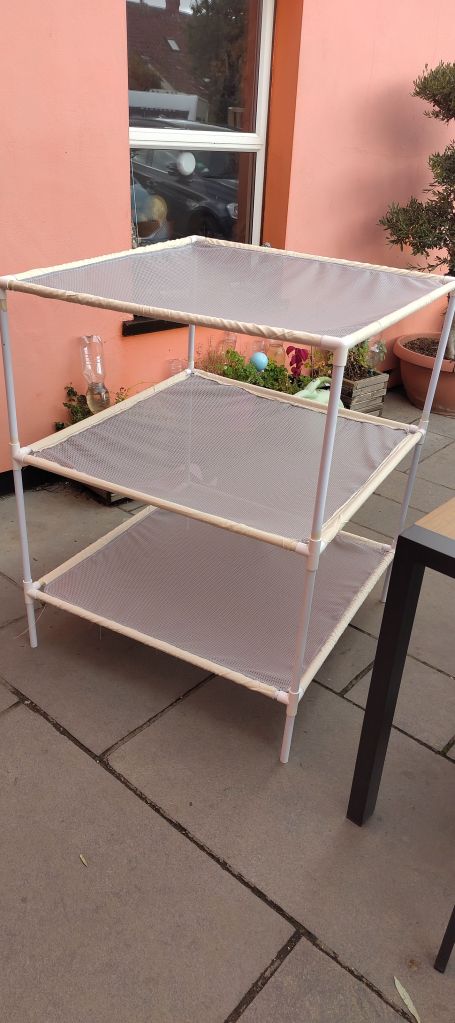
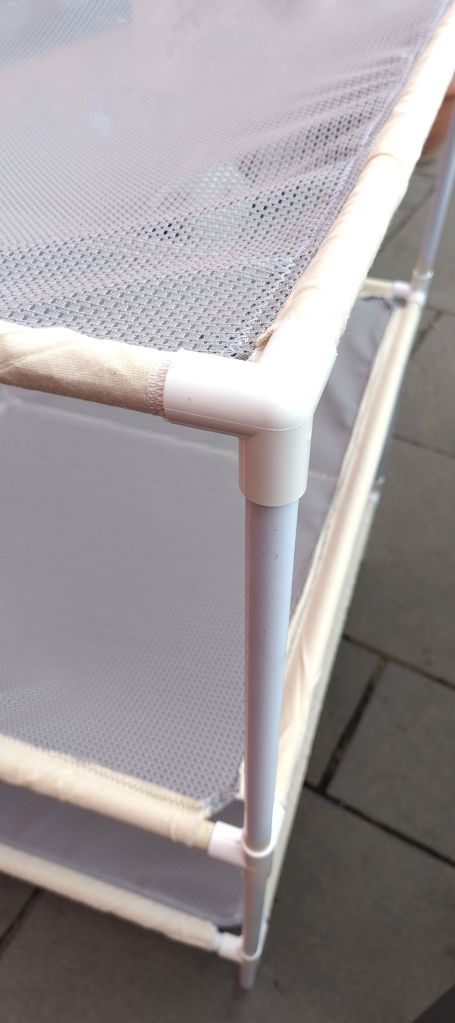
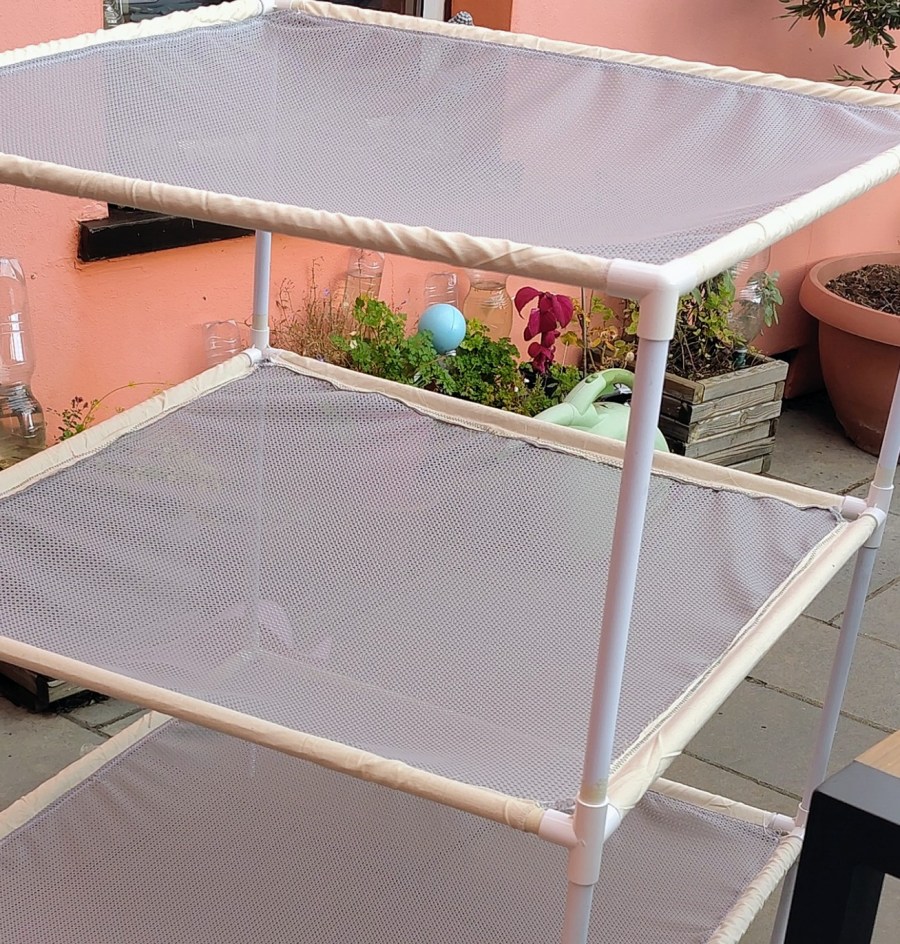
Designing the rack and working out the specs took some thought. I ended up with a plan for a three shelf rack, each shelf being approximately 80cm square. I intended to use plastic pipe and elbow joints for the frame and mesh fabric for the shelves. Mesh fabric would allow air to circulate, and if made from synthetic fibre, would dry fast itself and hopefully reduce the likelihood of mould whilst packed away.  Each of the mesh shelves would have sleeves sewn along all four sides through which the pipes of the frame would be inserted. Then the pipes would be connected via the 3 and 4-way joints, putting the shelf under tension. In this way the shelves would stabilise the whole structure.

I already had some plastic piping left over from making a collapsible niddy-noddy, but bought the rest from Wickes, then cut it all into the correct lengths. I borrowed a plastic pipe cutter to do this, which gave nice neat and smooth cuts which would facilitate threading the pipe into the shelf pockets. The 3 and 4-way joints came from ebay, as I couldn’t find them locally. However, if you decided to make one of the racks, do try a local plumbing store if you have one first, before going online.

So I had the frame and it fitted together, but then winter came so fleece washing ceased and access to my sewing machine was limited by building work. But I went ahead and ordered 3m of fine mesh fabric for the shelves in anticipation of getting started when I could.

Sadly, when I finally got to sewing the shelves, the mesh proved to be too fine, overstretchy and delicate, so it was back to the drawing board. This time around I sourced a much sturdier, low-stretch mesh fabric on eBay. It was pricier, but fitted the bill really well. Luckily I found some seconds of the danger fabric, which helped keep the cost down. I also decided to use Calico I already had to sew smooth, non- stretchy sleeves for the pipes so that it would make it much easier to slide the shelves on and off the pipes. The sleeves would also make a stable attachment to the between shelf and pipe, and hopefully reduce stretching and drooping of the central, mesh shelf. As usual, cutting out and sewing took some time because I was doing it around other things.

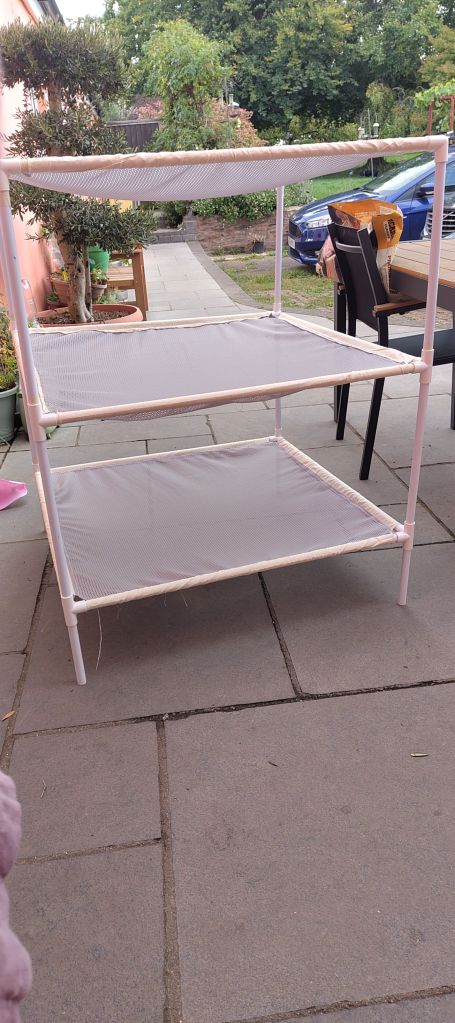
Finally it all came together. Probably too late to test on a fleece this year, but it might work in the greenhouse if necessary. I hope the shelves will not droop under a layer of damp fleece. I spin it after washing, so hopefully it will support the weight.

I guess it would also work for herb drying.

If you would like the instructions for making this fleece drying rack I will add them in a few weeks time.  Please pop back to this page to download the instructions.

The finished rack
The top, 3-way joints
Middle 4-way joints
Legs are interchangeable, so the shorter ones could go in the middle if desired

Ready to spin

An hour spent blending on the drum carder has got me set for some serious spinning.

The yellow and natural are broken Merino tops that I picked up at the John arbon Open Day last year.  I’ve blended these in equal parts with a very strong ultra marine blue which I won in my local Guild raffle.

I tested this first on hand carders and it produced a very nice yarn so now I’ve done it in bulk and taken rolags of a batt from the drumcard.

The singles so far.

I’m aiming for a 2 ply hand knit weight yarn, so spun the singles trying to let in a bit more fibre than I usually do. I read once that as you become more proficient at spinning you tend to spin finer, and that does seem to have been the case. Not that I’m claiming to be brilliant at it, just more practiced than I was.

This was spun the 1:8 whorl on my Louet S95 ‘Victoria’, which is the little folding portable wheel I take out to demonstrations. I aim to ply at the same ratio although I know it will probably work out a bit less. I am looking forward to spinning and plying this.

Somerset Guild of Weavers, Spinners and Dyers Skill Share day

Yesterday, Easter Saturday was the Guild Skill Share. There were many generous members who shared their knowledge and skills in weaving, knitting and spinning related sessions.

Kathy and I offered a Wool Fibre Preparation day so that members could have an induction on the Guild equipment or bring their own carders and combs etc. along to learn how to use them or just pick up some tips.

The morning was all about using swing or box pickers and hand and drum carders plus how to use these for blending. After lunch we tackled wool combing using a  pair of English Combs and smaller Valkyrie ones plus blending in a heckle.

We enjoyed running the session and everyone seemed happy. After my initial H&S talk it was me that pricked my finger on the combs!

Sock mending this evening

It’s a howling gale outside tonight, so the place to be is by the fire doing a bit of mending. The subject is a pair of socks machine knitted from my hand spun yarn. These sticks are like , ‘Trigger’s broom’ from Only Fools and Horses.

I plied the yarn from singles of Alpaca and Texel fibre, but did not include any nylon. Consequently, but after a reasonable amount of wear they have begun to thin and finally the stitches have burst. First of all the big toes went, and now the heels.

I had a little of the yarn left, but now it’s onto improvised and colourful mending…

The toes that were mended a while ago
Todays heel mending

I used one of those little mending looms for the toe repair, but the heels have been done ‘freehand’ using a technique from a 1970s mending book. I bought this useful book secondhand when a penniless student in the 80s, well before ‘slow textiles’ and ‘visible mending’ became a thing. Since then, useful book has helped me extend the life of many items for reasons of economy and necessity rather than fashion. Now my mending is on trend and it’s good to see the skill encouraged by a plethora of modern books on the subject.

Making the most of the sunshine

How often do we have such gorgeous weather in May in the UK?

So I decided to take advantage of it by having a swim and then sitting down with my spinning wheel to spin up some Jacob’s rolags I’d carded last night. What more perfect way of spending on Friday afternoon.

Ok the garden needs attention and I’ve got plants to plant out and I should be writing and all sorts of things, but sitting in the sun and spinning just seemed undeniable.

See more about machine and hand knitting and hand spinning on my ‘Vikkikit’ YouTube channel.

Fancy yarn workshop; spinning boucle yarn

Yesterday I had a fab time at a workshop learning to spin fancy yarns. We only managed boucle and slub but that was so rewarding. The workshop was organised by the Brighton and Hove Textile Arts Group and hosted by Spring Farm Alpacas in Fletching West Sussex. Ann Dishman led the workshop and provided Blue Faced Leicester tops, still various and other threads for us to spin with.

Although I have spun both types of yarns before, I learned a lot and really enjoyed having four hours in which to practise the techniques. I also found out that Ann had been taught to spin by my spinning hero, Mabel Ross, which made me extremely envious.

Unwashed boucle, Blue Faced Leicester singles and loops, cotton binder.
Unwashed the boucle was a bit lively, but it balanced out nicely after a strenuous washing.

Unwashed soft slub; Blue Faced Leicester singles with a fine industrial wool binder.

I took my Louet Victoria travel wheel and at usual she spin well and reliably, it was the user who made the mistakes!

Rya weave cushion completed

Although it’s taken me a while I have finally finished this cushion.

Front of the cushion. A tufted chequer board that is very tactile and squishy.

The front is Rya tufted and woven with a British wool rug yarn on a linen/cotton warp. The black tufts are Shetland staples and the cream is a mixture of Devon/Dorset staples. Although it’s not that clear in the photo, the squares are reversed; black edging with a cream centre and cream edging with a black centre.

The reverse of the cushion is a faux waffle weave in the same rug yarn that underlies the Rya tufts. Because my rigid heddle loom is only a 20 inch wide, the cushion is composed of four pieces.

I took the opportunity to insert a zip in the centre back seam.

Instead of feathers or polyester wadding, the cushion is filled with a pad of lofty carded wool fleece. I will use this cushion to make my chair extra comfortable whilst spinning at my wheel.